Elanor - EGJE
Solution Range
EGJE HR Portal
Description of the solution range
Content
1 Basic characteristics of the solution area EGJE HR Portal
2 Standard solution of area EGJE HR Portal
2.3 Authorization - profile selection
2.4 Basic display portal interface
2.5 The usual components of a portal interface
2.5.2 Staffing employee card (Pkz01)
2.5.3 Request for change (Pkz21mob, Dan31mob, ...)
2.5.5 Wflowmob - Workflow for mobile devices
2.5.6 Dcu01mob - Attendance Overview (for Mobile Devices)
2.5.7 Nep01mob - Request for (Non-)Presence (for mobile devices)
2.6 Container Messages (Messages)
3.1.1 Dov16 – record insertion restriction
3.1.3 Form Dov16 – request detail and button availability restrictions
3.2 Dov16 – "Overview of object rights and the use of rights for enabling buttons"
3.3.1 Restrictions on displaying form parts
4.1 Attendance and input - availability of forms
4.2 Dcu06 – Overview of object permissions and their use for button accessibility
4.3.1 Identification line employee
4.3.2 Line control elements form
4.3.3 Calendar with attendance
4.3.5 Left panel - Overview of attendance status
4.3.6 Right panel - Navigation list
4.3.8 Entering attendance – bulk deviation
4.3.9 Technological and operational information Dcu06
4.4 Form Dcu07 - Attendance - Overview
4.4.2 Detail of Calendar button
4.5 Form Dcp07 - Shift planning II.
4.6 Dcp13 - Employee Sample Plan
4.7 Dcp14 – Attendance Planning
4.8 Dca11 - Attendance Terminal
4.9 Report Dcm28f – Overview of vacation and work leave usage
5.1.1 Form Mob01 - Approval of applications for mobility KB
5.1.2 Form Mob01 - Approval of KB mobility application
5.2.1 Form Hod01fdpp – Hodnocení osoby
1 Basic characteristics of the solution area EGJE HR Portal
EGJE solutions - HR portal operates over the same database and fully shares the data and some of the technology standard EGJE. Also, the access rights are shared with the standard EGJE and its administrator forms are used (see Operating documentation and documentation of area Adm).
It is an evolutionary solution of the newer web client, which will gradually take over all users of EGJE Web.
Application alternatively provides a more intuitive user interface and is also applicable to the tablets respectively in limited range on the smartphones.
2 Standard solution of area EGJE HR Portal
2.1 Technical conditions
Browser:
Chrome (updated), Edge(Edge chromium), Firefox (updated)
Tablets - the application is functional on common browsers:
Android (Chrome, Dolphin, Opera, Firefox)
iPad (safari)
but not on them systematically tested
Smartphone - executable, but the screen applications are not designed for such a small screen.
We recommend Full HD resolution.
PDF viewer (any, tested on the standard Adobe Reader).
The application can be installed by SuperConfigurator utility.
2.2 Authentication - log into
The application supports multiple modes of authentication. The setting is done in Configurator utility and is described in the operating documentation. In this utility administrator sets the way of authentication. Authentication verifies that the user is trustworthy. Authentication is either taken from the environment into which the user has already logged or is just the beginning of an authentication screen.
For tablets depends on their connection to the corporate network, SSO authentication is not in the vast majority supported.
The login dialog is responsive, and the form is adapted for user login on small devices or when the CrispTouch theme is enabled.
2.3 Authorization - profile selection
In a portal interface the end of the http(s) address is used to determine the user interface type:
· Employee - address ends with /emp/
or
· Management - address ends with /mana/
For successful Authorization, a user must have at least one profile associated with the type of GUI
11 - Web Client - Interface employee
respectively
12 - Web client - manager interface.
Assignment is done on the profile (Adm02).
2.4 Basic display portal interface
The current version of the HR portal![]()

The complete redesign of the EGJE HR Portal, starting from version e202409, is controlled by the content/settings of an optional JSON file, which is disabled by default. The activation of the redesign is determined by the root setting in the JSON file (activation = true). To upload and apply a valid JSON file in EGJE, use the Adm70 form with the following configuration, Tile type, name 251 - Tile - JSON file - In this case, the reference table used is konfig_detail_typ.
detail_typ..
After uploading and activating the file, it is necessary to refresh the EGJE page in the browser. The system will then apply the configuration parameters from the JSON file (e.g., app-cool-config.json). This functionality will be released in a controlled manner based on client requests. Elanor will provide a base version of the JSON file along with instructions for individual settings.
When the JSON file is activated, individual clients will have a personalized tile design according to their preferences—primarily in terms of colors, images (e.g., logos), and similar visual elements.
Changes Implemented in the Version and Selected User Configuration Options:
- Use of new SVG icons (SVG icons can be selected via Adm42 – Icon Name – for marking tiles. Therefore, the redesign must be activated to enable their display on the tiles. Activation of the redesign is described above (under Adm70, actions 250 and 251.)
- Display of the hamburger menu
-
Breadcrumb navigation with the ability to move
to higher levels
- Mobile device optimization:
o Display of hamburger menu (actions grouped into a single menu)
o Breadcrumb navigation with the option to move up
o
Adapted usage of the first two tile levels for
various mobile devices
· Messages and Links – replacement of the right-side panel:
o Bell icon showing the number of messages – includes Public Messages, Internal Mail, and Workflow Messages
o
Links are placed under Hamburger Menu /
Settings, depending on the JSON configuration
- Ability to change background color
- Option to combine background color and image (background logo remains configurable via Adm21 / HR Portal – Background Logo)
- Ability to define colors for individual components (e.g., panels)
- Option to set background image alignment
- Option to define tile alignment and spacing - Alignment is only effective at certain widths – on mobile devices, top alignment and left margin will be suppressed
- Unified tile display across tile levels
- New search functionality using a magnifying glass icon with tooltip
- Translations of tiles on the first two levels
-
Potential new appearance of the HR portal on mobile devices, depending on the JSON configuration (see above).


Potential new design of the HR portal, depending on the JSON configuration (see details above).

Button switch profile
![]()
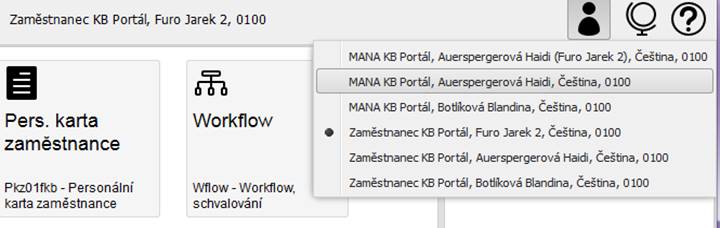
(Another possible variant
![]()

permits, unless the user has multiple login, switch to a different profile. Different profile may be also a substitution profile. After the surname and the name of substituted manager is in brackets substituting logged in person.
Switchable languages are available according to the object rights (f_lang_cs, f_lang_en, f_lang_sk).
The option can now also be hidden under the hamburger menu.

Portal menu is one to two levels, and its content is defined in the database.
The dynamic content has the Reports menu, which includes reports not included in other menus accessible and based on the profile / role.
Above left is a pair of
buttons ![]()
where the first allows you to hide / unhide top and bottom information and control lines. It is suitable mainly for smaller screens of mobile phones / tablets.
The second button returns the user to the home screen.
The
Start menu ![]() (bottom left) offers:
(bottom left) offers:
Appearance - the appearance of choice - a variant of the Touch provides greater fonts and greater distances among graphic elements, but on the screen it fits less
Reference period - the current month
Reference period - last month
The reference date is in the HR portal for the user profile with the rights for his own person or user limited by one Internal Unit determined from the date Vyp02 / Description / "Day of blocking inputs (Vst15, approved inputs) in relation to Pay Day:" when filled.
In this case, until the day calculated from this we offer to the user the last month as the reference period.
These options allow manual setting. This may affect the list of available employees in eg. Dcu06 window.
Reference Period - Next Month
Using this option will set the reference period for the form to the next period.
Copy environment description to clipboard:
getZak
setZak
Set Test Current Day
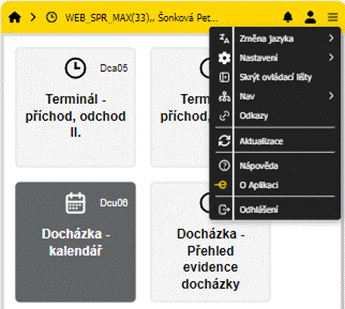
About the App
Logout - logout (it makes sense primarily for interactive authentication)
Besides
can be the buttons ![]()
The first is the direct button for Start / Logout
Second is to open Nav01 form in the dialog mode.
To configure what is inside Nav01 displayed, please read about the objects rights Nav *. in EGJE_Provdoc chapter 7.2.7 Special objects access rights.
The third is for those managers, officers, who have access to Nav02 form. It is primarily designed for the manager and displays the tree structure marked as organizational. It shows a summary and a detailed table of people for current center. The data include tariffs and incomes (see also Controlling chapter).
The last button is Refresh, which, depending on the context, reloads all data including codetables from the current screen.
Customization of HR Portal menu
Hiding squares
The squares of the HR portal contain the local menu "Hide item".
The function is directed to the user who does not use the item. This can be practical, especially for Reports and Attendance, Input groups. It is also possible to hide whole group squares.
Hidden items are collected in the "Hidden Items" squares and can be run from them, respectively can be also returned to use (again, the local menu "Stop Hiding Item").
There may be a problem with the local menu on
mobile devices, but hiding can also be set in the second way: The Run menu ![]() contains the item "Menu item settings"
where the user can set accessibility of all menu items at once using
checkboxes.
contains the item "Menu item settings"
where the user can set accessibility of all menu items at once using
checkboxes.
The form contains a list of available functions in HRP, which are divided into groups (squares).
Within a group, all available objects within the group are then displayed.
Form description:
Type - object type (group name - tile is highlighted, objects within the group - normal font)
Name - the name of the object
Group - in the column at the "group" level there is a checkbox, for showing / hiding the whole group
Item - in the column at the "object" level there is a checkbox, for displaying / hiding the object within the group
It is also possible to return to the original access by clicking the "Mark all" button.
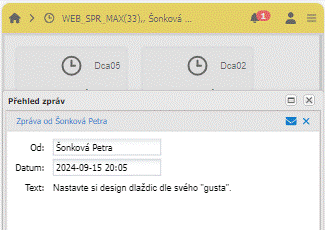
Hiding Messages and Links
You can also hide the entire "Messages and Links" column. This functionality is intended primarily for the mobile interface, where it is also offered at startup and where every millimeter of workspace is good.
This is the question "Number of workflows: n, messages: m. View?" That the user receives after logging in, if he has at least one message or workflow. After "Yes", the Messages and References column is displayed, after "No" the column is not displayed (no matter in standard or minimized form).
The display and hiding of both PC and mobile devices is also adjustable from the bottom left menu under the "Show Messages and Links" checkbox.
When the JSON file is activated, messages are now accessible via the bell icon.
To improve clarity, the number of unread messages is displayed next to the bell icon.
This includes all message types: internal mail, public messages, and workflow messages.
![]()
Links are, for now, accessible via the hamburger menu, provided the JSON configuration is active..
![]()
![]()
Environment
In some cases on small devices, the hamburger menu could become hidden; this has now been prevented.
In addition, on small devices where there is limited space to display the full environment name in the application header, it is now possible to view this information by selecting the Environment item (above Help) from the hamburger menu.
To ensure fast and efficient troubleshooting of potential issues when working with the application on a mobile device, a new functionality was introduced in e202606. When an application error warning occurs, the message is logged onto the web server.
After the issue has been reported to the HelpDesk, the logged information can be analyzed to determine the possible cause of the error condition.
Help
Standard calls this documentation respectively documentation of specific forms respectively reports.
However, an administrator can configure user help references to objects in form Adm34.
Button then calls the customer help site if defined by the administrator.
Note: Addressing of the HR Portal menu.
Basic HR portal sites represent objects
11 - HR Portal - Interface Employee
12 - HR Portal - Interface Manager
The submenus are then represented by objects MENUDL - example:
MENUDL_Doch - HR Portal - Attendance
Note 2: It calls a help page of already opened object. So, to get the user to a page submenu Attendance, the submenu Attendance must be first opened. The same applies to forms and reports.
Activate / Deactivate Push notifications
The visibility of the Activate Push Notifications option depends on the setting of the Allow Push Notifications parameter in Adm21 / Communication Parameters tab / Mail Sending section.
If push notifications are enabled, the user can disable them using the Deactivate Push Notifications option (in the hamburger menu).
If the Offer push notifications in HRP option is enabled in the Adm21 form, the user is prompted to allow push notifications when launching the HR Portal for the first time. If the user does not allow notifications, they can change the setting manually in the Hamburger menu if needed.
For proper functionality of sending push notifications to mobile devices, it is necessary for the user to add the page to the home screen (share icon and then select the Add to Home Screen action).
If PUSH notification registration fails in EDGE, the issue may be caused by the rejection of an untrusted address. In such a case, add the website address to the trusted addresses list in your mobile device under:
edge://flags -> #unsafely-treat-insecure-origin-as-secure
This will prevent EDGE from rejecting the website as an insecure origin..
Notice:
Elanor does not support the use of the HR Portal when the browser’s dark mode is enabled. To ensure standard application functionality, the HR Portal is forced to display in light mode even if the browser’s dark mode is active. This works correctly in browsers such as Google Chrome and Safari; however, the Samsung Internet browser does not respect this setting and has certain limitations—for example, low-contrast user interface elements.
2.5 The usual components of a portal interface
2.5.1 Wage slip
The default is accessed report Vyp11 (SK Vyp31) and Vyp26.
Report Vyp11 (SK Vyp31)
are in online mode imaging. At the top is the period selection, respectively optional choice of person (it is useful for the manager) and the bottom part is displaying report in html format.
In
footer is button Download PDF ![]()
![]() It starts downloading a PDF form on the client computer.
It starts downloading a PDF form on the client computer.
Customization KB herein contains Vyp11fkb etc.
2.5.2 Staffing employee card (Pkz01)
Form that displays basic information about Persons and employment with the employment navigation list.
At the top is the checkbox Including history. When checked non-actual data are listed also.
Form has tabs:
Personal data
Basic information on the person (Osb02) and Employee (Opv01) including photo
Personal details 2
Addresses (Osb02)
Pension
Health insurance
ID Cards (Osb02)
GDPR
tab is visible when user hasn't write access to GDPR form
2 subtabs:
Consent - same as Gdp01/Consent
Objection - same as Gdp01/Objection
User can here give the consent or raise the objection
Family Family basic data (Osb02)
For employees (row permission mode = VL_OSO) contains also birth certificate no.
Retirement savings
Only in SK legislation - Retirement Savings
Contains both included in II. Pillars (SDS from Pos01)
and contributions - table III. pillar (employer contributes - IA 4521, 4526, 4529 respectively the employee IA 4321)
Phone, e-mail
Osb02
Education
Education
Kva01 - knowledge, skills, respectively Periodic training
Languages schools
Kva01
Employment
Organization
Opv01 / Structures
Before joining
Opv10
Transitions
Osb29
Salary
Records from Opv02 with
When to account for = 1 - Each month
The Amount code 11,12,13,16
The user has access to WC - Adm06 - Group 20
It is filled Amount or Monthly amount in full tariff.
Liabilities
Osb13
Deductions
Tab only for employee (row permission mode = VL_OSO)
Contains standard deductions with IA:
4412, 4306, 4304, 4308, 4311, 4313, 4321, 4323, 4511, 4512, 4561, 4562, 4571, 4572, 4581, 4582, 4591, 4592, 4109 – 4113, 4521 – 4546
i.e. Cash on Delivery, Pension Insurance, Life Insurance, Other Collisions
Other
Medical examinations (Kva01, Kva05f)
Specific indicators (Opv27)
Contact person
Officers of the structures 14, 15, 10, and links to them (Osb02 12 - mobile, 31 - e-mail)
Notice requires a well-defined referents: thus the connection to the person (Str01 / structure 14,15, 10 / Manager-Person in EGJE - connection to the officer)
STANDARD contains a form Pkz01 - Staffing employee card.
Customization
KB Pkz01fkb contains a form that calls the user report Pkz02fkb.
Note. User report is not part of the standard
distribution and is installed over Adm51 like other custom reports.
Pkz01fkb
uses eligibility 100 (Slm02) with the group, it is possible to create either a
common or can each have their organization. Eligibility determines
that WC will be seen in a tab SALARY / WAGE.
For bonuses form uses eligibility 101, 102, 103, 104,
105.
Eligibility 106 and 107 are used for mobility.
2.5.3 Request for change (Pkz21mob, Dan31mob, ...)
Personal card data area contains also voluntarily:
Pkz21 - Request for personal information change
Sra21 - Deduction change
Dan31 - Statement by the taxpayer
Dan32 – Request for annual tax clearance
Gdp05 – Access to data – own person
These forms offer to the employee to send the request for personal data / deduction change.
These requests usually projects personnel clerk or payroll clerk to root data.
2.5.3.1 Pkz21mob - Requests for changes to personal data on mobile devices
The new Pkz21mob – Personal Data Change form allows users to request changes to their personal information directly from a mobile device (via the New Data Change Request form).
Access to the Pkz21mob tile must be configured in Adm42, the same way as for Wflowmob.
Within Pkz21mob, it is possible to request changes to personal data within the available areas (personal data, health insurance company, family members, identity card, documents, cash on delivery).
The buttons are grouped according to the request type. Each group contains a bold-highlighted request group name (button), supplemented with more detailed information related to the respective group.
If the display of a specific area (button) is not desired, this can be configured in Adm22 / Self-service. In such a case, the administrator selects value 4 – Not accessible for the respective item. Additional information about the Adm22 / Self-service configuration is provided in the Adm_uzdoc documentation.
The defined values (code list wfl_pkz_zprac) for individual items determine how the change will be processed:
Values from the code list wfl_pkz_zprac are available for selection:
· 1 – Processed by a case handler
Current processing method – the request is processed by a casehandler in Pkz23. If the configuration for SJ for the given type is not specified, this mode is used by default. The request is handled via workflow, i.e. the change must be approved by a case handler.
· 2 – Direct entry
Process without approval, i.e. the change is applied immediately without the need for approval (with an audit record of the employee)
· 3 – Record-only entry
A situation where the request from mode 1 is marked as completed, but the actual update is not performed (set status 30 – Reflected without update)
· 4 – Not accessible
If this value is set, the given item will not be displayed in the Pkz21fmob menu
For a change of the cash-on-delivery account, it is also necessary to set:
· Bank route for cash on delivery
· WC – cash on delivery
· Based on these values, the corresponding cash-on-delivery record is then searched in Sra01.
Using Pkz21Mob (Personal Data Change), the user can submit a New Data Change Request:
1. Personal data
a. Tab Personal data (On Pkz21mob, file uploads (attachments) are enabled. The option to add a new photograph (image) has been removed.)
b. Tab Address
In the personnel data change request section - Addresses (PersUdajAdresaMD), mandatory fields have been marked with red asterisks and the system now requires them to be completed.
Specifically, the following fields are mandatory:
:
· Street - cetosoadresa.ulice
· House number - cetosoadresa.ulice_cislo_pop
· Postal code - cetosoadresa.psc
· Country - cetosoadresa.stat
· City, Town - cetosoadresa.misto
c. Tab Communication
o This area differs from others as it includes multiple tabs (as mentioned above), grouped by the type of change. Users can freely navigate between tabs as needed—there is no predefined order for entering changes. A new request can be saved as a draft, supplemented later, and then submitted, or sent directly for processing. The system processes the request based on the new configuration defined in Adm22 / Self-service, see above; the configuration allows settings for each data type, based on which the request will be processed, e.g. 1 – Processed by an officer (processing by an officer in Pkz23 is required).
2. Health Insurance provider
3. Family members
4. Card
Starting with this version, the button has been renamed from Change Identity Card → Change Document.
The system also displays the following new fields:
- Document Type: (cetosoprukaz.druh_pruk)
- Authorization Level: (cetosoprukaz.uroven)
- Document Issued By (Country): (cetosoprukaz.stat)
- Authorization Group: (cetosoprukaz.skup_ro)
5. Documents
6. Firearms licence (according to authorization
7. Certificate / Qualification (based on permissions)
8. Cash on delivery
The following actions are available:
-
Confirm – prepares the
request for submission from the relevant overview. The system then displays a
summary of the changes (Review of Performed Changes form) and offers an
action to send the request
Cancel – deletes the request using the corresponding
action.
- Save Request – the request is saved with status 0 – Draft and remains pending until it is submitted.
Personal data is divided into three tabs. Partial entries can be saved, allowing the user to continue later and eventually submit the request (within the tab structure).
From the New Data Change Request form, users can navigate to the REQUEST OVERVIEW via the action of the same name.
2.5.3.1.1 Data editation
By selecting a specific type of change, the user is redirected to a form of the same name based on the selected change type. There, the user fills in the relevant data and has access to the following actions:
- Submit – submits the request for processing (based on configuration evaluation). Upon submission, the Action Evaluation offers the user the option to navigate to either the REQUEST OVERVIEW or BACK (to edit or complete any required fields). Once successfully submitted, the request status changes to 10 – Submitted.
- Cancel
- Save Request – the request remains in status 0 – Draft and is pending submission.
- By clicking into the item’s text field, the on-screen keyboard is displayed for data entry. After entering the data, the user can hide the keyboard by clicking on the form background, and the actions to complete the process (such as Save Request, etc.) are always accessible
2.5.3.1.2 Overview of Changes (Recap)
Overview of Performed Changes
- Displays the modified data of a given request that has not yet been submitted (status 0 – Draft).
- The system allows the following actions:
o Edit items – In the case of personal data, the relevant tab must be selected to enable editing of its fields.
o Submit the request for processing (Submit action) – The user is then redirected to the Action Evaluation, where they are informed of the processing result. They can then proceed by submitting a New Request or viewing the Request Overview (for statuses 0 and 10).
o Delete the request using the Cancel action – The user is redirected to the Action Evaluation and again has access to New Request and Request Overview actions.
o Save the request – Allows the user to save their partially completed request for later completion and submission. In this case, the request remains in status 0 – Draft, waiting to be submitted. After confirming the action, the user is redirected to the Action Evaluation, ideally with a message that the draft has been saved. They can then choose to go Back (to complete the request), create a New Request, or view the Request Overview.
Overview of Submitted Changes
- Displays the data of a request that has already been submitted (status = 10).
- The system allows the following actions:
o View changed data – Fields are read-only, as submitted requests cannot be edited. However, the entire request can still be deleted.
o Delete the request using the Cancel action.
o Redirect to create a new request (New Request action).
o Redirect to the request list (Request Overview action).
2.5.3.1.3 Requests Overview
Each request is listed separately, with the following basic information displayed:
- Request Type – e.g., New Family Member
- Change Date – the date the data was modified by the user
- Effective From – the date from which the data is valid, as specified by the user
- Change Status - In addition to requests in processing (status 0 – Draft and 10 – Sent), the system now also allows viewing the list of all requests, including those that have already been processed (status 1, 5, and 30).
- The Request Overview form allows users to return to the main overview (New Data Change Request) via the New Request action, where they can choose from available areas of personal data changes.
- The Request Overview form allows, via the NEW REQUEST action, a return to the main overview New Request for Data Change (areas of possible changes to personnel data)
2.5.3.2 Dan31mob - Czech Taxpayer Declaration (for mobile devices)
The new Dan31mob – Taxpayer Declaration form allows users to create and submit a new tax declaration for the relevant year directly from a mobile device.
Access to the Dan31Mob tile must be set to Adm42 (the same as for other mobile forms, e.g. Nep01Mob).
2.5.3.2.1 New Taxpayer Declaration
General elements
· Help available at every step
o Each step of the declaration includes an expandable help section displayed in the header with predefined guidance for the user. For clearer data entry, the help section can be collapsed to save space, especially on small devices.
· The Back button (allowing the system to return to the previous step) and navigation to the next step.
· Next button (action to continue the process to the next step)
· The Save button (the system saves and validate the changes made after entering the given step) and the Cancel button (the system cancels the changes made after entering this step), i.e. it removes data that was newly modified before saving.
· Entering attachments from different steps is unified and allows the selection of an already stored attachment (from previous declarations or Opv31) or the submission of a completely new attachment
· Visual element for better orientation in the taxpayer declaration entry process
· Required fields are marked with a red asterisk
Step 1 – Declaration
The first step is primarily intended for creating (New Declaration) or modifying a declaration for the selected year.
Until now, the New Declaration button was available only for the initial creation of the original declaration in the selected year.
However, the New Declaration action is now available at any time, including cases where an original declaration has already been created for the given year. The purpose of this change is to allow an employee to sign a new declaration again in situations where they left the organization and subsequently returned within the same year.
By selecting this action, the user is redirected to the next step, 2 - New Declaration
.
The user also has additional actions available:
OVERVIEW OF ALL DECLARATIONS – this action redirects the user to the section of the form with the same name, where all entered declarations are displayed, with the option to filter by the selected year.
From the declaration overview, the user can access the “Declaration Overview – Detail” (by clicking on a specific declaration), which provides a more detailed view of the declaration and, in particular, makes actions available depending on the status of the given declaration (e.g. Send to payroll accountant, Declaration preview, etc.).
Available actions:
· Declaration edits – more information in a separate chapter below
· Send to payroll accountant – by confirming this action, the system sends the declaration to the payroll accountant for processing
· Declaration preview – the system displays the Taxpayer Declaration Summary (Step 8 of 9)
· Print declaration – the system offers to display the Dan34 report for viewing or printing
The form also allows displaying audit information for each declaration through the AUDIT -> action.
By confirming the action, the user is redirected to the "Declaration Audit" form, where all changes related to the selected declaration are displayed.
For each change, the following information is provided:
• information about the type of declaration - displayed in bold in the header of the entry (e.g. Original, Change)
• Date of change
• Changed by
• Status
• Signature
• Comment - a comment associated with the given status
The records are sorted in descending order, i.e. from the most recent audit records to the oldest records.
.
OVERVIEW OF ALL E-ATTACHMENTS – displays an overview of all attachments (including invalid ones) for the given user
Step 2 – New Declaration
In this step, the user selects whether they are making a declaration (Making a Declaration = Yes/No), which is key for entering additional items in the subsequent steps. This declaration applies to the selected period (Validity Month From).
The user can simplify data entry from a previous declaration using the Load valid allowances for the current declaration validity period button and then “only” review and, if necessary, update the data of the new declaration.
The OTHERS action redirects the user to the next step of the declaration.
The DECLARATION SUMMARY action “skips” the individual declaration steps and redirects the user to the summary view before signing and submitting the declaration.
Step 3 – Data applicable only to tax non-residents
The third step is completed only by selected individuals, as it is intended for tax non-residents (e.g. persons who do not have a residence in the Czech Republic or who stay in the Czech Republic for the purpose of study or medical treatment, etc.).
Users enter the Country of Tax Residence, Tax Identification in the Country of Residence, and the Type, Number, and Issuing Country of the Identification Document.
Residents do not enter any data here and proceed directly to the next step for entering tax credits – OTHERS. Alternatively, if they are completing adjustments to a previously entered declaration (draft), they may skip individual steps and proceed directly to the DECLARATION SUMMARY.
Step 4 – Tax Credits
This step is used to enter tax credits:
- In particular, the Basic Tax Credit – to apply it, the user must select the credit and specify the validity period from and
- Disability Tax Credit (Level I–II) – the application of this tax credit is the same as for the basic tax credit; however, the user must first display (expand) the relevant section using the arrow at the end of the row with the tax credit label. For this tax credit, an attachment must also be.
- Extended Disability Tax Credit (Level III) – the application of this tax credit is the same as for the basic tax credit; however, in order to apply it, the user must first display (expand) the relevant section using the arrow at the end of the row for this tax credit. For this tax credit, an attachment must also be provided.
- ZTP/P Tax Credit – the application of this tax credit is the same as for the basic tax credit; however, the user must first display (expand) the relevant section using the arrow at the end of the row for this tax credit. Eligibility for this tax credit must be supported by an attachment.
To add an attachment, use the Add Attachment button, which redirects the user to the Attachments Proving Entitlement to Benefits form. Here, in the Internal and Payroll Attachments field, the user can select from attachments already stored in the system (saved from previous declarations or in OPV31), or upload a completely new attachment using the New Attachment button. The system automatically populates the Attachment Type based on the step from which the attachment is being added.
The uploaded attachment can be previewed or deleted (trash can icon) before saving.
After entering the data, the user can save the records, at which point the system checks the correctness of the entered information.
Step 5 - Tax benefit for children
The following Step 5 is used to display and enter child tax benefits.
First, the system displays an Overview of Children for whom the benefit is applied, showing the most important information (First Name and Last Name, Date of Birth, Validity).
To view more details about the child tax benefit or to make changes, open the record detail by clicking the arrow on the record. The following fields are available: First Name, Last Name, Personal Identification Number, Date of Birth, Applied (Not Applied or First Child, Second Child, etc.), ZTP/P, Adult Child – automatically populated by the system based on the date of birth, Validity Period From, Validity Period To, and Attachment with the displayed attachment type.
To upload an attachment, use the Add Attachment button, which redirects the user to the Attachments Proving Entitlement to Benefits step (with the option to select an existing attachment in the Internal and Payroll Attachments field or to add a new one using the New Attachment action). After saving the attachment, the user is redirected back to Step 5.
The Do Not Apply Benefit action (in the record detail) corresponds to the trash can (Delete) action on Dan31, which removes the record for the given year; i.e., for that year, the benefit is not applied to the specified child.
To enter a benefit for another child, select the Add Child action (below the overview of already entered children).
The system will redirect you to the New Record form to enter all required information (corresponding to the fields in the Detail view). To save the record, use the Save action. The Cancel action does not save the newly entered data on this form and redirects the user back to the children overview.
The standard action ← BACK is used to return to the previous step, while the NEXT action moves to the following step for recording a co-dependent person. Here as well, the user has the DECLARATION SUMMARY → action available, which redirects the user to a summary of the completed sections of the declaration (i.e., it skips the individual declaration steps), from where the declaration can be signed.
Step 6 – Co-supported person in the household
The following step is closely related to the entered child tax benefits, as it records whether there is another person in the household who co-supports the children.
As with children, this step displays an Overview where the user specifies whether there is another person in the household who co-supports the child – the Another person co-supports children field. This field determines whether it is necessary to enter information about a co-supporting person, i.e., if the field has the value 1 – Yes, the co-supporting person must be entered. If a co-supporting person has not yet been entered, they can be added using the Add Person button. On the New Record form, the following details are completed: First Name, Last Name, Personal Identification Number, Date of Birth, Residential Address, Applies Tax Benefit, Employment, Employer Name (required field marked with a red asterisk), Employer Address (required field marked with a red asterisk), Attachment (required field marked with a red asterisk). Uploading an attachment is described in the section on entering child tax benefits.
Save the completed information using the Save button. Conversely, the Cancel button does not save the newly entered changes on this form.
The ← BACK button redirects the user to the overview of the person in the household.
After the data is entered, the person is displayed in the Overview, including the option to open the Record Detail (via the arrow) to view and edit the entered information about the co-supporting person.
If the Another person co-supports children field is set to No, the system does not offer the option to enter a person.
Here as well, the ← BACK action redirects the user to the previous step, the NEXT → action redirects the user to the next step in sequence, and the DECLARATION SUMMARY → action redirects the user to a summary of the completed sections of the declaration (i.e., it skips the remaining declaration steps), from where the declaration can be signed.
Step 7 - Attachments
This step allows users to view an Attachments Overview as well as to add attachments (existing or new) for the given declaration and user.
In the attachments overview, the system displays basic information such as the Attachment Type (record header), Child (if linked to a child tax benefit), Valid From and Valid To, the attachment itself, and its validity.
From the overview, the user can navigate to the Attachment Detail, where individual fields can be viewed, including the option to view or remove the attachment.
If the required attachment is not available, the user can add a new one using the New Attachment button.
An uploaded but not yet saved attachment can be deleted (trash can icon) or previewed (Open Document).
To save the attachment, use the Save button. To cancel newly entered changes on this form, use the Cancel button.
An attachment can be removed only for records with a newly uploaded attachment.
The ← BACK action redirects the user to the previous step, while the DECLARATION SUMMARY → action redirects the user to a summary of the completed sections of the declaration, from where the declaration can be signed.
Step 8 – Taxpayer’s Declaration Summary
The Taxpayer’s Declaration Summary is used to review the data entered in the individual steps of the declaration. Each section can be collapsed or expanded using the arrow on the right to improve usability on mobile devices.
After the final section with attachments, the following actions are available:
· View Document and Sign – the system generates the Dan34 report, displays it, and after the document is closed, redirects the user to Step 9 Action
· Save Draft – the system saves the declaration with status 0 – Draft. The user can return to the declaration and continue working on it via the ALL DECLARATIONS OVERVIEW
· ← BACK – redirects the user to the previous Step 7 – Attachments
Step 9 – Action Evaluation
At this step, the system checks the entered data and assesses whether the declaration is ready for submission. To submit the declaration, it is necessary to Confirm the truthfulness and completeness of the information by selecting the corresponding checkbox.
Before selecting SAVE AND SUBMIT TO PAYROLL ACCOUNTANT, the user has the option to enter a Note. Confirming this action submits the declaration for processing by the payroll accountant.
The ← BACK action does not submit the declaration to the payroll accountant but returns the user to the previous Step 8 – Taxpayer’s Declaration Summary.
2.5.3.2.2 Declaration edits
In the case of a newly created declaration, it is possible to edit the declaration after saving it using the Declaration edits action. The action is available both in Step 1 of 9 – Declaration (according to the valid declaration) and in Declaration Overview – Detail for the respective declaration, whose status allows edits to be made.
Edits are possible in statuses where the declaration has not yet been processed by the payroll accountant, e.g. 0 – Draft.
After selecting the action, the user proceeds through the process in the standard way, modifies the required area in the relevant step, and then saves the declaration or sends it directly for processing.
2.5.3.2.3 Change in the taxpayer declaration
A change in the taxpayer declaration is possible if a version of the declaration already exists in the given year and the employee cannot edit it, i.e. the declaration version has already been sent to the payroll accountant (status 10 or 11) or is in status 20 – approved by the payroll accountant or status 30 – reflected in Dan01.
By selecting the Change in declaration action, the system prompts the user to select the area in which the change should be made (e.g. Step 4 – Tax reliefs). After confirming the selected step, the system redirects the user to that step. The period from which the changes apply is selected in the Valid from month field. The system automatically pre-fills the period according to the system date.
The subsequent procedure is the same as when entering a new declaration (continue step by step, or after entering the change go directly to the summary and then sign and send the declaration to the payroll accountant).
2.5.3.2.4 Take back / Request return for correction
The Take back / Request return for correction action allows the employee to retrieve (take back) the submitted Taxpayer Declaration for further edits or completion (provided that the payroll accountant has not yet approved it). Alternatively, using this action, the employee can request that the payroll accountant return an already approved (but not yet reflected) declaration back to them.
The action is available only in selected declaration statuses (e.g. 10 – Sent, 11 – Correction sent, 20 – Approved by payroll accountant).
The action is available (depending on the declaration status) in “Declaration Overview – Detail”, as it applies to a specific declaration.
2.5.3.3 Das31mob - Taxpayer Declaration SK (for mobile devices)
The new Das31Mob form – Taxpayer Declaration allows users to create and submit a new tax declaration for the selected year from a mobile device.
The availability of the Das31Mob tile must be configured in Adm42 (similarly to other mobile forms, e.g. Nep01Mob)
2.5.3.3.1 New Taxpayer Declaration
General elemnts
· Help available on every step
o Each step of the declaration contains an expandable help section displayed in the header, providing user guidance (including instructional text for expanding and collapsing the help section). For easier data entry, the help section can be collapsed to save space, especially on smaller devices.
· Back button (allows the user to return to the previous step) and navigation to the next step
· Next button (action to continue the process to the next step)
· Save button (the system saves and validates changes made after entering the current step) and Cancel button (the system discards changes made after entering the current step), i.e. removes newly modified data that has not yet been saved.
· Attachment handling is unified across the different steps and allows selection of an already stored attachment (from previous declarations or Opv31) or the addition of a completely new attachment.
· Visual element for easier navigation through the taxpayer declaration process
· Mandatory fields marked with a red asterisk
Step 1 – Declaration
The first step is primarily intended for creating (New Declaration) or modifying a declaration for the selected year.
The New Declaration action (button) is always available, including when an original declaration has already been created for the selected year.
By selecting this action, the user is redirected to the next step, 2 - New Declaration.
The user also has access to the following actions:
ALL DECLARATIONS OVERVIEW – this action redirects the user to the section of the form with the same name, where all entered declarations are displayed with the option to filter by the selected year.
From the declarations overview, the user can access Declaration Overview - Detail (by clicking on a specific declaration), which provides a more detailed view of the declaration and, in particular, makes available actions that depend on the status of the given declaration (e.g. Send to Payroll Accountant, Declaration Preview, etc.).
Available actions:
• Edit Declaration – more information is provided in a separate chapter below
• Send to Payroll Accountant – by confirming the action, the system sends the declaration to the payroll accountant for processing
• Declaration Preview – the system displays the Taxpayer Declaration Summary (Step 8 of 9)
• Print Declaration – the system offers the Das34 report for viewing or printing
The form also allows displaying audit information for each declaration through the AUDIT -> action.
By confirming the action, the user is redirected to the "Declaration Audit" form, where all changes related to the selected declaration are displayed.
For each change, the following information is provided:
• information about the type of declaration - displayed in bold in the header of the entry (e.g. Original, Change)
• Date of change
• Changed by
• Change status
• Signed
• Comment - a comment associated with the given status
The records are sorted in descending order, i.e. from the most recent audit records to the oldest records.
ALL E-ATTACHMENTS OVERVIEW – displays an overview of all attachments (including invalid ones) for the given user.
Step 2 – New Declaration
In this step, the user chooses whether they are making a declaration (field Making Declaration = Yes/No), which is essential for entering additional information in the following steps. This declaration applies to the selected period (Valid From Month).
The NEXT action redirects the user to the next declaration step.
The DECLARATION SUMMARY action "skips" the individual declaration steps and redirects the user to the summary view before signing and submitting the declaration.
Step 3 – Tax Reliefs
The next step is used to enter tax reliefs:
· in particular, the Non-taxable Part of the Tax Base for the Taxpayer – to claim this relief, the user must select the relief checkbox
· I receive an old-age/service pension – claiming this relief is done in the same way as for the first relief. For this relief, an attachment must also be provided.
To add an attachment, use the Add Attachment button, which redirects the user to the Attachments - New Record form. Here, the user can select from attachments already stored in the system using the Internal and PV Attachments field (attachments saved from previous declarations or in Opv31), or add a completely new attachment using the New Attachment button. The system automatically fills in the Attachment Type according to the step from which the attachment is being entered.
An attached file can be viewed or deleted (trash bin icon) before saving.
After entering the data, the user can save the records, upon which the system validates the entered information.
Step 4 – Information for Tax Non-Residents
This step is completed by individuals who have taxable income in the relevant period within the territory of the Slovak Republic and who claim a child tax bonus for a child living in the same household.
The NEXT action is used to proceed to the next step.
Alternatively, the user may skip directly to the DECLARATION SUMMARY.
Step 5 - Child Tax Benefit
The following Step 5 is used to display and enter child tax benefits.
First, the system displays an Overview of Children for whom the benefit is claimed, including the most important information (First Name and Last Name, Date of Birth, Validity).
To display more information about the child tax benefit or to make changes, open the detail view using the arrow on the record. The following fields are available: First Name, Last Name, Personal Identification Number, Date of Birth, Claiming (or Not Claiming) the Child Benefit, Valid From Period, Valid To Period, and Attachment with the displayed attachment type.
To upload an attachment, use the Add Attachment button, which redirects the user to the Attachments – New Record step (with the option to select an existing attachment in the Internal and ER Attachments field or add a new one using the New Attachment action).
The Do Not Claim Benefit action (in the record detail) corresponds to the trash bin (Delete) in Dan31, which removes the record for the given year, i.e. the benefit is not claimed for the specified child in that year.
← BACK - redirects the user to the Child Tax Benefit Overview
To enter a benefit for another child, select the Add Child action (below the overview of already entered children).
The system redirects you to a form for entering all required information (corresponding to the fields available in the Detail view). Use the Save action to save the record. The Cancel action does not save newly entered changes on this form.
The standard actions are ← BACK to return to the previous step and NEXT → to proceed to the next step for entering a personal note. The DECLARATION SUMMARY → action is also available here and redirects the user to a summary of the completed declaration sections (i.e. it skips the individual declaration steps), from which the declaration can be signed.
Step 6 – Space for Personal Notes
The next step is used for entering a personal note. The system displays information about the field capacity (200 characters).
The same navigation rules apply here: the ← BACK action redirects the user to the previous step, the NEXT → action redirects the user to the next step in the process (Attachments), and the DECLARATION SUMMARY → action redirects the user to a summary of the completed declaration sections (i.e. it skips the remaining declaration steps), from which the declaration can be signed.
Step 7 - Attachments
This step allows users to view the Attachment Overview as well as add attachments (existing or new) for the given declaration and user.
In the attachment overview, the system displays basic information such as Attachment Type (record title), Child (if linked to a child tax benefit), Valid From and Valid To dates, and the attachment itself.
From the overview, the user can navigate to the Attachment Detail, where individual fields can be viewed, including the option to display or remove the attachment.
If the required attachment is not available, the user can add a new one using the New Attachment button.
An uploaded but not yet saved attachment can be deleted (trash bin icon) or viewed (Open Document).
Use the Save button to save the attachment. Any newly entered changes on this form can be discarded using the Cancel button.
An attachment can only be removed for a record containing a newly uploaded attachment.
The ← BACK action redirects the user to the previous step, while the DECLARATION SUMMARY → action redirects the user to a summary of the completed declaration sections, from which the declaration can be signed.
Step 8 – Taxpayer Declaration Summary
The Taxpayer Declaration Summary is used to review the data entered in the individual declaration steps. Each section can be collapsed or expanded using the arrow on the right for better usability on mobile devices.
After the final section containing attachments, the following action is available:
• View Document and Sign - the system generates the Das34 report, displays the report, and redirects the user to Step 9 - Action Result, Signature.
Step 9 – Action Evaluation
In this step, the system checks the entered data and determines whether the declaration is ready for submission. To submit the declaration, the user must confirm the correctness and completeness of the data by selecting the corresponding checkbox.
Before selecting SAVE AND SEND TO PAYROLL ACCOUNTANT, the user has the option to enter a Note. Confirming this action sends the declaration to the payroll accountant for processing.
The ← BACK action does not send the declaration to the payroll accountant but instead returns the user to the previous step, Step 8 – Taxpayer Declaration Summary.
2.5.3.3.2 Declaration changes
If a new declaration has been created, it can be modified after saving by using the Edit Declaration action. This action is available both in Step 1 of 9 – Declaration (according to the active declaration) and in Declaration Overview – Detail for the respective declaration whose status allows modifications.
Modifications are possible in statuses where the declaration has not yet been processed by the payroll accountant, for example, 0 - Draft.
By selecting this action, the user proceeds through the standard process, modifies the required section in the corresponding step, and then either saves the declaration or submits it directly for processing by the payroll accountant.
2.5.3.3.3 Change of Taxpayer Declaration
A change of taxpayer declaration is possible if a version of the declaration already exists for the given year and the employee can no longer edit it, i.e. the declaration version has been sent to the payroll accountant (status 10 or 11), or it is in status 20 - approved by the payroll accountant, or status 30 – reflected in Dan01.
By selecting the Change in Declaration action, the user enters the month from which the change is valid in the Valid From Month field, while the system automatically pre-fills the period according to the system date.
The next steps are the same as in the process of entering a new declaration (continue step by step, or after entering the change, skip directly to the summary and then sign and send the declaration to the payroll accountant)
.
2.5.3.3.4 Recall / Request Return for Correctio
The Recall / Request Return for Correction action allows an employee to retrieve (recall) a submitted Taxpayer Declaration back for editing or completion (provided that it has not yet been approved by the payroll accountant). Alternatively, this action can be used to request that the payroll accountant return an already approved (but not yet reflected) declaration back to the employee.
The action is available only in selected declaration statuses (e.g. 10 - Sent, 11 - Correction Sent, 20 - Approved by Payroll Accountant).
The action is available (depending on the declaration status) in "Declaration Overview – Detail", as it applies to a specific declaration.
2.5.3.4 My Documents (download)
Form (Osb62) used by employees to request the
sending of a document and to collect it after the request has been made by the
payroll accountant. On the form, it is possible to pick up selected documents
sent by the payroll accountant even without a request (e.g. ELDP). This is a
separate product, with more details in the Zam_dok_uzdoc documentation.
2.5.4 Workflow (Wflow)
Runs form Wflow for processing workflow
2.5.5 Wflowmob - Workflow for mobile devices
It launches the Wflow form to process the workflow on a mobile device.
Actiovation/Deactivation of Responsive Forms can now be managed through a JSON configuration file.
Enabling the mobile responsive form (workflow) depends on the following:
1. A configuration JSON file, uploaded via Adm70, in which both the redesign and responsive forms must be activated.
{
"enabled": true,
"responzive": {
"forms": {
"enabled": true
}
}
}
The enabled property in the forms section has a default value of false.
If specific (responsive) forms are to be used instead of the standard ones, the enabled property must be set to true not only in the forms section, but also at the root level of the JSON file—i.e., the redesign must be activated.
2. There must be set object rights WflowMob
- It is required that the client has the Notifications/Workflow Overview tile (WflowMob) set up in Adm42.
To display a brief title of the workflow in the workflow overview, we recommend setting the name of the workflow step to Adm14 in the subject of the message.
Workflow – the name of workflow step and its usage in HR Portal
The name ot the workflow step has previously been used as the subject (subject) of messages – whether email or internal. Now, when creating a workflow, we save it and extend its use to:
· WflowMob – a new form for mobile phones that allows the approval of EGJE workflow. In this case, the name of the workflow step is displayed in the workflow overview as well as in its details.
·
Wflow – the
standard form for all environments for approving EGJE workflow. Here, the
step's title is displayed in the standard navigation list. Alternative
navigation lists will remain in their original content for now.
Since the saving of the step name is implemented
only from e202411, if it was not previously filled in (older workflows), the
original value is displayed, i.e., the first 1000 characters from the entire
action text. For this reason, we recommend that administrators check the
message subject in Adm14 / specific workflow / Workflow Steps / step / Workflow
Step Name and adjust or refine the specific texts as soon as possible to ensure
the workflow overview for mobile devices is clear.
Similarly to the Notification Template, it is allowed to use the same macros
here (which are different for each workflow). The macros are described in the
Adm_uzdoc documentation.
Typical step names can be defined as follows:
|
Step |
Step name |
|
WF 11, step 0=>10 resp. 1=>10 |
CP %CP_DESC_MINI% |
|
WF 11, step 0=>20 resp. 1=>20 |
CP with backup %CP_DESC_MINI% |
|
WF 15, step 0=>10 |
%SLM_NAZEV% %DATUM_OD% %DETAIL_OD% - %DATUM_DO% %DETAIL_DO% |
|
WF 16, step 0=>10 |
SLM %SLM_NR% %SLM_NAZEV%: částka %CASTKA% |
|
.... |
|
%CP_DESC_MINI% is a new macro providing a shortened description of the business trip.
Consider adding and placing %JMENO_CELE% in the subject of
the message. In the new form for mobile devices, the name (of the person for
whom the workflow is) is displayed on a separate line, with the workflow step
name below it. If you want to include the name in the workflow step name as
well, consider its placement to avoid having the names listed one below the
other, e.g., placing it after the SLM name or adding it to the end of the step
name – for example:
%SLM_NAZEV% %DATUM_OD% %DETAIL_OD% - %DATUM_DO% %DETAIL_DO% - %JMENO_CELE%
For completeness, we would like to remind you that the step name is also used for the email subject.
2.5.5.1 Notifications Overview (Workflow) tile
One of the available options for workflow approval by a manager is access via a dedicated tile: Notifications Overview (WflowMob form) designed for mobile devices.
The tile is located on the second level, under the Workflow tile, and its name can be customized in the Adm42 form if needed (e.g., Mobile Workflow Overview).
By clicking the tile, managers are presented with an overview of pending workflow items, where:
· In the first line of each workflow item, the highlighted full name (first name and last name) of the user the workflow refers to is displayed.
· In the bottom line, the workflow step name is shown by default. This name is taken from the macro defined in Adm14 – Workflow Step Name (email subject) for the given workflow type.
Example macro: %SLM_NAZEV% – %JMENO_CELE%, %DATUM_OD%–%DATUM_DO%
This topic is described in more detail above and in the change documentation for version e202411a. If the step name is not defined, the system will display a shortened version of the workflow description. For better clarity, it is recommended to define the step name.
Note: If you do not include the user's full name in the macro, it will not be immediately visible who initiated the workflow when viewing the workflow detail.
„Potvrzením“ daného workflow je uživatel přesměrován na Detail workflow se základními informacemi potřebnými k jeho zpracování a zohlednění zpracování na mobilním zařízení.
2.5.5.1.1 Detail workflow
The new responsive Workflow Detail form displays the essential information required to process (Approve/Reject) the workflow.
:
· Workflow Name – the name of the workflow step, primarily constructed from defined macros in Adm14. If no macros are defined, a shortened version of the workflow description (approx. first 30 words) is used instead.
· Workflow Description – based on the action item; reflects the type of workflow and its context. The text is defined in Adm14 using macros, where it can include the initiator, the type of workflow, and its name.
· Previous Comments – displayed only if the user entered a comment when creating the request, or if a system message is present (e.g., entitlement exceeded).
· Comment – an editable field where the user can enter a note before approving or rejecting the workflow.
· Approve / Reject actions – allow positive or negative processing of the request.
· Overview action – returns the user to the workflow overview (go back one step).
· Detail action – redirects the user to the non-responsive Workflow Detail form (classic desktop interface). In this case, the user sees the original workflow detail (without the navigation list), now enhanced with an Overview button to return to the responsive version, based on these conditions:
o If the user accessed the workflow detail via a tile, they will be redirected back to the workflow overview.
o If the user accessed the workflow detail from the notification overview (bell icon), they will be redirected back to the notification overview.
o
If the user accessed the detail from a message,
they will always be redirected back to the notification overview (bell icon).
Upon selecting Approve or Reject on the workflow detail, a confirmation form is displayed with the outcome:
· Action Evaluation (e.g., Workflow approved)
· Information – displays key details related to the action taken. This field is shown only if information is returned during processing.
· Error – displays an error message, if any, with the option to copy it for further use. This field is shown only if an error is returned during processing.
· Overview action – redirects the user to the workflow overview.
· Next action – opens the detail of the next workflow item.
If the Adm14 form is configured so that the workflow must be signed, the Wflowmob form does not allow the manager to Approve or Reject the workflow directly. Instead, using the DETAIL action, the manager is redirected to the Wflow form, where the workflow can be Signed or Rejected. The manager can then return to Wflowmob and continue processing other workflows.
.
2.5.5.2 Notification Overview, including Workflow
Access to the notification overview (including workflow items, internal messages, and public messages) is available to the user via the bell icon in the top right corner—provided that the JSON configuration file is active, including the section for bell icon notifications.
In the notification overview, the displayed information varies depending on the type of each notification.
:
· Workflow – displayed in the same way as when accessed via the tile: the initiator’s full name (first and last name) is highlighted in the first line, and the workflow step name is shown in the second line based on the configuration in Adm14 – "Workflow Step Name (email subject)". If no step name is defined, a shortened version of the workflow description is displayed instead.
· Internal Message – this type of notification is marked with an envelope icon in the list. The first line displays the highlighted full name of the sender, and the second line shows "Message from [date/time]", indicating when the message was sent.
· Public Message – this type is also marked with an envelope icon. The first line displays "System" as the sender, as these messages are typically sent by the system administrator. The second line states when the message was sent, in the format: "Message from [date]".
2.5.5.2.1 Message detail (Internal post)
When a user opens a notification of the "Internal Mail" type, a detail form is displayed showing the following fields:
:
- Sender – the full name (first and last name) of the user who sent the message from the system
- Date – the date and time the message was sent
- Text – the content of the message
- Attachments – a list of attachments, shown only if any were included
- Action Read – marks the message as read, so the notification will no longer appear in the list.
- Overview – redirects the user back to the notification overview (one step back)
- Detail – redirects the user to the non-responsive Workflow Detail form (classic desktop interface). From this view, the user can return to the responsive Notification Overview using the Overview button.
2.5.5.2.2 Message Detail (Public message)
Public messages (Zpráva všem) are visually distinct in the list by having "System" as the sender. In the detail view of this notification type, the following fields are displayed::
· Sender field = System
· Display From Date – the date from which the message will be shown to users
· Display Until Date – the date until which the message will be shown to users. These messages automatically disappear from the overview after their expiration date.
· Text – the message content displayed to all system users
· Overview action (button) – returns the user to the message list
2.5.5.3 Redirect via Email Link
A workflow can also be processed by accessing it via the notification email, through a link that redirects the user to the workflow detail. To ensure the user is redirected to the responsive version of the workflow detail form, the link in the notification template for the given workflow step must be correctly configured in Adm14.The correct URL format in the macro editor should look like this:
<a href="%WEB2URL%mana/#form=Wflowmob&formParams=id_sworkflow2%3D%ID_SWORKFLOW2%">display text of the link, if you don’t want to show the actual URL</a>
This portion will be inserted into the email and contains the defined link.
To redirect the user to the responsive form for workflow processing on a mobile device, the link must include the parameter form=Wflowmob
2.5.6 Dcu01mob - Attendance Overview (for Mobile Devices)
The Dcu01mob form – Attendance Overview is an alternative form for viewing the current status of attendance records, with the option to close attendance records on a mobile device.
The application administrator must make the form available to individual users by configuring it in Adm42 (Dcu01mob tile).
This form allows users on mobile devices to:
- View a summary of their attendance for a selected month
- Change the period (to view previous months)
- Lock or unlock their attendance using the lock icon at the bottom of the form, ensuring all data is verified
- Display the error log generated during attendance closing (message types are color-coded by severity – Info, Warning, Error)
- Use the LOG action to display the error log for the selected month
- This button is only available if the log has already been generated for that month
- Use the ATTENDANCE OVERVIEW action to switch from the log view back to the attendance overview
The attendance data is arranged in a row-style layout to enhance clarity on mobile devices.
- Planned working time – displayed at the end of each day's row
- Presence or absence, including the SLM code and name – shown within the day field
- Counted hours – displayed at the end of the presence/absence row
- Any difference is color - coded and shown next to the day of the week
- Weekend days are displayed in italic
- Public holidays are color - coded according to the attendance configuration
2.5.7 Nep01mob - Request for (Non-)Presence (for mobile devices)
The Nep01mob form – Attendance/Absence Request is an alternative form for submitting supported request types within attendance tracking and for viewing the processing status of submitted requests on a mobile device.
The application administrator must make the form available to individual users by configuring it in Adm42 (Nep01mob tile) and by appropriately configuring WGC availability in Adm06.
Using this form, users can submit requests such as vacation leave (or another attendance deviation) from a mobile device.
The range of WGCs available for the form and the current profile is determined by the configuration in Adm06 for WGC objects no. 7, 8, 17, and 18.
The individual absence types (WGCs) are typically divided into groups, with each group offering a selected set of WGCs according to IA, which are also defined in Adm06 for the logged-in user (profile and organization).
Each group is represented on the form by a separate button:
- Vacation – IA 21
- Leave of absence (Sick day, Free day ...) – IA 26 - 28
- Work from home (Home office ...) – IA 5101 a IA 5151
- All
An exception is the All group, which offers all available SLM without categorization.
If the organization has not defined one of the payroll components for a given type (IA), the system will not offer this group (e.g., Free day).
By selecting a specific group, the user is provided with an easier selection of SLM (e.g., in the case of vacation)
The Nep01mob form – Attendance Request is an alternative form for submitting supported attendance-related requests and for viewing the processing status of submitted requests on a mobile device.
The application administrator must make the form available to individual users by configuring it in Adm42 (Nep01mob tile) and by appropriately setting up WGC availability in Adm06.
Using this form, users can submit requests such as vacation leave (or other attendance deviations) from a mobile device.
The range of WGCs available in the form for the current user profile is determined by the configuration of WGC objects 7, 8, 17, and 18 in Adm06.
The individual absence types (WGCs) are typically divided into groups, with each group offering a specific set of WGCs according to the IA configuration defined in Adm06 for the logged-in user (profile and organization).
Each group is represented in the form by a separate button.
2.5.7.1 New Request, including Action Evaluation
After selecting the appropriate type of (non-)presence, the system displays a form for entering a new request.
The structure of this form depends on the selected SLM, particularly regarding the input of half-days and time from/to, as well as entitlement rules.
A new request includes the following items:
- Employee’s OSČPV (Personal Number of the Employment Relationship)SLM (Payroll/Wage Component) – in the case of Vacation, Payroll Components with IA 21 are offered; for Leave of Absence, Payroll Components with IA (Internal Algorithm) 26–28 are offered, in combination with the settings in Adm06
- Current balance – shown in both days and hours (e.g., 15 days (112.5 hours))
- Entitlement – also displayed in both days and hours
- Date from/to
- Firs day from/Last day to (according to the input mode)
A new request is supplemented by the following actions:
- Submit for Approval – The system processes the request (evaluates the entitlement to usage) and redirects the user to Action Evaluation, where a summary of the submitted request and the result of the action are displayed. If the operation is successful, the request is saved with the status 10 – Request for Approval of the Payroll Component (SLM)
- Save Request – With this action, the user ensures that the data is saved with status 0 – Draft, for later submission with possible modifications. In this case as well, the user is redirected to Action Evaluation, where they are informed about the draft being saved. The user can then proceed by selecting the REQUEST OVERVIEW action to verify the saved request, or use the BACK action to edit and submit the newly created request, or create a new request via the NEW REQUEST action.
- Cancel – this action deletes the request. The user is informed of this in Action Evaluation, and is then offered the actions NEW REQUEST and REQUEST OVERVIEW to continue working in the area of entering or monitoring (non-)presence.
Systém umožní vytvořit novou žádost i v případě, že je uzavřené období a uživatel má v nastavení zvolené referenční období = současný měsíc nebo předchozí měsíc.
2.5.7.2 Request Overview
The user is allowed to:
- view the list of requests created for
submitted (non-)presence applications.
Each request is displayed separately with the corresponding basic information:
- Request type: according to the selected Payroll Component (SLM) (etc. Vacation)
- Change date: the date when the data was modified by the user
- From date: the date from which the (non-)presence is planned
- To Date: the date until which the (non-)presence is planned
-
Change Status: the system displays requests with
all statuses (e.g., 0 – Draft)
- filter and search by change statuses
Users are allowed to view the list of all (non-)presence requests by their status, including those that have already been processed.
Requests are divided into the following groups (Active, All, Completed), and within each group, an additional filter by request status is available.
Group Division:
-
Active –
requests with the following statuses:
0 – Draft
2 – Cancelled Request for Payroll Component (SLM)
10 – Request for Approval of Payroll Component (SLM)
11 – Request to Cancel Request / Approved Payroll Component (SLM)
-
Completed –
requests with the following statuses:
1 – Rejected Request for Payroll Component (SLM)
21 – Approved by Supervisor 1
22 – Approved by Coordinator
23 – Approved by Supervisor
30 – Approved – All
- All (displays requests with all statuses)
A maximum of one year old records is displayed.
- display the request
details with additional actions (depending on the nature of the request).
From each request, the user
can drill down into its detail view, with a detailed overview of individual
items — see the next chapter Request Detail.
Through the NEW REQUEST
action, the user is redirected to the list of (non-)presence types in order to
submit a new request.
2.5.7.3 Request detail
From each request in the
overview, the user can drill down into its detail, with a view of the
individual items.
For requests with status 0 – Draft, the following additional actions are available:
- Submit for Approval – sends the modification for approval.
- Save Request – allows later processing or completion.
- Cancel – deletes the request
For requests with other statuses, only a view of the submitted data is available, along with the following options:
- Cancel Request – applies to requests with status 10 – Request for Approval of Payroll Component (SLM) (the request has not yet been approved and the user has changed their mind).
-
Withdraw Request
– applies to requests with status 23 – Approved by Supervisor (the request has
already been approved, but the user now needs to cancel it)
With these actions, the user
is allowed to add a Comment to state the reason for withdrawing or
cancelling the request.
From the Request Detail, the user can return to the list of requests (via the REQUEST OVERVIEW action), or display the groups of (non-)presence types to submit a new request (via the NEW REQUEST action). To exit the (non-)presence request form, the user can use the breadcrumb (the home icon for returning to the main screen) in the application header.
2.5.8 Controlling
Manager menu, offering Con01 and Nav02.
2.5.8.1 (Con01) - Daily reports
Con01 form offers to the manager the Daily News, Advices and History of changes.
It emphasizes series of interesting information to the manager:
New employees and leavings,
Out-of-records employees,
Expiration of periodic courses and others.
You can either display one type of data or select ALL - all types of event within the scheme (Daily News, Advice and History of changes).
2.5.8.2 Nav02 - Personal data by organization structure
The Controlling square also includes this form, which also has a quick launch via the button at the bottom left of the bottom bar.
The form is primarily intended for the manager and displays the structure tree marked as organizational.
It displays Summary and Detail for a specific center (detailed person table).
The figures include tariffs and incomes.
The Summary includes:
Box Today on departament - all related to today's date
User Code: Organization Center
Count - phys.: Number of persons counted in the physical state
Count - agrements: Number of part-time jobs, when part-time jobs are taken by their coefficient of agreed weekly time and time at the workplace
Exclusion from records: Number of persons in out-of-presence status (given by type of employment and exclusion)
Vacations: Number of people who have approved vacation today, free time (more specifically WCode with internal algorithm 21, 26 - Dov16)
Sickness and compens.: Number of people who have a disease already registered in the system today (WCode with internal algorithm 51-99)
Box According to rights:
Monthly tariff sum (today): Sum of Monthly Tariffs at the Center (WCode with Internal Algorithm 1101-1107, 1121-1126, 2131 with Code Code 12.13 and Flag of Settlement). Only persons / employees to which the user has row right are added to sum.
Gross wages (period): The sum of gross wages cleared at the Center in the period mentioned above under "Period for gross wage". Only persons / employees to which the user has row right are added to sum.
The Detail includes:
Checkbox " Absent only" - restricts people in the table to those that are today
o in out-of-presence status
o they have entry with vacation or sickness
The Pkz01 button calls the specified form in a dialog box for a specific person. It is accessible to those who have rights to Pkz01 and only to the person to whom the user has row rights.
The Income graph button calls the XLSX report Vyp26g and its accessibility is tied to this object and can only be called by the person to whom the user has row rights.
In the report, the Gross Wage for the period containing the gross salary (Payroll Folder) for each billing period and the monthly and yearly chart based on them.
Another sheet The average for the period (for reimbursement) processes the data in an analogous way, but the amounts are also drawn from the pay slip, but the components of the wage that are listed by the WCode are included in the average earnings (whether monthly biannual, annual or other).
Table People / employees from Center:
Full name
Emp.no.
Agr. coef. - coefficient of workload (ratio of agreed weekly time to workplace)
Starting date - employment start,
Termination date - end date of an employment
Emp. type
Exclusion from records - evaluation of out-of-attendance status and time before and after employment
Vacation - a sign that an employee has a vacation for today
Sickness - a sign that an employee has an entry with sickness for today
The last 2 columns are then displayed only for people / employees to whom user has the row rights:
Tariff (according to rights) - the same logic as for the above-mentioned Sums of tariffs, with an hourly tariff (code 11, 16)
Gross wage (according to rights) - from the billing period from the form header.
2.5.9 eProposal (Epr01)
Offer calls Epr01 form, which is the basic form for special approval processes.
The area is described in Epr_uzdoc.
STANDARD contains only two eProposals:
7 - Proposal for tariff and extra tariff change STD
25 - Workflow about position
all others are KB customization.
2.5.10 Education
The area of education is in standard in two levels.
Menu contains offering / requesting forms about education and training. This may be Kva16, Kva15 or any of its custom modifications for example Kva16fkb.
Accompanying then may be forms for a manager or employee (Kva01, Kva03, Kva01fkb).
STANDARD - employee (ie. 11 Type GUI - Web client - Interface employee)
Kva16 - Training events - sign up (with workflow)
Kva03 - Assigned events
Kva13 - All professional abilities - person (RO)
STANDARD - manager (ie. 12 - Web Client - Interface Manager)
Kva16 - Training events - sign up (with workflow)
Kva03 - Assigned events
Kva13 - All professional abilities - person (RO)
MODE KB - employee (ie. 11 Type GUI - Web client - Interface employee)
Kva16fkb - Courses, training events - sign up
Kva44fkb - Evaluation of courses and instructors
Kva01fkb - My courses
Kva37fkb - Education plan
MODE KB - manager (ie. 12 - Web Client - Interface Manager)
Kva16fkb - Courses, training events - sign up
Kva44fkb - Evaluation of courses and instructors
Kva01fkb - My courses
Kva37fkb - Education plan
2.5.11 Evaluation, Benefits
STANDARD - employee (ie. 11 Type GUI - Web client - Interface employee)
Ben01 - Benefits - state and drawing role 51 for reading
Hod01 - Personal appraisal role 51
Hod01fppfab - Personal appraisal
Hod02 - Tasks and targets evaluation role 51
Hod02fppfab - Employee targets
STANDARD - manager (ie. 12 - Web Client - Interface Manager)
Ben01 - Benefits - state and drawing role 52 for reading
Hod01 - Personal appraisal role 52
Hod01fppfab - Personal appraisal
Hod02 - Tasks and targets evaluation role 52
Note: This menu is not a part of KB customization.
2.5.12 Traveling orders
STANDARD - employee (ie. 11 Type GUI - Web client - Interface employee)
Cep01
Cep06
STANDARD - manager (ie. 12 - Web Client - Interface Manager)
Cep01
Cep04
Cep06
The roles 51, 52 don't include this offer.
Note: This menu is not a part of KB customization.
2.5.13 Reports
Combined Reports menu includes all the reports that are in the manager or employee profile accessible and have not appeared yet in the previous menus.
View of the report in this client prefers HTML format. There are some reports and exports with format set inside and it is respected in this client also.
2.5.14 System
STANDARD - employee (ie. 11 Type GUI - Web client - Interface employee)
Nav01 - navigation structure, Employee-Person, Position
Mail - Internal mail
Gen01 - Query Generator
Opv31 Documents of Employment Note: object is not std. part of 51
STANDARD - manager (ie. 12 - Web Client - Interface Manager)
Nav01 - navigation structure, Employee-Person, Position
Mail - Internal mail
Gen01 - Query Generator
Adm15 - Employee substitution
Opv31 Documents of Employment Note: object is not std. part of 52
MODE KB - employee (ie. 11 Type GUI - Web client - Interface employee)
Nav01 - navigation structure, Employee-Person, Position
Mail - Internal mail
Gen01 - Query Generator
Opv57fkb Request a business card (KB) Note: object is not std. part of 51
MODE KB - manager (ie. 12 - Web Client - Interface Manager)
Nav01 - navigation structure, Employee-Person, Position
Mail - Internal mail
Gen01 - Query Generator
Adm15 - Employee substitution
Opv57fkb - Business cards and rubber stamps (KB) Note: object is not std. part of 52
To configure what is inside Nav01 displayed, please read about the objects rights Nav *. in EGJE_Provdoc chapter 7.2.7 Special objects access rights.
2.5.15 Links
Links (e.g., www.Elanor.cz) to various pages defined by the client in Adm51 / Link for All are displayed to users with role 51 – HR Portal – Employee Interface and 52 – HR Portal – Manager Interface on the second level under the Links tile (MENUDL_Link).
Each link is presented as a separate tile that opens the target page in a new browser tab.
The Links tile is a specific system tile and therefore does not support all standard tile editing options in Adm42.
Users are allowed to change:
- User-defined name
- Order (by default, the tile appears at the end of the list)
- Icon name
Users are not allowed to change:
- Tile level
- Menu code
- Parent menu code
- Object type (menu)
- Object code (permission)
- Name
Additionally, for the MENUDL_Link tile, the following actions are restricted:
- Creating a new record
- Copying a record under the Links tile
- (Links are not offered as a parent menu option)
- Deleting this item
- Assigning the Links tile under a different tile
- Creating a new tile
-
2.6 Container Messages (Messages)
Container respectively column include the messages from the Mail window, respectively workflow approval records from the window Wflow.
This is an interactive information.
It allows you:
Workflow
·
direct
approval of individual workflow request (icon ![]() )
)
·
direct
transition to the form Wflow to the specific row (icon ![]() )
)
Mail (internal)
·
direct
transition to form Mail to the specific row (icon ![]() )
)
·
also
set the attribute Read (icon ![]() )
)
· indicates the attachment and allows to expand it

Container example:
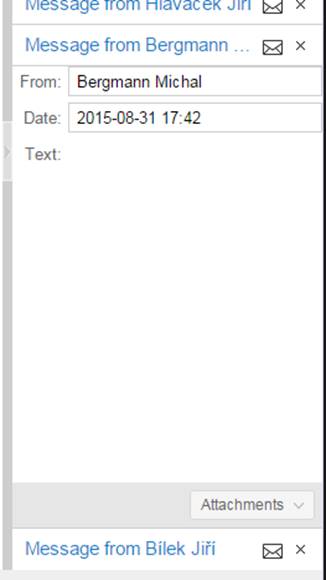
3 Vacation
3.1 Form Dov16 - Vacation
It calls Dov16 standard form, which is the counterpart of the calendaring forms Dov05, Dov06 and plan forms Dcp01, Dcp02. Accessible wage codes are defined in Adm06. But access is possible only for the WCs with IA 21,22,26,5151.
It allows you to enter a vacation to the Plan and send available WCs into the approval process.
Planned vacation is possible to turn into vacation request and then send it.
Note: When creating a holiday request from the plan and when sending it for approval, the same check for the attendance / period closure status will be performed as used when sending the directly created request in Dov16, ie. the application thus created cannot be submitted for approval if the relevant period from the point of view of attendance is closed.
The controls are similar to a form Attendance (Dcu06), described in detail in the following chapter.
There just remember that day by clicking opens a dialog to enter input when you press the mouse on the first day of the required range and the you move right mouse button to the last day, date range is pre-filled.
Item dialog depend on the selected WC and after completing input data, it can be directly send to the approval (button), or simply save it as a draft (another button).
The repeated
deviation mode is not allowed for Dov16.
When approving an SLM in repeated deviation mode, it will be approved as a standard
deviation.
There isn’t possibility for user selection of the input’s diversion format on the form Dov16 (contrary to Dcu06). The format is chosen automatically from the list of enabled formats for WCs and for the profile on the Adm06 – from the list is chosen the format with the lowest code.
E.g.:
For WCs is available the group of WCs (Adm06 for WCs and the Profile) – 7, 8, 17
Always is used the group 7.
For WCs is available the group of WCs (Adm06 for WCs and the Profile) – 18
Always is used the group 18.
In navigation lists are only employees having a possibility of vacation or time off.
They have Dov01 / Type of vacation entitlement > 0 or any entitlement in Dov02.
It is efficient for employees with more employments, but only one of them can have vacation.
Navigation also doesn't contain the future employees.
Indication of persons / employee in navigation:
- a standard employee is shown in black (this is a Legal relation type 1,21,22,31,52)
- an employee who is not in the reference period for at least one day is shown in italics
- agreement staff (Legal relation type 6,7,8,9,12,32,33) are displayed in dark brown
- employees with other employment (Status and Legal relation type), without filling in the kind are shown in a dark blue color
The restriction of showing WCs along Adm06
The administrator can make available in Adm06 for the form “Vacation” only the WCs of these types:
internal algorithm 21 – Vacation
internal algorithm 22 - Entering the claim and Drawing of "additional vacation"
internal algorithm 26 - Entering a drawing of "time off"
internal algorithm 5151 - Registration tracking "time off"
by default, is accessible only Vacation.
More details are described in the processing of applications Dov_uzdoc / Dov05, Dov06
For insert WC is possible to use only the group of WCs 7, 17.
The group 8, 18 is not available for the form.
Attention: for inserted WCs there is not possibility to use the user’s form of selection the group WCs for inserting – for WCs is automatically chosen the first (with the lowest number) group from the list of enabled for actual WC. The automatically chosen format is shown in the inserting form.
Options for changing the beginning and end of the approved record.
The change is made to the portal by canceling the original and entering a new request. This is a very simple process in HR Portal. There is not a data issue that is so problematic before approving the change request, when the old application should still apply, but it is not already in the data and the changed request is not valid yet.
That's why we do not already support this change in one request, that has remained for Dov05 / Dov06 for historical reasons.
3.1.1 Dov16 – record insertion restriction
The status of the period is controlled when inserting a new record in Dov16 (saving, sending for approval). If the status or the period is not able for inserting of diversion, there is shown a dialog and the operation is not finished.
It´s not possible to insert a record if:
a/ the record is for a period, which status is (Vyp02) >=3
b/ the record is taken in the day, which is not allowed for inserting
3.1.1.1 Restriction for entering negative hours
Restriction on entering negative hours by the user in SLM that allow direct entry of hours. For a detailed description, see DT006 for Dcu06
3.1.1.2 Time-Based Blocking of Record Insertion (Date)
When inserting a new record in Dov16 (save,
submit for approval), the period status is validated.
If the status or date does not allow insertion of a deviation, a message is
displayed and the operation is not completed.
Insertion of a record is not permitted if:
a) the record
is intended for a period whose status (Vyp02) is ≥ 3
b) the record is created on a day that is no longer permitted for insertion
The user input closing date is derived from the Payroll Period Date (if specified) and from the value of Input Blocking Day I. (approval-required vacation, Vst15) relative to the payroll period date (PPD):
A value = 0 means that the blocking day is
the payroll period date;
the user is allowed to enter records up to the day preceding the payroll period
date.
A value = –1 means that the blocking day is one day before the payroll period date.
The Payroll Period Date is not specified,
the closing date is derived from the beginning of the month.
In this case, the following rules apply based on the value of Input Blocking
Day I. (approval-required vacation, Vst15) relative to the payroll period date:
–1 The blocking day is the penultimate day of the closing
month;
the last editable day is the day before the penultimate day of the closing
month.
0 The blocking day is the last day of the closing month;
the last editable day is the penultimate day of the closing month.
1 The blocking day is the first day of the following month;
the last editable day is the last day of the closing month.
3 The blocking day is the third day of the following month;
the last editable day is the second day of the following month.
3.1.1.3 Restriction of the List of Applicable WC
3.1.1.3.1 Availability of WC Vacation in Exhaustion Mode
For the Dov16 form, the availability of WC of the Vacation type in exhaustion mode in hours is restricted (WC with IA = 21 and Slm01 setting – WC processing type specification = 7).
WC of this type is available in the WC code
list only with entry mode = 8.
All other entry modes for this WC are blocked
3.1.2 Dov16 - explanation
The form is fixed to the monthly view.
Color of cells
Today
Holiday
Day outside the current month
At the beginning of the day field is the identification of the day from Kal01 respectively from the Daily header. Ex .:
![]()
and displays all vacation inputs and leave from work inputs relating to the displayed period:
Request concept (prefix
"Concept:") or Plan - planned vacation (prefix "Plan:") ![]()
Light blue - request ![]()
Light green - approved respectively realized ![]()
Dark blue - reflected in the payroll input ![]()
Without background color framed in black, italic - Rejected / withdrawn request
(statuses
1 and 2) ![]()
If there is no entry for the entire day, but for
half a day, this is indicated both by moving the balloon left - right in
synchronization with the text information (in brackets "half from"
resp. "half to") ![]()
The text in the balloon is the name of the wage code.
On the left side is a plug-in information Status vacation entitlement. (see next chapter)
.
On the right side is the employee navigation that staff. For employee with one employment is hidden.
3.1.3 Form Dov16 – request detail and button availability restrictions
Standard accessibility of the Accept / Reject buttons depends on the type of profile (Adm02) and the write rights for the Dov16 form:
Profile type with VL_OSO privileges (access only to one's own), independent of the rights to Dov16: Approve / Reject is not accessible
Other rights than VL_OSO + Read Rights Dov16: Approve / Reject is not accessible
Other rights than VL_OSO + Write Rights Dov16: Approve / Reject is accessible.
If necessary, it is possible to use the same rules for accessibility of buttons as there is in the form Dov05/Dov06 – according to the assignment of the object’s rules of type Dov056*.
If the user has the right Dov056Dov16 = 1 (is allowed to start), then availability of buttons is the same as on the forms Dov05, i.e. according to the rights Dov056*.
Button accessibility Cancel request:
read rights to Dov16: Cancel request is not accessible
write rights to Dov16: Cancel request is accessible
If necessary, it is possible to block the button [Download request] for form Dov16 or Dcu06.
The restriction is implemented for the profile based on the object right Dov16StahnouNe or Dcu06StahnouNe.
If the right Dcu06StahnouNe/ Dov16StahnouNe is in the status:
= Must not start (0 or not filled in) – the button „Download request“ is displayed by default on the editable form of diversion on the form Dcu06/Dov16.
= May start (1) – the button „Download request“ on the editable form of diversion on the form Dcu06/Dov16 is not displayed.
The restrictions on the forms are not dependent on each other, each has its own right.
By default, the right is not assigned to any role.
3.1.4 Form Dov16 – left panel
This is a plug-in part of the form with data of the status of leave and monitored work time off.
Contains paragraphs:
Values accounted in payroll dd.mm.yyyy
The payroll calculation is the final settlement of claim, cutting, drawing and balance in vacation area to any date
Holiday records have an annual character. For a full-year view, this paragraph provides the Entitlement and Old Drawdowns / Reductions item - all applications registered from the beginning of the year to the specified date and the Balance, which takes into account only applications processed in wages for the last closed period.
Drawing mode - displays information about drawing holidays in shifts or hours
is set according to the item Dov01, mode of vacation drawing
if mode dov. is:
= 0,1,2,5,6 is displayed: in shifts
= 3, 4 is displayed: in hours
= 7 if the transfer is in shifts from min. year> 0 is displayed:
in hours (CY) and shifts (from LR)
if the transfer is in shifts from min. year = 0 is displayed:
in hours
Holiday entitlement: - holiday entitlement as of 1.1. current year
Reductions and withdrawals: - total reductions and withdrawals in closed periods
Balance: - the balance of leave at the end of the last closed period
If the drawing mode of vacation is in hours, then is represented:
a/ the column Hours in the format dd.dd
b/ the column Hours in the forma HH:MM.
The first column is mainly for eventually comparing with the form Dov01 and with the wage calculation.
The second one is mainly for need of attendance – e.g. for inserting the fractions of the balance of leave.
If the mode of vacation drawing is = 7, the period is 2021-01 or later, Adm22 - Transfer from min of the year in hours = NO and entitlement from last year in shifts (Dov01)> 0, another column of items is displayed, which contains information about holidays in shifts from the previous year.
Reference period yyyy-mm
Data processing is performed mostly during the reference period. Here are the Unclosed requests from this period
Values from dd.mm.yyyy till the end of the year
Evidence of vacation has annual character. This paragraph provides for the full-year view. Item New drawing (incl. requests) offers all requests registered from that date until the end of the year. Item Balance (incl. requests) offers also contains these requests
The balance in the recalculated shifts (incl. requests): it display the balance of vacation in the recalcutated shifts (the balance in hours / Opv01, Average lenght of shift)
Note: the count of shifts for withdrawals is only informative, it doesn’t establish no entitlement for withdrawals of vacation. It only serves for user’s orientation.
The annual plan
You can plan vacation - from the perspective of SW it is tentative.
Here is how many days were planned in the current year.
Another thing is which items from the plan were transferred to requests.
Other request may be entered directly without plan.
Contains items:
Entered in the plan (the whole year) (does not include reversed variances)
Unplanned leave until the end of the year – it is displayed the balance of the unplanned leave:
= (annual plan of leaves – vacation actually taken for the closed period – planned vacation for the open and closed period until the end of the year)
There won´t be taken into account the approved leave or the leave in the process of approval for actual or next period into the balance of the plan.
The plan must be reported for the entire leave balance, which is recorded as of the last day of the last closed payroll period (it is not enough to have a closed period for DOCH).
If profile has an object right Dcu06PláDovNe with the settings “Can run”, in Dcu06/Dov16 form it is not displayed field „Planned until end of year:”.
States of leave table
WCodes of time off use the claim from form Dov02. Here is each claim with Drawing, Balance and Plan. Like vacations also time off work may be entered via plan or without plan).
Drawing mode: - displays information on WCodes pumping in shifts or hours
is set according to IA WCodes:
if IA 26 is displayed: in shifts
if IA 5151 is displayed: in shifts
if IA is 63, 64, 65 is displayed: in hours
On Slm02 is the includability "Dov16Dcu06" - "Exceptions for Dov16, Dcu06"
and in it the group "stavyA26". Meaning: "Do not show these WCodes with IA 26 in Dov16 / Dcu06"
The WCodes listed here are not included in the Dov16 / Dcu06 time off display table
The deviation approver and his substitutes
Display of the section is controlled by the object right Dov16PanelZobrazSchval - Dov16, in the panel, show the Approver section or Dcu06PanelZobrazSchval - Dcu06, in the panel, show the Approver section.
The rights are of type „May run“
By default, the rights are not assigned to any of the standard roles.
The section displays:
manager for approving WCodes according wfl 15 – e.g. for VŠE page 8,
there is displayed at everyone: Surname, Name, Titles.
Note: we are not able to display From/To Date for approvers
Then we display Substitutes (if they exist): the list of defined substitutes from Adm15 for the manager.
If on Adm15 the column „Representation mode and WFL e-mails“ is not filled in, then we search for the corresponding profile in Adm02 the item „List of representation modes and e-mails“ - if one of the values 1, 2, 3, 4 is in the list, so we také the profile as a substitute.
There is displayed for every substitute: Surname, Name, Titles, Date from, Date to
Note: From/To Dates are the dates of validity of substitution
But this does not mean that he will be allowed to approve for the entire period of validity.
The substitute does not have to be approver for the entire validity of substitution.
If there are multiple approvers, we repeat the display for each of them.
3.1.5 Dov16 - View from Vyp01
In the case of using connection between the forms Vyp01 and HRP Dov16, we strongly don’t advise to use also inserting, which don’t contain at least filling the field Date from – this is for the deviations inserting or importing into Vyp01, Inputs the type of vacations (IA21), Paid leave (IA26) and WCs with IA 5151. Unadvisable is also the using of the code for period HSK (and others with calculated fields hours/shifts/days) if you don’t have at the same time filled both of date’s field.
For the correct displaying of the deviations from Vyp01, Inputs in the form HRP Dov16, we strongly advise to use inserting with filling to both of Date’s fields - Date from and Date to – it is for WCs with IA 21, 26 and 5151.
Conditions for taking over the record (IA 21) and IA 26, 5151 from Vyp01, Calculation detail.
The record from the specified IA will be displayed in Dov16 if:
a / the wage calculation has been done
(ie the record will be displayed in Dov16 only after the calculation of wages, from the tab Vyp01, Detail)
b / only WCs with IA 21, 22, 26, 5151 are taken over
c / at least one of the items Date From / Date To must be filled in
d / period from Vyp01, the calculation detail must be in the range of dates displayed in the calendar
e / if the lines from Dcm01 and Vyp01, Detail overlap, then only the lines from Dcm are displayed (in both sources the same date must be from / to and the same WC), in this case the record from Vyp01, Detail on Dov16 will not be displayed
If the corresponding input in Vyp01 - Inputs has not filled in any of the items Date From / To, for transfer from Vyp01, Details to Dov16 (on the Detail tab, deviations from inputs to detail are processed so that if the Date From is not filled in, the date of the first day of the month is entered in the detail, if the Date To is not filled in, the date of the last day the method used:
a / if the Date From is filled in (it is different from the first one) and the Date To is not filled in (it is the last day of the month) and the hours and shifts are not filled in - we transfer Date To = Date From
b / if the date from or the date to is not filled in - we ignore the record
c / if the Date From is filled in and the Date To is not filled in and the number of shifts is filled in - we set the Date To as the Date From + the number of work shifts (we skip free days)
d / if the Date From is filled in and the Date To is not filled in and the number of shifts is not filled in and the hours are filled in - We set the Date To as the Date From + the number of work shifts during which the set number of hours is filled
If the deviation is not for the whole shift, then it is displayed as the "first half of the shift" for the last day.
In the cases, if there is calculated to redistribution one deviation according to distribution of costs by percentage (Opv02) or according to structures (till now, every record from Vyp01 was displayed as one row in Dov16) is for displaying vacation from Vyp01 in the Dov16, the Detail of calculation, used the method:
- if there is more deviations of the same WC in one day, add for one day and the result compare to the planned shift and according to this the deviation is displayed in the day in one row.
3.1.6 Vacation plan – details
The flag doesn’t need to be available as required, it is possible to hide the flag „Plan“, if set:
Adm21, HR Portal, the section Dov16 - Vacation, the item Dov16 – hide the flag Plan = Yes.
The availability of SLM (Payroll
Components) for planning can be restricted based on the configuration in Adm06,
SLM group 42.
To work with
items in the vacation plan, use the Plan tab from the New form (to enter a new
item in the holiday plan) or the "Edit plan / Convert to request"
form to update the holiday plan record or to create a holiday request from a
plan item.
Changing the date of the holiday plan changes just
after "Save".
Due to the possibility of changing the dates for
creating a request, the "Edit plan / Convert on request" form has
editable date items even if you select Convert to request, in this case the
change of dates will only be reflected in the holiday request record (dates in
the plan item do not change).
If the user
changes the default WC value to a different one after activating a new record,
and the new item does not have insertion mode 7, the fields First Day From /
Last Day To will be set to “not filled”.
Plan scheduling can be configured.
We enable the mode where the employee in the
"Vacation states" belt, using the "Lock annual vacation
plan" button, ends the creation of the plan and locks the plan (the right Dov16uzavRocPlan
and configuration settings Dov16 – option to closed the annual plan: Yes).
When viewing an existing Dov16 plan record and using the "Convert to Request" button, it is not possible to change the SLM – the SLM field is displayed as read-only.
Before submitting the request using the "Convert to Request" button, a DK039 validation is performed (if enabled), the same way as with manually entered records using Save/Submit.
Based on the validation result (INF, VAR, ERR), the conversion is either completed or, in the case of an ERR, an error message is shown and the user is returned to the edit screen.
Let me know if you’d like this expanded with definitions of INF/VAR/ERR statuses or adapted for internal developer notes.
By the function of „Saving“ and also by the function „Convert the plan on request“, the „halfday“ item settings are checked. If the both items are setting for halfday, the dialog is displayed: „The oneday item cannot be setting on both halfdays „Yes““ and is the user return for editing.
When transferring a request from the plan to a request (forms Dov16, Dcu06, Dov05/Dov06) - before saving to Dcm01 (payroll data), we check for overlap just like with a new request - check for overlap with both unapproved and approved deviations.
If a conflict is found, the following message will appear:
'The current record overlaps with a daily attendance record. Should the conflicting records (1) DD be deleted?'
If the conflicting record is another approved deviation or an external record, the save will be interrupted – it is not possible to have two approved records or an approved and an external record.
For approved deviations, we check all
except canceled or revoked ones (i.e., we are not interested in approved
records in states 1 and 2). For states 11 and 12, we will not allow input –
because we do not know if it will be approved or not.
Configuration objects:
right Adm04, Dov16uzavRocPlan - "Dov16 - accessibility
of the Lock annual holiday plan button"
configuration items Adm21 / HR Portal:
Do not delete Dov16 Plan after conversion on
request: Yes / No
Code list of agreement:
if „No“ or „unfilled“ – the record of the plan, which is transferred to the request will be deleted
if „Yes“ – the record of the plan, which is transferred to the request, will be retained.
Dov16 - possibility to close the annual plan:
Yes / No
Code list of agreeement:
if „No“ or „unfilled“ – cannot close the plan
if „Yes“ – the plan closes
Dov16 - hide the flag Plan: Yes/No.
Code list of agreement:
if „No“ or „unfilled“ – the flag „Plan“ is displayed
If „Yes“ – the flag „Plan“ is hidden
3.2 Dov16 – "Overview of object rights and the use of rights for enabling buttons"
Overview of object premissions for Dov16:
Dov16 Holiday - calendar
Dov16LPanelNe Dov16, Unauthorized left panel
Dov16PanelZobrazSchval Dov16, to display the Approver section in the panel
Dov16PouzePlan Dov16, Displaying only the Plan tab
Dov16SmazatNe Dov16, Edit form, hide the Delete button
Dov16StahnouNe Dov16 - Edit form, hide the Download button
Dov16uzavRocPlan Dov16 – accessibility of the Lock Annual Leave button
Dov056Dov16 Dov16, buttons for approval based on Dov05
Dov16DetSchvalovatel Dov16, Display of Approver in Detail of Request
The accessibility of buttons is subject to:
· settings of Workflow 15 (resp.16,17) in appliacation from Adm14,
· Closing deadline status
· holiday status
· the user’s role
When the Dov056Dov16 permission is enabled, the Dov56emp permission must also be enabled for the user to be able to submit requests for Dov16.
The availability and limitations of form buttons are described in EGJE_web_uzdoc, chapter:
Dov16 – The request details and limitations of button availability.
3.3 Form configuration
3.3.1 Restrictions on displaying form parts
If Dov16PouzePLan = is allowed, only the Plant ab is available, and the Vacationtab is not displayed (the Plant ab is shown as active)
If Dov16LPanelNe = is allowed, the Left panel is not displayed for Dov16
4 Attendance
4.1 Attendance and input - availability of forms
The offer is intended for customers who use the module attendance.
Compared to traditional attendance forms, it also for the manager integrates persons who do not fall under attendance.
Note: It is according to mode: Opv01 / Mode / Emp. accessible in attendance.
The offer is in standard in two levels. It always contains a calendar form Dcu06. It may also include additional input and surveillance forms for example Dcu07 respectively customer form Dcu05fkb.
Menu Attendance forms offers:
STANDARD - employee (ie. 11 Type GUI - Web client - Interface employee)
Dca01
Dca02
Dca05
Dca06
Dcd01
Dcm01
Dcp03
Dcp07
Dcs02
Dcu01
Dcu06 in the role 51
Dcu07 in part 51 of reading
Dcu08
Dcu10
Dcu20
Opv53
STANDARD - manager (ie. 12 - Web Client - Interface Manager)
Dca01
Dca02
Dca05
Dca06
Dcd01
Dcm01
Dcp03
Dcp07
Dcs02
Dcu01
Dcu06 in the role 52
Dcu07 in the role 52
Dcu08
Dcu10
Dcu20
Opv53
Vst15 in the role 52
Vst16
MODE KB - employee (ie. 11 Type GUI - Web client - Interface employee)
Dcu01
Dcu05fkb
Dcu06 in the role 51
Dcu07 in part 51 of reading
Dcu08
Dcu10, Dcu20
Opv56fkb
Pre01
MODE KB - manager (ie. 12 - Web Client - Interface Manager)
Dcs02
Dcs03
Dcu01
Dcu05fkb in the role 52
Dcu06 in the role 52
Dcu07 in the role 52
Dcu08
Dcu10, Dcu20
Opv01
Opv55fkb
Opv56fkb
Pre01
Vst15
Object rights to these forms are not usually part of the standard roles of 51 and 52. The administrator assigns them via user roles included in the profile.
In a later chapter describes the main form Dcu06.
Usage notes:
Switching to another profile when form is open and in new profile is this form not available, the application switch to the first level (with message from system).
4.2 Dcu06 – Overview of object permissions and their use for button accessibility
The overview of object permissions for Dcu06:
Dcu06 attendance - calendar
Dcu06_inspektor Dcu06 - Extension of items in the dialog (group of wage component, Source, State)
Dcu06ctiDOCH Dcu06 - Read-only access to records from DD and MV
Dcu06editPlSmen Dcu06 - Ability to edit planned shift
Dcu06GenSablona Dcu06, Generate wage component according to template
Dcu06GenSablonaSLM Dcu06, Generate wage component from template, change of wage component
Dcu06GenSablonaSLMEdit Dcu06, Genereate wage component from template, edit of wage componentDcu06GenSablonaSLMUloz Dcu06, Genereate wage component from template, Save and Exit
Dcu06HromZmenaSlm Dcu06 Access to bulk change od wage componentDcu06Korekce Dcu06, Overtime correction
Dcu06LPanelNe Dcu06, Restricted left panel
Dcu06nesmiUzavrit Dcu06 - User does not have the right to Close record
Dcu06nezobrazitFunkce Dcu06 The button not displayed on from Dcu06 [Functions and selections]Dcu06nezobrazitZdroje Dcu06 The button not displayed on form Dcu06 [Resource restriction]
Dcu06PanelZobrazSchval Dcu06, Display Approver in panel section
Dcu06PlanEdit Dcu06, edit form Modify plan / Convert to request
Dcu06pocitaj Dcu06 - Enable calculation of daily/monthly hours in the record
Dcu06schvalit Dcu06 - Accessibility of Approve/Reject buttons
Dcu06SmazatNe Dcu06, Edit form, Delete button not displayed
Dcu06SmazatVse Access to delete all Dcu06 records
Dcu06StahnouNe Dcu06 - Edit form, Download request button not displayed
Dcu06ZakazUzavrit Dcu06 - User does not have the right to Close/Open attendance
Dcu06ZobrazProtokol Dcu06, Display Protocol option
Dcu06DetSchvalovatel Dcu06, Display of Approver in Detail of Request
Availability and restrictions of buttons in the form is same as for Dov16.
· The accessibility of buttons depends on:Workflow 15 configuration (resp.16,17) in Adm14,
· Settlement period status
· Vacation status
· User role
· For the Dcu06 from, it also depends on the Dcu06Schvalit permission
4.3 Form Dcu06 - Attendance
Form is the basic form of the Attendance area in EGJE HR Portal.
Left side: "push-in" panel "Survey of attendance"
Right side: "push-in" panel "Navigation List"
Calendar in monthly format consists of
The first row - day of week
Left column - identification of the week
Cells for a day in defined scope description)
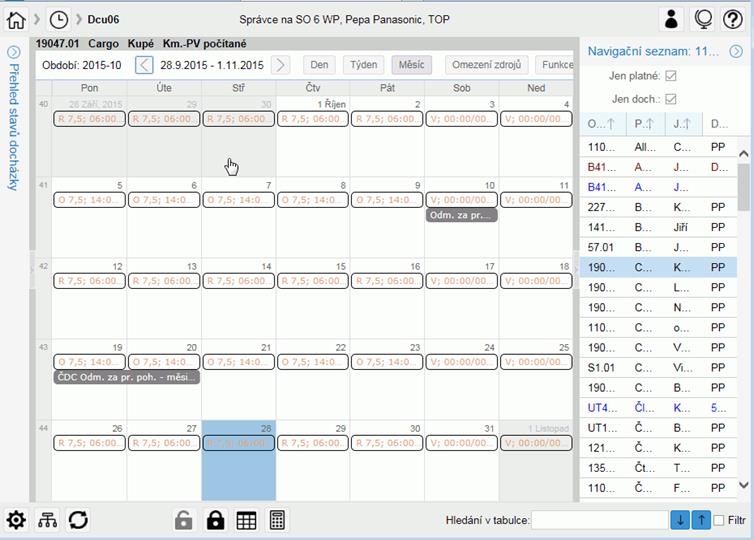
4.3.1 Identification line employee
Identification line of the employee - matches to the navigation list
EmpNo, full name and status of the employee to the organization
4.3.2 Line control elements form
Period - active period within the displayed calendar.
When attendance for this period is closed, period identification is in bold red.
Shift buttons (left and right) to move the display range (one day / week / month forwards or backwards)
Buttons to select the display format: [Day], [Week], [Month]
The [Restrict data] - to display the list of possible restrictions (see the following description)
Button [Features and Selections] - to view the list of available additional features and a list of restrictions on the navigation list (see description)
4.3.2.1 Options in Restrict data
Using the [Restrict data] button you can restrict the display of entries from some sources, respectively records of the specified type.
There are:
Not
display vacation plan - from forms "vacation plan " (Dcp01, Dcp02, Dov16).
Predefined setting "checked".
Not
display unapproved requests - from the record forms "WCode Approval" (Dov05, Dov06,
Dov16), which have the status of request = 1, 2.
Predefined setting "checked"
Not
display requests in approval process (unapproved yet) - from forms "WCode Approval" (Dov05, Dov06, Dov16), which
have the status of request = 0,10,11,12.
The default setting is "unchecked".
Not display Planned shift - when checked do not show the source of the "Shifts plan";
Default setting "unchecked"
Not display Planned shift, add. - when checked do not show the source of the " Shifts plan additional" - default setting "unchecked"
Not display WTF fullfilment shift - while checked do not show the source of "WTF shift balance" - default settings "ticked"
Not display Invalid records in daily attendance – while checked do not show “invalid” records from daily attendance, default settings “ticked”
in the footer of the form there are
buttons:
[Save] - save the current settings and close the
form
[Back] - close the form without saving the current
settings
4.3.2.2 Features/function menu and selections
Button [Features/Function and Selections] includes functions for evaluating and working with daily or monthly attendance and predefined filters to restrict navigation list.
4.3.2.2.1 Features/Function menu:
Calculations for all Employees in the navigation list - the same function as in Dcd01, makes the Calculation for all Employees in the navigation list
Closure for all employment reationships in the navigation list - the same function as in Dcd01 - Daily/monthly transfer + closing for all Employees in the navigation list
For bulk initiation of attendance closure, the permission
dialog is used:
“Do you really want to initiate it for all records in the navigation list for
the period <period>?”
Open for all employment reationships in the navigation list - the same function as in Dcd01 - Open data for all employees in the navigation list
Overtime WCode change - mass change of WCode for overtime for one employee.
Function is similar to the [WCode change] button on the Dcd01 Transfer and Closing tab.
Availability is subject to Object rights.
The rights object is not added into any standard role.
4.3.2.2.2 Working Fund Correction
WFC correction - the function is used to display the status
a) fulfillment of AWH, LA and overtime at the time of closing of attendance
b) redistribution of work benefits on public holidays
and a possible correction of the results of the redistribution of benefits for overtime and holiday work, stored in the wage documents.
The content and use of this function are similar to the use of the Dcd01 tab, AWH Corrections tab (see the description in Doch_uzdoc).
Here as well, it is possible to restrict the availability of the form only to ERs with ER Type = 1 (the same as on Dcd01).
Unlike the function on Dcd01, on Dcu06 both editable tables with WC for corrections are opened together, and upon saving, validation is always performed both for the redistribution of benefits for work exceeding AWH and for benefits related to work on public holidays.
The content and use of the function are like the use of the Dcd01 tab, the AWH Correction tab.
Unlike the function on Dcd01 and on Dcu06, both editing tables with WC for correction are opened
together and when saving, a check is always performed for redistribution of benefits for work over
AWH but also for benefits for work on holidays.
Availability is tied to object rights.
When the tab is opened, records for all defined WCs are displayed according to the AWH status (<0, =0, >0).
When saving, only those records that have a non-zero key item (hours, shifts) are saved to Dcm.
The "Delete" button will delete all displayed records for AWH correction.
Note:
a/ If the AWH balance > 0, then only rows with WC from the countability of Slm02.DOCH05 from the group 'NEUZNAN', 'NVT', 'PLAC', 'STRAVA' can be edited.
b/ If the AWH balance < 0, then only rows with WC from the countability of Slm02.DOCH05 from the group 'NVC', 'STRAVA' can be edited.
c/ If the AWH balance = 0, then only rows with WC from the countability of Slm02.DOCH05 from the group 'STRAVA' can be edited.
When saving to Dcu06, AWH Corrections, a check is performed that prevents changes from being saved to the form if attendance has been closed in the meantime.
First, the current attendance status for the current employment relationship and period is checked.
If the status is 3, 13, 23, or 33, or if the payroll period status is greater than or equal to 3 but not equal to 9,
the message “DT002 Cannot save, attendance is already closed!” is displayed
and the user is returned to edit mode.
The user must cancel the editing action and refresh the form content.
Additionally, during the save process, it is verified whether another process (changes on a different form, payroll calculation, closing of attendance, etc.) is modifying data in the monthly attendance records. If this is the case, the following message is displayed:
Unable to save record.
Records for AWH correction are currently being modified by another user/process.
4.3.2.2.3 Selections for restricting navigation list:
Add all (cancel filter)
restores full navigation list
With unclosed attendance
displays only employees valid for attendance with unmatched attendance, i.e. attendance records with a status of 0, 2, 12, 22, 32
With unclosed attendance or closed only by employee
displays only employees valid for attendance who don’t have closed attendance in the actual period (status = 0, 2, 12, 22, 32) or they are closed only by employee (status = 3).
With closing status according to the choice
displays only employees valid for attendance who have attendance in the required status in the actual period. User defines the status or the list of status, which he wants to see. The last entered list is saved and used for new opening.
With error from calculation / closure
displays only employees valid for attendance with evaluation of attendance in the state error or critical error
With critical error from calculation / closure
displays only employees valid for attendance with evaluation of attendance in the state critical error
With non-fulfilment planned fund of working time month
displays only employees valid for attendance, that have not met the planned monthly working hours
The unapproved absences (in approval process)
displays only employees valid for attendance, for which it is registered record of approval, which is not yet approved.
With assigned calendar
displays only employees, which have the last day of the period assigned specified calendar (user enters the calendar identification in the dialog)
With a legal relationship type
displays only employees with, which have been assigned to the specified employment type (user enters the employment type identification in the dialog)
The reported WC
displays only employees, which have a Wage Code in daily or monthly attendance record in current period (user enters the WC identification in the dialog)
The filter does not read WCs from Opv02 (exclusion from records), Cep01, Vyp01.
You can select only the WCs with IA from 11 to 1009 or from 2121 to 2132 or 5101
With assignment according to structure
displays only employees valid for attendance with, which have been assigned the specified element of the selected structure. From the time perspective, the evaluation is made
a. For current day within the period - to act. days
b. For historical periods - to the last day of the selected period
c. For period in the future - to the first day of the selected period
Dialog for entering filter parameters includes items:
Type of structure - the list of structures (only the structures applicable for attendance, No. 2 is used if not set)
Structure - a list of the selected structure
Including subordinates - (checkbox, predefined
"No") -
When set to No, the survey is made only for the
specified element of the structure
When set to Yes, the survey is made also for subordinate elements of the structure
4.3.3 Calendar with attendance
This part of the form has several display formats for the calendar:
Monthly format, Weekly format, Daily format.
4.3.3.1 Monthly calendar view format
It is the standard default display.
The first line shows day of the week identification (abbreviation).
The first column is week nr in year (when clicked - switch to the Week format).
In other rows and columns are cells for individual days of this period.
4.3.3.1.1 Cell calendar - Day
In the first row of the cell is displayed the order of the day in the month (the first day of the month called the month of the current day are displayed Today and the current time hh:mm, for other days only order nr). In other cell lines are shown individual records of attendance records. In case of large number of records in one day the continue symbol is displayed on the last line of cells.
One record usually contains information (by the source):
Source Information
External sources : WC name (abbreviation)
Plan your vacation : Plan - WC name (abbreviation)
APPROVAL : <prefix> - WC name (abbreviation), hours, shifts
Monthly record : WC name (abbreviation), hours, shifts
Daily Record : according to the configuration:
start time, WC name (abbreviation), hours, shifts
or
start time, end time, name (abbreviation), hours
Shifts plan : Pattern calendar day code, Start time, End time, duration of shift
Background colour:
Day of the month
The current day
Holiday
Day outside the current period
In one day can be more individual records of attendance (with different colour and text).
Approved inputs, inputs from monthly records or from external sources have a colour background:
Tan
- planned vacation or request concept ![]()
- Record of planned vacation or shift
Light
blue - request ![]()
- Record of the approval of the WC, not approved yet
Light
green - approved respectively realized ![]()
- Record of the approval of the WC, already approved
- this standard display can be changed, see the description "Color marking of approved deviation"
Grey
- non-editable entry ![]()
- A record from payroll, from Exclusion from records (Opv01), travel orders and non-editable attendance records
Black
- editable entry ![]()
- A record of monthly attendance records - editable
Inputs from daily attendance (shift plan, inputs, WTF - Work Time Fond balance) - with white background - text colour:
Tan
- information from Planning ![]()
- Record from shifts schedule, daily WTF balance
Grey
- non-editable entry ![]()
- Non-editable record of daily attendance
Black
- input record ![]()
- Editable record of daily attendance
Red
- input record ![]()
- Editable record of daily attendance with error
Red italics – input record ![]()
- invalid record from daily attendance (see description invalid record in Doch_uzdoc)
If it is a multi-day record, it'll appear as a stripe across more days. The record contains the usual WC name (abbreviation), with:
Prefix according to approval status
Plan vacation plan
Approved from approval process
Rejected from approval process - rejected or cancelled
Request in approval process
Beginning of the input - for daily input with time specification
4.3.3.2 Weekly calendar display format
This view shows one cell for each half-hour in a day, every day of the selected week is displayed in a single column.
The first line contains the header of the day.
Header shows an abbreviation of the day of the week and the order nr. Name of the month is by the first day of the week. In header can be also one-day input valid for whole day.
Individual inputs appear as a defined area in a half-hour daily scale. When multiple inputs are in a single day, each displayed in a separate column within the day.
Which WC are offered in the weekly view also depends on the way cells - days are marked:
when multiple days are marked in the header line of individual days, WC for multi-day entries is offered
- Adm06 group 7, 17, 18 (approved); 24, 25, 26 (unapproved monthly); 36 (for WC plan)
if you click only on a specific day, WC for one-day entries is offered
- Adm06 group 8 (approved); 33 (unapproved monthly); 22, 23 (unapproved daily)
if you click only on a specific day and select a time period, WC is offered for one-day entries with a time from/to
- Adm06 group 8 (approved monthly); 22 (unapproved daily)
4.3.3.3 Daily calendar display format
Basically it is the same format as the weekly forma, but displays only one day.
After selecting this format, you always see the current day. To the desired date you can pass:
Shift by left / right buttons
By entering the desired day into the field, where day identification is displayed
By selecting the "Calendar" square button located in the field of day identification
4.3.3.4 Editing dialog forms
User can view or modify attendance records by them.
There are several types of editing forms, used by data nature of the displayed data.
Also the inclusion of WC into groups according Adm06 is to choose appropriate form.
Note: Items marked with "*" (in this document) are displayed for user Dcu06_inspektor object right.
The clock on the dialog forms entered in the format: hour [hh24:mi]. The forms contain a check that displays an error message if the user tries to enter, respectively to save the hour with another delimiter than colon (erroneously comma, period).
On some forms, it is possible to assign 1 to 3 structures; by default, this option is disabled. For the activation and usage process, see Section 4.3.8.4 'Assignment of Structures to DOCH Input.'
4.3.3.4.1 Restriction of the List of Usable WCs
4.3.3.4.1.1 Availability of WC - Vacation in Exhaustion Mode
For the Dcu06
form, the availability of WC of the Vacation type in exhaustion mode in
hours is restricted
(WC with IA = 21 and Slm01 setting – WC processing type specification = 7).
WC of this type is
available in the WC code list only with entry mode = 8.
All other entry modes for this WC are blocked
4.3.3.4.1.2 DH03, Checking the Applicability of WC based on the Type of Employment Relationship
When inserting a new wage component (WC) record, it is possible to check whether a specific WC is allowed or prohibited for a specific Type of Employment Relationship (ER).
By default, the check is inactive.
If DH03 = 0, the check is not performed.
The WC is checked against two lists of ER Types, which are on Slm01, Attendance & External Inputs.
If the ER Type in question is not on either list for the checked WC, then the WC is accepted.
If for the specified WC, the current ER Type is on the list for WC Slm01, “WC allowed for ER Type” found – WC is accepted.
If for the specified WC, the current Employment Relationship Type is on the list for WC Slm01, “WC prohibited for ER Type” found – WC is not accepted, and the following message is displayed:
DH03 [U] [0] For ER Type: <pv type>, prohibited WC <slm>! depending on the reporting level then: 1-3 at the user's discretion, 4 - return to WC entry.
4.3.3.4.2 Common checks during [Save]
4.3.3.4.2.1 DK152
Verification DD152 (Verification for WC with IA 2121/2122), if is activated (viz description in Doch_uzdoc)
4.3.3.4.2.2 DW01 - Entering WC on a Holiday
The DW01 check is intended for WC from the eligibility of Slm02, DOCH02, ODPR.
It is designated for Dov05/Dov06 and Dov18/Dcu06 - approved WC.
For a detailed description, see Doch_uzdoc, chapter “Approved working hours and SV”.
Verification DW01 and DW01a
When entering a deviation, the Wage Component (WC) checks the type of worked time.:
a/ if WC with IA 1006 – It is only possible to enter it on public holidays with mode N (if the Wage Component is entered on a day other than a public holiday N, message DW01a/DW02a will be displayed, and the process will continue according to the severity level of the message).
b/ if WC is different, without IA 1006 and deviation contain a public holiday N, then deviation is divided and user must enter deviations for public holidays independently.
4.3.3.4.2.3 DW02 – entering SLM for a public holiday
Designated for Dov05/Dov06 and Dov18/Dcu06 - approved WC.
Check for approved and unapproved monthly deviations - only for calendar mode.
For WC deviations, the eligibility is from DOCH03. DW02 and it is not IA 21.
For a detailed description, see Doch_uzdoc, chapter “WC with IA 26, interrupted by a holiday with compensation”.
4.3.3.4.2.4 DT002* - Record of 12 or More Hours
DT002a/DT002b - Shift Duration Exceeding 12 Hours (26 hrs/recording limit of 24 hrs)
If more than 12 hours are recorded in daily attendance logs Dcd01, Dcu06 (for Dcu06, this applies to WC entries from groups 22,23) and these hours are either directly entered by the user or calculated based on specified time Form/To:
Standard Mode:
- If more than 24 hours are entered, a
message will be displayed:
DT002a [E] FAT: Record with more than 24:00 hours !!!
and the record will not be saved.
If more than 12 hours are entered and there
is no IA to WC (2121, 2122), a message will be displayed:
"DT002b [U] VAR: Record with more than 12:00 hours, isn’t it a
mistake?"
and the record will be saved based on the user's decision.
For special cases where shift exceeds 12 hours (e.g., 24-hours shift for healthcare
professions, the 12 / 24-hour limit can be adjusted by settings the “Shift
Duration Limit for Controls (including brake):” field in Dcc06, Control limits.
If this field is left blank, the control will default to 12-hours limit.
Detail description is in Doch_uzdoc (probably only in CZ a nd SK)
4.3.3.4.2.5 DT004 - Validation on save in Dcu06 for monthly part-time contracts
During the save action in Dcu06, it is possible to activate validation DT004, which checks the fulfillment of the planned working time (FPD) for employees with part-time contracts.
Note: The DT004 check (Dcu06 entry) is not suitable for attendance modes without tracking of worked hours, such as:
13 – Attendance with imported plan and deviations (repeated import, continuous calculation).
Therefore, we recommend disabling this validation for the affected work modes.
Validation Conditions, the check is performed if DT004 > 0 and it concerns a part-time contract (Opv01), the description and employment coefficient (koef) is less than 1 and it is not an agreement-type contract (Druh_pv ≠ 6, 7, 8, 9, 12, 32, 33)
Validation Message
If the employment coefficient (koef) is not defined for the employment record (PV), the system will display the following message:
DT004a [U] [ERR] The part-time coefficient in Opv01 is zero. Please check the contract settings and ensure the coefficient is defined for the entire month.
Calculation:
xZkrFondHod = Calculated monthly planned working time based on attendance records (Dcd01) – contractual fund
xFondHod = Calculated converted full-time equivalent (FTE) for the month, as:
xFondHod = xZkrFondHod / coefficient
xNaduv = Calculated possible overcapacity (overcontracted hours), as:
xNaduv = xFondHod - xZkrFondHod
x1003 = Calculated reported hours on SLM with IA 1003 (overcapacity) for the current period, from both daily and monthly attendance
x1111 = Calculated reported hours on SLM with IA 1111 (overtime), or 11, 13 (non-working days) for the current period, from both daily and monthly attendance
xHod = Calculated total time recorded toward the planned monthly working time (FPD), as the sum of:
Worked hours (ODPR) + Absences (NEPR) + Non-working compensated time (NVC)
For attendance modes with ongoing time entry or generation, the validation now includes the expected worked hours for the remaining days of the month (i.e., shifts the employee is scheduled to work according to the shift plan).
The use of planned worked hours in the validation is enabled via the DT004d message, which must be set to a value greater than 0 (default is 0 = disabled).
If DT004d > 1, an informational message will be displayed to indicate inclusion of planned hours in the calculation:
DT004d [U] [0] OSČPV <o> Planned but not yet reported work shifts – hours <h>
Id DT004 > 1 display informational message:
DT004 [U] [VAR/2] OSČPV <osčpv> Sjednaný FPD <h1> Stanovený FPD <h2>, hodiny <h3/h4/h5>, Nadúvazek <x1003>, Přesčas <x1111>.
Where
h1 = recalculated monthly contractual planned working time (FPD)
h2 = recalculated monthly statutory planned working time (FPD)
h3 = total of reported and planned hours
h4 = currently reported hours only
h5 = currently planned but not yet reported hours
x1003 = hours reported on SLM with IA 1003 (overcapacity / overcontracted hours)
x1111 = hours reported on SLM with IA 1111 (paid overtime)
// Validation: Exceeding the Contractual Monthly Workinf Time Fund
If xHod > xZkrFondHod, then show message:
If DT004b > 0, display:
DT004b [U] [INF] OSČPV <osčpv>. You have exceeded the <contractual> monthly working time fund <xZkrFondHod> for a part-time contract. Reported: <xHod>, difference: <xHod - xZkrFondHod> <overcontracted hours>.
// Validation: Exceeding the Statutory Monthly working time fund
- xHod1 = xHod + x1003
- xHod2 = xFondHod - xZkrFondHod
If xHod1 > xFondHod, then show message:
If DT004b > 0, display:
DT004b [U] [INF] OSČPV <osčpv>. You have exceeded the <statutory> monthly working time fund <xFondHod> for a part-time contract. Reported: <xHod>, difference: <xHod1 - xFondHod> <overtime>.
// Validation: Reporting SLM Overcapacity – IA 1003
Only validate if x1003 > 0
If xHod < xZkrFondHod, then show message – contractual FPD not fulfilled
If DT004c > 0, display:
DT004c [U] [FAT] OSČPV <osčpv>. Unauthorized reporting of <overcontracted hours> <x1003> for a part-time contract. Reported: <xHod>, limit: <xZkrFondHod> <contractual working time fund>.
// Validation: Reporting Overtime – IA 1111
Only validate if x1111 > 0
If xHod <= xFondHod, then show message – statutory FPD not fulfilled
If DT004c > 0, display:
DT004c [U] [FAT] OSČPV <osčpv>. Unauthorized reporting of <overtime> <x1111> for a part-time contract. Reported: <xHod>, limit: <xFondHod> <statutory working time fund>.
4.3.3.4.2.6 DT006 - Restriction for entering negative hours
Restriction on entering negative hours by the user in WC that allow direct entry of hours.
In forms Dcu06/Dov16, for the WC entry mode according to Adm06, which allows entering hours/amounts/shifts (groups from Adm06, e.g. 23), the item editing is configured so that negative hours/amounts/shifts can be entered only if negative values are allowed for the given WC in “Slm01, Attendance & External Inputs, Allowed hours/amounts/shifts into minus:”.
The user can enter a negative value in WC either by manual entry or by clicking, but during saving the system checks whether a negative value is allowed for the given WC.
If a negative value is not allowed for the given SLM, the following message is displayed when saving:
DT006 [U] [FAT] Negative value is not allowed for WC <slm>.
Depending on the message level, the user is either returned to editing (in case of FAT) or may complete the save operation according to their decision
4.3.3.4.2.7 SCH10 - Overview of WC Selection in Dcu06 Based on Adm06 Configuration
o simplify the lookup of WC availability on the Dcu06 form, a new function has been implemented.
If the current user has the permission Dcu06SCH10 = Allowed to execute, and message SCH10 > 0, then upon saving a record, the system displays information about the source object from which the WC is permitted.
If message Sch10a is also enabled, the system will additionally display links to the relevant WC profile and group.
On saving records:
If the setting Dcu06SCH10 = Allowed to
execute is active and message SCH10 > 0,
(SCH10 [U] [0] SLM <> pro objekt <>) a message is displayed for
each WC selected for assignment, indicating from which object the WC is
permitted.
If setting of SCH10a > 0,
the system performs a lookup for the affected object that either has a matching profile or no profile at all and display SCH10a (SCH10a [U] [0] WC <> for object <> profile <> group <>)
A message is then displayed that includes the object, the profile, and the group to which the WC is linked.
The message includes references to:
The object with an assigned profile, and the object without a profile - depending on how the WC availability was determined in the given context.
Note:
It is not recommended to keep message SCH10 permanently enabled.
We suggest turning it on only temporarily when troubleshooting WC availability on the Dcu06 form.
Examples of displayed message:
SCH10 WC
209 for object 7
SCH10 WC 209 for object 8
SCH10 WC 209 for object 24
SCH10 WC 209 for object 25
SCH10 WC 209 for object 23
SCH10a WC 209 for object 7 profile jakrcz_6_SPR_MAX _WP -
HO_jarkcz_6_SPR_MAX, SO 6 WP - Portal-mana group DOV05_07
SCH10a WC 209 for object 7 profile - group DOV05_07
SCH10a WC 209 for object 8 profile - group DOV05_08
SCH10a WC 209 for object 24 profile - group input dcm01/dcu06 24
SCH10a WC 209 for object 25 profile - group input dcm01/dcu06 25
SCH10a WC 209 for object 23 profile - group input dcd01/dcu06 23
4.3.3.5 Editing form - inputs without approval, daily attendance
Form is made to work with edit daily attendance records (WC Group 22, 23).
For WC attachment cannot be attached, see description for more details.
The items:
Date
Time from, time to - only for WC from group 22
WC
Hours [hh24:mi]
Total hours
Shifts
Note
* WC Group
* Source
* Editing status
Function keys:
Button [Delete]
Button [Save]
Button [Open] - key to enable record editing for users with lower levels of editing
The button appears when the record is locked for editing, but the user is authorized to permit its editing
Button [Close] - button for banning record editing for users with lower levels of editing
The button appears when the record is enabled for editing
Button [Copy] - actual record copy into one or more days. You can change some attributes on following dialog form (Date, Repetition, Skip free days)
Notes to Copy:
- WC with IA 1008 – only days with type in N, S are copied
- WC with IA 1006 – only days with type in C, N, S are copied
- WC with IA 21 – new record is not copied on days with type in C, N, S. Holiday days are added to repetition.
- WC with IA 1001,1002 – copied to holiday – after transfer is for type N changed to 1006 and for S remains.
- Copying is limited for current period.
4.3.3.6 Editing form - inputs without approval, monthly attendance
Form is made to work with monthly attendance records (WC Group 24, 25, 26, 33).
Attachments can be attached for defined WCs.
The attachment can be connected in the case where the WC from the group of 24, 25 and 26 is also included in the group on the object WC for 34 Adm06 (optional supplement) or 35 (compulsory attachment). See description for more details.
For WC from group 25, it is possible to enter a half day on WC from the countability DOCH02, NEPR, ODPR and NVC.
When saving an WC from group 25, a check is enabled to enable the half-day flag setting. If the half-day setting is entered and it is not an WC from the DOCH02, NEPR + ODPR + NVC computation, the message is displayed: For WC <slm> illegal entry half a day! and the form returns to edit mode.
In the dialog for entering a new request when filling in the From Date, the To Date is automatically pre-filled (with the From date content) and the user can then edit it as required.
In the application update dialog:
a / if the original Date From = the original Date To and the user changes the Date From, then the Date To is also overwritten.
b / if the original Date From <> the original Date To and the user changes the Date From, then
also overwrites the To Date, but only if the original To Date is less than the current From Date.
The items displayed on WC from the group:
Date from
The first day of the - only for WC from group 25
From time - only when the WC from group 26
By date
The last day to - only for WC from group 25
Time to - only when the WC from group 26
WC
Hours [h: me]
Hours calculated.
Shifts
Shifts calculated.
Amount
Note
*Group WC
*Source
*Status editing
For WC without attachment

For WC with attachment
Buttons: Change the attachment, Delete the attachment, Attachment – for update/change or delete the attachment for WC defined in Adm06 n.34 or n.35.
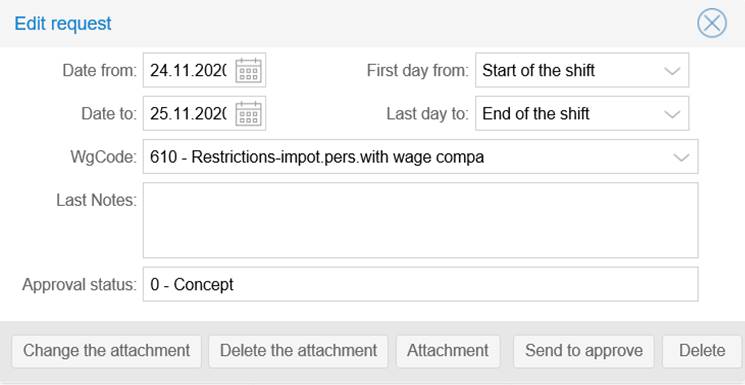
4.3.3.7 Editing form - inputs with approval
Form is made to work with attendance records with approval process (WC Group 7, 8, 17, 18).
Approval is possible for WC type Vacation or Paid Leave (from Dov02).
For defined WfCodes is possible to connect th attachment. See description for more details.
Buttons [Approve], [Disapprove] are available as well as in the form Dov16, see the chapter:
Dov16 – Detail of the request and restriction on the availability of buttons
Button [Delete] – is for deleting the actual record
The button could be blocked.
The display of the button is conditionally governed by the Dov05/Dov06 permission in Read/Write state and any of the Dov056EMP, Dov056VED, or Dov056VED1 permissions.
The blocking is made in link for the profile by filling in object right Dcu06SmazatNie for the form Dcu06 or Dov16SmazatNie for the form Dov16.
If the request status is >= 10, the Delete button is not displayed.
Button [Save] – is for saving the actual record without sending for approval.
4.3.3.7.1 Form items – type 7:
Date from
First day from
Date to
Last day from
WC
Department
Unit
Drawing a request in shifts <shifts>
Drawing the request in hours <hours>
If it is a holiday (IA 21)
Shifts = for holiday mode <> 3,4,7 (drawing in shifts) - shifts drawing holiday
= for holiday mode = 3,4,7 (drawing in hours) - holiday shifts
hours = hours from the holiday record
for other IA
shifts = shifts from the WC record
hours = hours from the WC record
Note:
It will be displayed if the user has the object right Dcu06PoznamkaSch = Allowed to run.
When saving such a record, if the SLM is from the group Adm06 / 39, the filling of the Note field is checked (the content is not checked). If the Note field is not filled out, the following message is displayed:
SCH07 [E] [FAT] Filling out the Note field is mandatory for WC, and the user is returned to the editing mode to fill out the Note.
When sending a request to the workflow, the Notes are copied into the workflow notes (Previous Notes).
State approve:
The item "Approver" or "Deputy" is displayed if the user has been assigned the right Dov16DetSchvalovatel for the form Dov16, or Dcu06DetSchvalovatel for the form Dcu06.
If the current user for
approval is a direct manager, only the "Approver" item will be
displayed.
If the current user for approval is a "deputy," only the
"Deputy" item will be displayed.
The same information that is displayed in the left panel of the form Dov16/Dcu06 is shown.
Approver:
Manager for Approval of Deviation
Deputy:
Deputy Manager for Approval of Deviation
The item "Deputy" is displayed only if it is valid for the current date.
Previous Notes:
WC Group:
Entitlement:
Utilization Including Request:
For WC with limit on Dov02:
Entitlement From: - the period of the start of validity for WC limits
Entitlement To: - the period of the end of validity for WC limits
Note: The validity of the entitlement is tied to the day of the deviation's OD - request.
Balance Including Request:
On the deviation detail, both New and Display, if the break mode for the current WC is set on Slm01, Doch&Ext.Inputs, the items displayed are:
Break Time on the First Day
Break Time on the Last Day (similarly displayed on Dcm01, Inputs - Summary).
if the holiday drawdown regime is = 7, the period is 2021-01 and later and the balance from the min of the year in shifts (Dov01)> 0, the items are displayed:
Holiday from last year in shifts - from Dov01 - balance of leave from min. year in shifts
Balance in shifts - the balance of leave in shifts from the previous year to the last day of the previous month if the period is February-December, for January on the 1st day of the period, reduced by shifts of drawing leave in shifts up to the amount of the balance
"Drawdown and balance do not include the current deviation"
For holiday mode 7, an explanatory message is displayed in the request detail that the current request is not included in the drawdown statistics.
On the detail of deviation New also Display and if there is configure the mode of break on Slm01 for the actual WCode, Attend&Ext. inputs are displayed the fields „Breaks in 1st shift“ and „Breaks in last shift“ (similar like is displayed on Dcm01, Inputs – tab).
On Dov16 is likewise displayed the field Wage component group to see the right format for inserting the deviation.
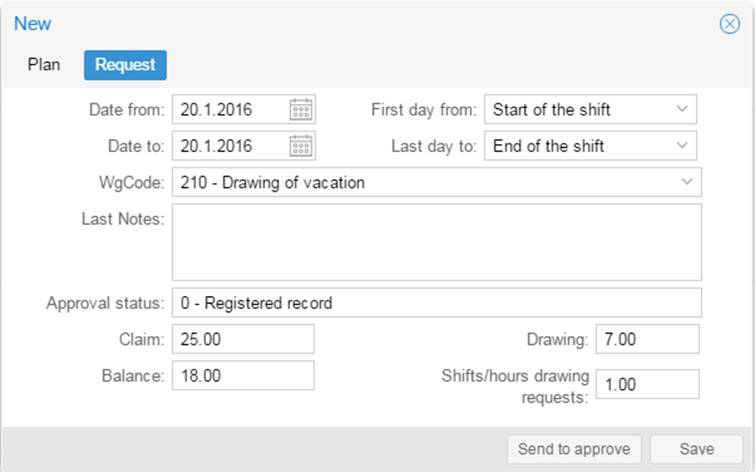
.
Or
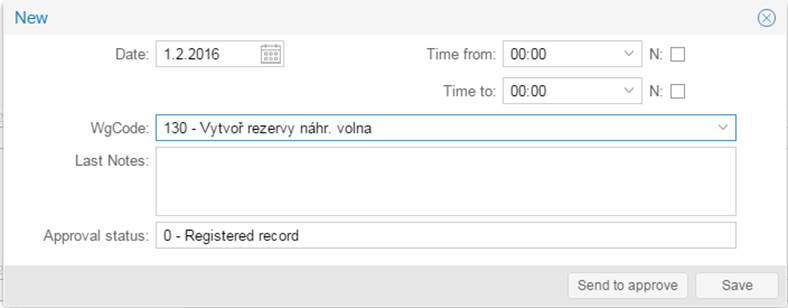
For WCs with Attachment allowed, form contains also buttons:
"Delete the attachment"
"Delete the attachment"
"Attachment"
serve to add / update / delete a document to the request.
Buttons are displayed only for WCs defined in Adm14, Action workflow = 15, WC list - attachment possible / mandatory attachment in Dov05, Dcu06 (see , Chapter 3.5 Dov05).
In the dialog for entering a new request when filling in the From Date, the To Date is automatically pre-filled (containing the From Date) and the user can then edit it as required.
In the application update dialog:
a / if the original Date From = the original Date To and the user changes the Date From, then the Date To is also overwritten.
b / if the original Date From <> the original Date To and the user changes the Date From, then
also overwrites the To Date, but only if the original To Date is less than the current From Date.
4.3.3.8 View and Edit dialog - Shift plan
Used
for displaying a record from the employee’s shift schedule.
By default, the form is available in view-only mode. Edit mode (updating the
Template Day field) may be enabled for a user (profile) by assigning the object
permission Dcu06editPlSmen.
See also the conditions and restrictions for Shift plan on Dov16
Other conditions to edit:
- Dcu06 is in read/write mode
- Neither attendance nor period is closed
- Dcu06editPlSmen = allowed to execute
- The row is not locked for the current user (see Dcd01, Inputs, Header)

Sample day – code table is same as Dcd01 / Inputs / Header, also validity and row rights to sample days are applied
For situation with write possibility form has buttons:
[Save] - save changes. It includes checks depending mainly on sample day.
Sample day code table selection depends also on raw level rights.
[Close] - Close the edit mode for users on profiles with lower level (visible when record is open)
[Open] - Open the edit mode for users on profiles with lower level (visible when record is closed)
4.3.3.9 Edit Form – Non-Approved Deviations, Monthly Attendance
For records with SLM (Payroll Components) of the type non-approved deviation in the monthly attendance format (SLM groups 24, 25, 26, 33).
For the defined SLM (Payroll Components), it is possible to attach a file attachment.
An attachment can be added if an SLM from group 24, 25, or 26 is also assigned in the SLM group Adm06 for object 34 (optional attachment) or object 35 (mandatory attachment).
For more details, see the description below..
For Payroll Components from group 25, it is possible to enter a half-day on Payroll Components from the attendance countability codes DOCH02, NEPR, ODPR, and NVC.
When saving an SLM (Payroll Component) from group 25, the system checks whether
the half-day flag setting is allowed.
If a half-day setting is entered and the SLM does not belong to the attendance countability codes DOCH02, NEPR + ODPR + NVC, a message is displayed:
For SLM <slm>, half-day entry is not allowed!
The form then returns to edit mode..
In the dialog for creating a new request, when the From Date is entered, the To Date is automatically pre-filled with the same value. The user can then adjust the To Date as needed..
In the Update Request dialog:
a) If the original From Date = original To Date and the user changes the From Date, the To Date is updated accordingly.
b) If the original From Date <> original To Date and the user changes the From Date, the To Date is also updated, but only if the original To Date is earlier than the new From Date.
Displayed items for SLM (Payroll Components) from the group:
From date
First Day From – only for SLMs from group 25
Time From – only for SLMs from group 26
To Date
Last Day To – only for SLMs from group 25
Time To – only for SLMs from group 26
SLM (Payroll Component)
Hours [hh:mm]
Hours Calc.
Shifts
Shifts Calc.
Amount
Note
*SLM Group
*Source
*Edit Status
For Payroll Component without an attachment

Buttons [Open], [Close], [Delete], [Save] – see description of non-approved SLM in the daily attendance format.
Alternatively, for Payroll Components with an allowed attachment:

Buttons [Add/Change Attachment], [Delete Attachment], and [Attachment] – used to add or update a document for an SLM (Payroll Component). These buttons are displayed only for SLMs assigned to SLM group Adm06 no. 34 (optional attachment) or 35 (mandatory attachment).
4.3.3.10 Edit Form – Non-Approved Deviations, Monthly Attendance
For records with SLM (Payroll Components) of the type approved deviation in the monthly attendance format (SLM groups 7, 8, 17, 18).
Approval is possible for SLM (Payroll Components) of the type Vacation or Leave of Absence (from Dov02).
For the defined SLM (Payroll Components), it is possible to attach a file attachment. For more details, see the description below.
Buttons [Approve] and [Reject] are available in the same way as in Dov16 – see chapter:
Dov16 – Request Detail and Button Availability Restrictions.
[Delete] button – used to delete the current record.
The button can be disabled.
The button visibility depends on the following permissions Dov05/Dov06 in Read/Write mode, and one of the rights Dov056EMP, Dov056VED, or Dov056VED1.
Disabling is performed in relation to the profile by assigning the object right Dcu06SmazatNe for the Dcu06 form, or Dov16SmazatNe for the Dov16 form.
Button [Save] - used to save the current record without sending it for approval
4.3.3.10.1 Form items – type 7:
From Date
Firs Day From
To Date
Last Day From
Payroll Component
Cost center
Department
Request consumption in shifts <shifts>
Request consumption in hours <hours>
If it concerns Vacation (IA – Internal Algorithm 21)
shifts
= For Vacation mode ≠ 3, 4, 7 (consumption in shifts) – vacation consumption is recorded in shifts
= For Vacation mode = 3, 4, 7 (consumption in hours) – vacation is recorded in hours
hours = hours from vacation record
for other IA
shifts = shifts from Payroll Componet record
hours = hours form Payroll Component record
Note:
This field is displayed if the user has the object right Dcu06PoznamkaSch = Allowed to Run.
When saving such a record, if the SLM (Payroll Component) belongs to Adm06 / group 39, the system checks whether the Note field is filled in (the content itself is not validated).
If the Note field is not filled in, the following message is displayed:
SCH07 [E] [FAT] For this SLM it is mandatory to fill in the Note field
and the user is then returned to edit mode to complete the Note field.
When the request is sent to the workflow (wfl), the Notes are copied into the workflow notes (Past Notes).
Approve status.:
The field Approver or Substitute is displayed if the user has assigned right Dov16DetSchvalovatel for the Dov16 form, or Dcu06DetSchvalovatel for the Dcu06 form.
If the current approver is the direct manager, only the “Approver” field is displayed. If the current approver is a Substitute, only the “Substitute” field is displayed.
The same information is displayed as in the left panel of the Dov16/Dcu06 form.
Approver:
Manager for Deviation Approval
Substitute:
Deputy Manager for Deviation Approval
The “Substitute” field is displayed only if it is valid for the current date.
Lats notes:
Payroll Component group:
Entitlement:
Consumption including requests:
For SLMs (Payroll Components) with a limit on Dov02:
Entitlement from: - start period of validity for SLM (Payroll Component) limits
Entitlement to: - end period of validity for SLM (Payroll Component) limits
Note: The validity of the entitlement is tied to the From Date of the deviation/request.
Balance including requests:
In the Deviation Detail (both New and View), if the current SLM (Payroll Component) has a break mode set in Slm01, Attendance & External Inputs, the following items are displayed
Break time on the first day
Break time on the last day
(displayed in the same way as in Dcm01, Inputs – Summary).
If the vacation consumption mode = 7, the period is 2021-01 or later, and the balance from the previous year in shifts (Dov01) > 0, the following items are displayed:
Entitlement from the previous year in shifts – from Dov01; vacation balance from the previous year in shifts
Balance in shifts – vacation balance in shifts from the previous year or the period February–December: as of the last day of the previous month, for January as of the first day of the period, reduced by the number of vacation shifts taken, up to the amount of the balance
“Consumption and balance do not include the current deviation”
For Vacation mode 7, in the request detail an explanatory message is displayed, indicating that the current request is not included in the consumption statistics.
In Dov16, the field SLM Group is
additionally displayed to indicate in which format the deviation is entered.

or

or for Payroll Component with approved attachment:

Buttons [Change Attachment], [Delete Attachment], and [Attachment] – used to add or update a document for an SLM (Payroll Component). These buttons are displayed only for SLMs defined in Adm14 with Workflow Action = 15, and for SLMs listed for optional/mandatory attachment upload in Dov05, Dcu06 (see Dov_uzdoc, chapter 3.5 Dov05).
In the dialog for creating a new request, when the From Date is entered, the To Date is automatically pre-filled with the same value. The user can then adjust the To Date as needed.
In the Update Request dialog:
a) If the original From Date = original To Date and the user changes the From Date, the To Date is also updated.
b) If the original From Date ≠ original To Date and the user changes the From Date, the To Date is updated only if the original To Date is earlier than the new From Date.
4.3.3.11 Editační formulář – Plán směn
For displaying the employee shift plan record. By default, this is for view only.
Edit mode (to update the Pattern Day field) can be enabled for a user (profile) by assigning the object right Dcu06editPlSmen.
See also the conditions and restrictions for the Shift Plan in Dov16.
Conditions for enabling edit mode:
- Dcu06 is in read/write mode
- Attendance and period are not closed.
- Dcu06editPlSmen = Allowed to Run.
- The row is not locked for the current user (see Dcd01, Inputs, Header)
The availability of SLM (Payroll Components) for the plan can be restricted based on the configuration in Adm06, SLM group 42.

Code list for the field Pattern Day:
The code list is the same as in Dcd01, Inputs, Header (valid VZD, possibly restricted according to row-level rights for VZD).
Buttons on form:
[Save] – saves the performed changes.
The corresponding fields are filled according to the selected VZD.
Prescribed validations are executed (see Dcd01, Inputs, Header).
The VZD code list may be restricted by row-level rights in the usual way.
[Close] – closes the planned shift for subordinate profiles.
(The button is displayed if the record is Open)
[Open] – opens the planned shift for subordinate profiles.
(The button is displayed if the record is Closed)
4.3.4 Bottom control line
Includes system and application buttons (see the general description), and functions related to form:
![]() [Open] - Opening a form for updating, availability and functionality
corresponds to a similar button on Dcd01
[Open] - Opening a form for updating, availability and functionality
corresponds to a similar button on Dcd01
![]() [Close] -
Closing form update functionality and availability corresponds to the [Transfer
and close] form Dcd01
[Close] -
Closing form update functionality and availability corresponds to the [Transfer
and close] form Dcd01
If the user has the right to object = Dcu06pocitaj, the calculation is performed immediately after save (can lower the performance).
If the DP012 check is active, and if the previous period is not closed, a dialog will be displayed:
Previous period 2018-10 is not closed yet. Continue?
and the next step is determined by this choice (for more details, see Doch_uzdoc description).
Note: When employee is not accessible in attendance (Opv01/Mode tab), buttons Open / Close are not available.
Additional right: Dcu06ZakazUzavrit – remove the buttons for this form.
![]() [Daily Recap] -, table overview by days. Same
content as Dcd01 tab.
[Daily Recap] -, table overview by days. Same
content as Dcd01 tab.
![]() The [WC
Recap] feature allows for a tabular overview of reported times according to WC,
identical in content to the form Dcd01. This function is accessible when the
user has the object right Dcu06RekSLMDD.
The [WC
Recap] feature allows for a tabular overview of reported times according to WC,
identical in content to the form Dcd01. This function is accessible when the
user has the object right Dcu06RekSLMDD.
![]() [Monthly
inputs] allow you to view the contents in the tabular overview of the current
monthly attendance records (see. Dcu07 description, button [Inputs]).
[Monthly
inputs] allow you to view the contents in the tabular overview of the current
monthly attendance records (see. Dcu07 description, button [Inputs]).
![]() [Protocol] - Display Monthly Report from the Last Calculation or
Attendance Closure (corresponding to the Dcm01, Protocol tab)
[Protocol] - Display Monthly Report from the Last Calculation or
Attendance Closure (corresponding to the Dcm01, Protocol tab)
The function is tied to object permissions and is not automatically included in any standard roles.
[Help] button.
If you select the desired line in the report with the cursor and then use the [Help] button, the system will open the document Hlas_uzdoc in the appropriate language version and search for the description of the selected report.
If the report is found, the cursor in the document will be positioned at the found description. If the report is not found, the document will remain open at the beginning. You can then attempt to manually locate the required report.
![]() [Calculation] - start the calculation process of the daily and monthly
attendance records.
[Calculation] - start the calculation process of the daily and monthly
attendance records.
The button appears only when automatic mode (Dcu06pocitaj) will not be set.
![]() [Delete
Month] allows you to delete all daily attendance records for the current period
and employee (button only appears when also [Close] button is displayed, and
the user has right to this function).
[Delete
Month] allows you to delete all daily attendance records for the current period
and employee (button only appears when also [Close] button is displayed, and
the user has right to this function).
Confirmation dialog is displayed when pressed.
![]() [Run
Report] - run a report for a description of the current attendance data
[Run
Report] - run a report for a description of the current attendance data
The default report is Dcd18 or its customer clone.
The icon appears only when this report is accessible due to user rights.
![]() [Generate SLM by template] - KB customer function. By default, the Generate SLM according to template. The icon is
displayed only if the conditions for its display are met. For a detailed
description, see the description of the Doch_dopl_uzdoc form, chapter of the SLM generation function,
template
[Generate SLM by template] - KB customer function. By default, the Generate SLM according to template. The icon is
displayed only if the conditions for its display are met. For a detailed
description, see the description of the Doch_dopl_uzdoc form, chapter of the SLM generation function,
template
4.3.5 Left panel - Overview of attendance status
The panel includes blocks of data, statuses and statistics for the displayed period.
Panel is in "permanent open" mode, when opened - it is different against navigation list and similar vacation (Dov16) left panel.
The individual sub-panels are opened / closed as it was during last closing of the panel.
Some parts are displayed conditionally according to current employee data.
Attendance records status
Period - the current displayed period
Pay day status - pay day status for whole Internal Unit (IU)
Edit state - employee monthly attendance status
Closed by - identification of the user who last performed closing
Personal data
View the current state of selected personal data
Legal relation type
Employment starting date
Employment termination date
Manager OS (Employee's manager - same as in Opv01 header; structure 2 or other by Adm21/Conf.par.)
Fulfilment of monthly working time fund
Planned fund of working time - the sum of planned shifts in a month
Reported time into fund
When status is closed - the sum of hours to fund from monthly attendance records
When status is open - the sum of hours to fund from daily attendance records
The hours from the WCode from the includability DOCH02.ODPR + NEPR + NVC will be counted in.
The balance of Working Time Fund (WTF) fulfilment
= ("Recognised time to fund monthly" minus "Planned fund to month)
Subsection "Monthly Limits and Fulfilling WHF for Part-Time Employment"
Established WHF: Agreed
WHF / Opv01, Description, Employment Coefficient
(rounded to 2 decimal places)
Weekly: Opv01, Description, Established weekly employment:
Difference to Fulfill Established WHF: PLSTFPD
Agreed FPD: Sum of planned shifts from the work calendar for ER and period
Weekly: Opv01, Description, Agreed weekly employment:
Difference to Fulfill Agreed FPD: Reported time into the fund - Agreed FPD
Reported overtime hours: Sum of reported hours on SLM with IA 1003
Reported extra hours: Sum of reported hours on SLM with IA 1111
Monitored WCode status
(see description of Dcm01, monthly header)
Annual limit paid overtime
Act. drawing of paid overtime
Act. balance of leave of absence
Leave of absence to payment in the current period
Act. balance of leave of absence for worked holiday
Leave of absence - holiday to payment in the current period
Annual limit standby hours
Act. report of standby hours
The item "Current Overtime balance" is recalculated at the end of attendance calculation or when using the Dcm01 function, Monthly Header Update.
Vacation status
Content and description same as for form Dov16 (see description)
Monthly recapitulation according to WCode
Recap of the actual attendance records by WCode (code and name) in the structure:
WCode, Name, Hours, Shifts, Amount
If attendance is closed - from monthly attendance records
If attendance is opened - from daily attendance records
Calendar
Current working time fund calendar is in the title bar
History is in the table.
Approver: - see description for Dov16
Substitute of approver: - see description for Dov16
Time off: <period from>-<period to><WCode>
The current balance of the monitored work leave (for each WCode in Dov02)
For each valid limit in Dov02 is showed one row in menu and after clicking there is:
Consumption mode - in shifts / in hours – according to the consumption mode tied to SLM
WC Code - code of WC
Name - name of WC
From - the period of the start of validity for WC limits
To - the period of the end of validity for WC limits
Entitlement - a claim by Dov02 for the current period (for the range of the period in which is the current period)
Drawing - utilization within the current period range
Balance - balance for the current period range
Shown month - drawing in the displayed month
Note: The validity of the entitlement is tied to the day of the deviation's OD - request
Beware: the data is dependent on the status of current period from payroll perspective.
The data is displayed as follows:
a/ for closed periods according to payroll records
b/ for open periods, the data is based on the status of the last closed payroll period, and the open period is calculated based on attendance records
On Slm02 is the includability "Dov16Dcu06" - "Exceptions for Dov16, Dcu06"
and in it the group "stavyA26". Meaning: "Do not show these WCodes with IA 26 in Dov16 / Dcu06"
The WCodes listed here are not included in the Dov16 / Dcu06 time off display table.
Leave of Absence for [SK] legislation according to Dov02:
Three lines are displayed in the format: yyyy-mm – yyyy-mm SLM – WGC name
They are not displayed for CZ legislation.
Only in SK legislation mode are the current entitlements and remaining balances displayed for SLMs monitored in Dov02 on the "Leave of Absence Limit" tab. These are leave-of-absence records reported using SLMs with the following IAs:
63 - Doctor Visit with an annual limit of 7 days – SK
64 - Accompanying a Family Member with an annual limit of 7 days – SK
65 - Accompanying a Disabled Child with an annual limit of 10 days – SK
4.3.6 Right panel - Navigation list
A special navigation list for the Dcu06 object is used, displaying employment relationships (ER) according to the methodology for the navigation list type ER. This navigation list does not have an alternative display and does not support standard selection functions. The title of the navigation list shows the number of displayed ERs (after applying a filter, also the total number of ERs).
Row rights for the navigation list are always evaluated based on the reference day (current calendar day) at login, both when opening the form and when changing the profile.
When the displayed period is changed, the navigation list is not updated and always displays a list of ERs valid for the reference period or one month back (the list of ERs is the same regardless of the selected period for displaying data).
The content of the navigation list does not update even after using the [Close]/[Open] buttons for an individual employee or for the mass version of these functions.
Limiting the display of ERs in the navigation list can be done by checking the options: Only Valid and Only ATTEND
Only Valid – corresponds to the option Just valid (RD+1 month) of the standard navigation list ERs
Only ATTEND – displays ERs according to the methodology for the standard navigation list of attendance windows - PvDoch.
Buttons from the group of predefined filters (from the [Functions and Selections] button menu) allow the navigation list to be limited to ERs meeting a predefined condition. If the condition allows parameter entry via dialogue, it is always a selection of a single value of the required type (a list of values cannot be defined).
Repeated use of the filter requires repeated parameter entry.
Displayed items in the navigation list include:
Personal ID, Surname, First name
Type of legal relationship - Opv01, Type of legal relationship
Code of the relevant JPC catalogue.
A tooltip can display the full name of the status item.
If the abbreviation is not filled in, the full name of the status item is displayed.
Coloring and font style use same rules as Pkz01:
- a standard employee is shown in black (this is a Legal relation type 1,21,22,31,52)
- an employee who is not in the reference period for at least one day is shown in italics
- agreement staff (Legal relation type 6,7,8,9,12,32,33) are displayed in dark brown
- employees with other employment (Status and Legal relation type), without filling in the kind are shown in a dark blue color
4.3.6.1 Navigation List - Opening
(TC 1142337)
Loading the navigation list and checking the employee record (ER) from the URL link used to open the Dcu06 form.
This action is performed in the following steps:
- Check the ER against the navigation list. If it is not found, continue with step 2. Using only step 1 causes issues when filters are applied, therefore an additional search is performed if the ER is not found.
- Check the ER against the fully loaded ER list. If the list has not yet been loaded, continue with step 3. The loading of the complete ER list is performed in the background so that the application is not slowed down.
- ER check - an SQL query is always executed for the specific ER. If the ER is accessible through the SQL query, one row is returned; otherwise, no row is returned. This is faster than loading the entire list of accessible ERs.
4.3.6.2 Navigation menu – output or exclusion to out-of-period state
By default, the navigation menu for the Dcu06 form is created from valid employment based on the reference date (regardless of the displayed period). This means that employments are not displayed unless they are valid for the current reference date.
Example:
If an employment is terminated on April 27, 2023, and the Dcu06 form is opened on May 2, 2023, the period displayed is April 2023, but the employment will no longer appear in the navigation menu.
It is possible to adjust the display of the navigation menu in terms of including employments. If the setting for the Dcu06 item - loading the navigation menu based on the current period in Adm21, HR Portal tab, Dcu06 section - is: Yes - the navigation menu will be populated with employments valid for the displayed period (standard DOCH)No or blank - the navigation menu will be populated with employments valid for the reference period
By default, the parameter is not set, so employments are included in the navigation menu based on their validity for the reference date.
4.3.6.3 Navigation List - Invalid Employee (ER) for the Current Period
If the First ER in the Navigation List of Dcu06 is an "Invalid" ER for the Current Period, system response for such situation is move the cursor to the nearest valid ER.
The same procedure is applied in the situation where the content of the navigation list changes, i.e., for example, after a change of period or the application of a filter, the current PV is no longer valid or unavailable – meaning the cursor will be set to the first 'valid' PV for the period or the first valid PV after the current PV before the navigation list change.
If there are no other valid ERs in the current navigation list, the system will display the corresponding information and switch to the next period.
Procedure if the Navigation List is Lost When Reporting "Invalid ER":
a/ After displaying the "Invalid
ER" message, e.g., for the period 2024-05, click OK.
b/ Switch to the following period, in this example, 2024-06.
c/ In the navigation list for 2024-06, set the cursor to another valid ER.
d/ Return to the current period, i.e., 2024-05.
System Response When an Invalid ER is Selected from the Dcu06 Navigation List for the Current Period
If a user selects a ER from the Dcu06 navigation list that is not valid for the current period (for any reason, such as changes in the assignment of ER to an organizational structure that is not allowed for the current user), the system displays the following message:
“??? OSČPV <osčpv> is not available for the current user in the period <period>”
After the user acknowledges the message, the system automatically resets to the last valid period for the affected ER and user.
4.3.6.4 Navigation List – Empty List After Applying a Filter
In version e202401, optimization was implemented for displaying the navigation list in HRP client forms, which automatically hides the navigation list if it is empty or contains only the current PV. Re-displaying the navigation list is not straightforward, which causes issues when a filter is applied that returns an empty list. Due to technological reasons, reverting to the previous solution is no longer possible.
Therefore, we have added a new button “Cancel Selection/Filter” to the Dcu06 form (with permission to hide: Dcu06SkryZrusFiltr - Dcu06, Hide button “Cancel Selection/Filter”). The button is typically displayed only when a filter selection is active.
Button Functionality - Cancels the current selection/filter and refreshes the navigation list.
4.3.7 Entering attendance
There are two processes for entering attendance: a new entry or edit entry.
Their accessibility is controlled by:
· Status of the pay day (=period =month)
· Edit state - employee monthly attendance status
The ability to edit is controlled in the same manner as the entire attendance area, meaning it is not possible to edit if the attendance period is closed, if the employee's attendance is closed, or if the current record is closed.
The procedure to insert a new record:
- user clicks into the unoccupied part of the calendar cell or clicks a drag cursor to mark more cells
- When the New Record form is automatically displayed with the option to enter WC (if the form was activated by mistake, simply click outside the calendar area) in the Wage Component Choice field. For a monthly format with single-day entry and daily attendance format, the WC catalog includes all SLMs configured for the Dcu06 and Dov05 forms (see Adm06, groups 7, 8, 17, 18, 22, 23, 24, 25, 26, 33). For a monthly format with multi-day entry, the WC catalog includes WCs configured for the Dcu06 and Dov05 forms but is limited to groups 7, 17, 18, 24, 25, 26, 33. For a weekly or daily format, the WC catalog contains WCs configured for the Dcu06 and Dov05 forms limited to groups 8, 22, 23.
- Upon selecting or entering the WC, a table
of options on how to apply the chosen WC will be displayed (see below).
The standard WC list according to permissions may be further restricted by additional configurations (e.g., according to the Type of Employment Relationship). - After selecting one of the options, a form appears containing fields and controls corresponding to the chosen method of entry. Some fields (date, from/to date, etc.) are automatically pre-filled. The WC field is non-editable to ensure that there is no change to the WC with a different format than requested.
- The user fills in the fields as deemed necessary and completes the entry with the appropriate control button (see chapter Editing dialog forms) and Save the date (or Send request).
Note:
Vacation plan entries is possible to enter via Dov16 - Vacation form only (or Dcp01, Dcp02)
Wage code groups
Note: user with Dcu06_inspektor see also the number of group when choosing the editing dialog form.
The method for entering WC (wage component) is determined by its classification into what are known as WC groups (see WC Configuration). If the WC is found in multiple groups, a table of options limited by the occurrence of WC will be displayed. If the WC is found only in one group, the corresponding form will automatically open.
The first line displays the name of the group, and the following lines feature buttons. The corresponding WC group according to Adm06 is indicated in parentheses.
|
Approved
inputs |
Full day s and multi-day entries (Dcm01) |
Overnight
inputs |
|
date from / into a half days (7) |
date from / to (24) |
date and time from / to (22) |
|
date and time from / to (8) |
date from / into a half days (25) |
date and shift or hours (23) |
|
date from / to (17) |
date from / to time and from / to (26) |
|
|
date from / to a time from / to (18) |
date and shifts or hours |
Approved entries - depend on workflow setting (Adm14 - workflow 15)
The procedure for editing the record:
- Just click the desired record and edit (when all conditions to edit are fulfilled)
- WCode you can change only inside the same group. To change group, you should delete and insert the record.
Comment:
SLM Group 33:
If only the Hours item is filled in (without filling in the Date From / To items), these are automatically overwritten in the Hours off item as well.
The code list for the SLM item contains all SLMs from the same group as the original SLM record, ie. that within a record, SLM can only be changed within a group.
If the record is created within a fat client or from pass processing, the form is used:
From the daily attendance record, source 13, 14 - in mode 23
From daily attendance records, other sources - in mode 22
From the monthly attendance register, source 20, 24 - in mode 26
From monthly attendance records, other sources - in mode 25
Options for changing the beginning and end of the approved deviation.
It is not possible to change the date from / to on HRP (Dov16, Dcu06) for approved deviations, it is possible on Dov05 / Dcu06.
Therefore, to change the beginning and end of the approved derogation, it is recommended to cancel the original application and create a new one, which is a very simple process for the portal.
see before - Dov16
4.3.8 Entering attendance – bulk deviation
This section defines the technical workflow for the entry and processing of deviations used in bulk generation scenarios. The user procedure is described in the section Bulk Deviation Entry Based on a Template
Identification of a Bulk Request for Dcu06:
If an authorized user submits a bulk request using SLM (SLM from group 42), the request is marked as a bulk deviation template for generation for the affected employment relationships
(Additional source = 40 – Dcu06, bulk deviation template).
The request is marked under the following conditions:
a) the customer is authorized to use the Bulk Vacation Generation function
b) the user has the permission Adm04, with Dcu06GenHromSLM = Allowed to execute
Dcu06 and Bulk Request:
If a user enters or views a request in Bulk Request mode, the set of available buttons changes.
Depending on the request status, the following buttons are displayed:
[Save Bulk Deviation Template] button
Replaces the standard [Save] button.
Availability is subject to the same conditions as [Save].
Displayed only if the request is an SLM in Bulk Request mode.
When selected, the record is saved as a template for bulk requests
(Additional source = 40 – Dcu06, bulk deviation template).
The deviation may be either approval-required or non-approval-required.
[Submit] button
Replaces the standard [Submit for Approval] button.
Availability is subject to the same conditions as [Submit for Approval].
May be used for both approval-required and non-approval-required deviations.
Displayed only if the request is an SLM in Bulk Request mode.
For WC, entry of a note is mandatory.
If the request is non-approval-required:
The record is marked as if it were approved, using the approved deviation workflow.
If the request is approval-required:
The note is copied from the Form into the WFL Note.
The following text is appended to the WFL Note:
Bulk absence <WC – code name> from <date> to <date>
All functions and validations applicable to [Submit for Approval] are executed.
[Generate Bulk Deviation] button
The button is displayed on the EDIT form if the WC belongs to group 42, is in the Approved request status (23), and Additional source = 40.
Upon activation, an approved deviation is generated based on the approved bulk deviation template for each affected employment relationship (i.e. for all employment relationships included in the working set).
The function may be executed after approval of an approval-required deviation, as well as for a non-approval-required deviation.
After activation, the following dialog is displayed:
Is a working set defined for bulk deviation generation?
Do you want to proceed with generating WC <code – name> from <from> to <to> for all ER records in the working set?
Buttons: [Continue] / [Cancel]
If the user selects [Continue], the current record is copied for all affected ER included in the working set.
Copying Procedure
The log is opened and the following information is written to the log:
Working set status – identification of the active filter
DT007 UZIV, WARN, "Working set filter <filter>"
Template settings
DT007a UZIV, INFO, "WC deviation template <wc> from <from> to <to>"
Identification of the current user
DT007b UZIV, INFO, "User identification <login>"
A list of ER is created for bulk generation based on the current working set.
For each employment relationship in the list, the following steps are performed:
· A check is performed to verify whether the affected employment relationship is active on the day(s) specified in the deviation.
If not, the
following message is logged: DT006a [U] [ERR] <empRelId> not valid for
deviation, valid <hire date> / <termination date>
Processing continues with the next ER.
·
A check is performed to
verify whether the affected ER is not in an out-of-record status. If a record
is found in exclusion for the entire period (excluding exclusion of type 42),
the following message is logged: DT006b [U] [ERR] <ER> in out-of-record
status, exclusion <from> / <to>
Processing continues with the next ER.
·
A copy of the template is
created, including references to the original record (template) and references
to the approval workflow (WFL). The new copy is marked with Additional source =
41.
Generated records can subsequently be processed using the standard WFL process
(cancellation, deletion).
·
The new record is
recalculated based on the current ER and calendar
Calculation messages are written to the log.
If any message with FAT severity occurs, processing continues with the next ER.
For non-approval-required inputs, the record is temporarily set as
approval-required prior to hours/shift calculation and reset to its original
value after calculation.
·
WC-specific validations are
performed in the same manner as during standard deviation saving for the given
WC. Validation messages are written to the log (see list of validations below).
If any message with FAT severity occurs, processing continues with the next ER.
·
If all validations pass
successfully, the record is saved and the following message is displayed:
DT006c [U] [INF] <ER> Deviation generated
· If DT006d > 0, a notification is sent to the affected ER regarding the generation of the bulk WC.
- The notification message is identical to the notification used when approving a deviation within the standard WFL process.
DT006d [U] [O] Permission for notification of bulk deviation generation
Notification of bulk request generation is not performed by default.
· After successful completion of the generation process, the template record (Additional source = 40) is updated to Additional source = 42.
[Delete Bulk Deviations for All ER] button
Replaces the standard [Delete] button.
The button is displayed for WC from group 42 in Bulk Request mode for users with the permission Dcu06GenHromSLMDel.
Description:
· First, a confirmation dialog is displayed.
· The user performing the bulk deletion is identified and logged.
· Subsequently, all records within the period with the given WC from the current period are deleted, provided theyhave the same WFL identification as the current record, and have Additional source = 40, 41, or 42.
·
Deletion of each record is
logged with the following message (if DT006e > 0):
DT006e [U] [INF] <ER>, deleted WC <wc> from <date from> to
<date to>
[Withdraw Request] and [Reject Request] buttons
For WC from group
42 in Approved request status (23) with Additional source = 40,
these buttons are not displayed.
4.3.8.1 List of Validations During Bulk Deviation Generation for ER
For non-approval-required inputs, the following validations are applied:
- DH01 – public holiday validation within the deviation
- DT001 – reported hours in an invalid duration
- DW02 – monthly deviation including a public holiday
- DT006g – balance validation
For approval-required inputs, the following validations are applied:
- Overlap in Dcm
- DD177 – NV validations
- DK039 – WC usage permitted only after vacation entitlement is exhausted
- DW01 – validation of public holiday usage within the deviation
- DW02 – monthly deviation including a public holiday
- SCH01 – valid ER for attendance
- SCH05 – free days validation
- SCH06 – absence validation against a planned shift
- DT006g – balance validation
4.3.9 Technological and operational information Dcu06
4.3.9.1 The reference period / date
By default, a user of type EMP or MNG is not allowed to select a reference period and is always logged in, based on the profile type, with a reference date or period corresponding to the current calendar day.
The reference date/period is decisive for the majority of attendance functions.
For users with a profile with Own Person rights, or for users restricted to a single SO, the reference date is determined differently if Vyp02 / Description / Input Blocking Day is specified.
In this case, up to the blocking day, the previous month is set as the reference period.
In cases where a return to the previous period is unavoidable (e.g. attendance closing on the first day of the following month), a function available in the Settings menu allows the reference period for the Dcu06 form to be reset to the previous month. As this operation requires an update of period-dependent data structures, the response time of this function may be longer, particularly for customers with a larger number of ER).
Reference period – previous month – changes the reference period to the previous month and the reference date to the last day of the previous month. The shift is possible only by one month relative to the current calendar day. After the reference period is changed, all relevant data bound to the reference period are updated (working set, attendance records displayed in the calendar, content of the left panel).
Reference period – current month – returns to the reference period corresponding to the current calendar day and subsequently updates the displayed data.
- The same actions as described above are performed, but for the reference period derived from login
4.3.9.2 WGC Code List Update When Changing Profiles
(TC 1145075)
When changing the profile in the Dov16 and Dcu06 forms without logging out of the application, the stored (cached) code lists are refreshed according to the permissions of the currently selected profile each time the profile is changed.
For example, the SLM code list is updated to reflect the state and permissions defined by the newly selected profile.
4.3.9.3 Controlling access to forms
Invalid employment for the period
If the current employment is not valid whole period, attendance forms will be in read-only mode.
Invalid employment for attendance
If the current ER is not valid for attendance (Opv01, Mode, ER available in attendance = 0), only records with WC from approval processing (groups 7, 17, 8, 18) can be entered, and standard attendance functions cannot be used
ER in out-of-record status
For an employee with attendance permission mode = 1 who is in an out-of-record status for the entire period, the Dcu06 form has the following restrictions:
It is not possible to insert a record.
It is not possible to initiate closing from the form.
If the bulk closing function is used, the following message is displayed in the log:
Cannot close, out-of-record status
4.3.9.4 Controlling access to records
The Dcu06 form uses the same method for controlling access to individual records according to the defined level of the user profile (Adm02), which is used for the Dcd01 or Dcm01 forms (applied for records with WC from groups 22-26), i.e.
a) any editing of a record will automatically close the record for users with a lower level (e.g., an employee cannot edit a record taken/edited by a manager)
b) making the record available for editing by users with a lower level can be done by a user (of the same or higher level than the user who last made the update) by pressing the [Open] button on the editing form
c) prohibiting the editing of a record for users with a lower level, can be done by a user (of the same or higher level than the user who last updated) by pressing the [Close] button on the editing form
4.3.9.5 Assignment of structures to DOCH input
(TC 1100504)
If employees, in addition to working at their workplace (department), can be sent to work in another department (department) under a different manager, then this work needs to be recorded separately, but within one time sheet.
In addition to the deviation standard, for the work performed in this way, it is also necessary to record the classification into structures (there may be more).
The structures assigned in this way should also be transferred to the calculation of wages and, by agreement, should be displayed in the relevant forms and reports.
For these situations, it is possible to add a configuration linked to the profile for the Dcu06 form, which will allow the specified SLMs to be supplemented with permitted structures with mandatory or optional filling.
The function is bound to the current profile by assigning the object rights Dcu06Structura1, Dcu06Structura2 or Dcu06Structura3.
The selection of WC is determined by including the concerned WC in the group SLM Adm06 - 37, 38.
Before using the function for the first time, the following must be done:
a) configuration of the affected profiles - assignment of rights
b) for the affected WCs, define their inclusion in Adm06 in SLM groups 37 and 38
c) in the item list Dcc08 define which and how to use structures on Dcu06
Entering a new deviation with the assignment of structures.
In the standard way, we enter the deviation on the WC with the display of structures enabled.
After selecting the WC and the entry method, we find out whether the object right Dcu06Struktura1, Dcu06Struktura2 or Dcu06Struktura3 exists for the user and whether the WC is from the WC group Adm06 - 37, 38.
If both conditions are not met, a standard deviation entry form will be displayed.
If both conditions are met, we will display one to three lines for entering the structure under the Note field.
We check whether there is a valid time slice for individual rows of structures in the Dcc08 codebook.
According to the act. setting the Dcc08 dial, we display a line with items:
Name – Name of the structure (according to Dcc08 or Str01)
Assignment - field for assigning a structure element to a structure element,
code list of elements for the type of structure with restrictions according to the rights of the actual user
When saving (sending) a new deviation:
If the WC is from the Adm06/38 group (obligation to fill in the structure), we check whether the user has filled in the mandatory structures.
If at least one of the mandatory structures is not filled in, the user is returned to editing for completion.
The assigned structures are then stored in the standard tables after saving the structures to record from Dcd01 or Dcm01.
View/update an existing variance
A similar procedure as for a new deviation, only instead of selecting the date and WC deviation, these parameters are determined by selecting an existing deviation and the structure items are filled according to the current state of the assigned structures.
When saving (sending):
If the WC is from the Adm06/38 group (obligation to fill in the structure), we check whether the user has filled in the mandatory structures.
If at least one of the mandatory structures is not filled in, the user is returned to editing mode for completion.
The associated structures are then saved/updated to the standard tables after saving the structures to record from Dcd01 or Dcm01.
4.3.9.6 WC Input Edit Configuration
As required, editing restrictions may be applied on the Dcu06 form for designated non-editable WC (from Adm06 groups 22 to 26).
If a WC is assigned only to Adm06 group 29 or 30, the row is displayed on Dcu06 in read-only mode and cannot be updated or deleted. It is also not possible to create a new row with a WC from group 29 or 30. If a WC is simultaneously assigned to groups 22–26 and groups 29–30, the higher permission applies (editing and entry). In this case, the row with such WC is editable.
WC from
groups 29/30 are not displayed in the WC code list for the new dialog.
Rows with WC from group 29 are displayed as WC from group 22.
Rows with WC from group 30 are displayed as WC from group 25.
4.3.9.7 Dcu06 – Plan of vacation
For inserting and editing an existing record from the plan (Dcp01, Dov16 Plan) in Dcu06 is definitely right Dcu06PlanEdit.
If Dcu06PlanEdit <> Is allowed to run – records from the plan of absence are only displayed and it is not possible to insert them
If Dcu06PlanEdit = Is allowed to run – records from the plan of absence is possible to insert and edit (under the same conditions as in Dov16plan).
After marking the day for deviation it is displayed the entry form and also if the profile has the right of insert the plan of absence (Adm06, the group 36), in the options of choice in the column „Approved iputs/plan“ there is displayed the choice „Date from/to and halfdays – plan (36)“.
Then proceed as usual.
4.3.9.8 The same controls are executed (as in Dov16, Plan) when saving.Records Dcu06 and connection attachment
The records from daily attandance (mode input 22, 23) we do not allow attachment.
The records from not approved monthly divergence (mode input 24, 25, 26) – there is configuration of help Adm06 34/35.
For approved monthly divergence (mode input 7, 8, 17, 18) there is configuration of help Adm14, see description in Dov_uzdov, the chapter: Workflow 15-20 – attachment option.
4.3.9.9 Drawing of vacation in hours on Dov16/Dcu06
For drawing of vacation’s balance in hours (for holiday mode = 7) – entering on the form Dov16 or Dcu06 is the mode of entering:
If there is chosen WCodes with IA 21 and with settings Slm01 on Dov16/Dcu06, Wage code processing type – refinement = 7 and mode of vacation drawing is 7:
- so it is automatically used mode 8 for approved and 26 for unapproved deviations
- in this case there is not set automatically the start date from/to according to scheduled shifts
In context of user’s requirement user fills in the start or the end of deviation.
In the process of saving procedure:
If there isn’t filled in Time from – it sets the start of shift
If there isn’t filled in Time to
there is found out the balance of vacation in hours
if the vacation’s balance is bigger or equal then scheduled shift,
there is displayed notification:
The vacation’s balance in hours is bigger then scheduled shift, WCode <> you cannot use”
and we will return to editing
if the vacation’s balance is smaller then scheduler shift,
there is set Time to = Time from + vacation’s balance
and we continue in the standard way
If it is a standard vacation that is longer than the planned shift, the following message is displayed:
DK240f [U] [FAT] SLM %1, on %2 hours %3 in an invalid length, max. %4!
If it is a carry-over vacation that is longer than the planned shift, the following message is displayed:
DK240fg [U] [VAR] SLM %1, on %2 hours %3 in a different length, shift %4!
4.3.9.10 Limited check and calculation - WCs from group 33
Group 33 - SlmDoch2e - Single day inputs Att.-calendar - with hours/shifts (without approval)
Only SLMs with IA (Internal Article) numbers 62, 63, 64, 65, 950, 1003, 1111, 1113, 1114, 1135, 1154, 2131, 2132, and 5101 to 5104 are accepted.
When inserting an unapproved record into Dcu06, for SLMs from group 33, no check is conducted for the existence of other records in the daily attendance log. This means that the following dialog will not appear:
"Current record overlaps with a daily attendance log record. Should the conflicting records (1) DD be deleted?"
In this case, the record is always saved.
For records with WCs from groups 24, 25, and 26, the dialog will be displayed.
For the Dcu06 form:
The "DH02 Check for WC on Allowed Day" is not conducted for WCs from group 33.
For entries from the daily record, there is a 24-hour limit. If more than 24 hours are reported, the following message will be displayed:
DT001[E][FATAL] “Reported hours in unacceptable duration %1 hrs (max. %2 hrs).”
For entries from the monthly record, there is a 150-hour limit. If more than 150 hours are reported, the following warning message will be shown:
DT001a[E][WARN] “Reported hours in unacceptable duration %1 hrs (max. %2 hrs).”
In Dcd01:
WCs from group 33 that are entered in Dcu06 are not transferred to the daily attendance forms Dcd01/Dcu01, nor to any objects (forms and reports) that work with so-called virtual entries based on daily attendance records. This means that these specific WC entries are effectively isolated from the standard daily attendance tracking and reporting mechanisms, ensuring they are handled differently within the system's overall data processing and visualization structure.
During the closing of attendance tracking:
For entries made in Dcu06 with WCs from group 33, a control recalculation of the monthly record entry is not performed (restriction in DME023 control).
Note on settings in Slm01:
WCs from group 33 must have the default time code B set. This ensures that these specific WC entries follow a particular handling procedure that is predefined and distinct from other groups, aligning with their unique requirements and regulations.
4.3.9.11 Dcu06, Approved WC – HO type (TC 1114784)
Function for the Dcu06 Form that allows the display of work items for entering the work location and description of work performance when entering an WC of type HO (Home Office). These details will then be sent within the approval workflow to the approver.
On the input form for the approved deviation of type "work from home" (WC defined by configuration), two "note" items will be displayed without a reference to the dictionary, with configurable titles and an option to make them mandatory to fill in.
These notes will be transferred to the workflow notes for the approver when the request is submitted for approval.
Description:
When the user enters "Home Office" (WC) on the Dcu06 form, a detailed entry form will appear, containing the following items:
Work location – address:
Description of work – reason:
The user will fill in the standard fields as usual and, in accordance with the employer's instructions, also complete the two note fields.
Upon saving/submitting the request:
a) A validation check will be performed for both note fields if their completion is mandatory (the content of the fields is not checked, only whether they are filled).
b) The note fields will be copied into the workflow note, which will be sent along with the request for approval to the manager (MNG).
Activation of function:
a) Define WC for the HO mode with a note
b) Object permission Dcu06PoznamkaSch12 – assign to all affected
profiles
c) Populate group Adm06/39 and assign it to the affected profiles
d) Slm01, Attendance & External Inputs – configure the labels for the Note
1 and Note 2 fields on the Dcu06 form for WC HO
4.3.9.12 Viewing the record in cell Calendar
Sort of the records in cell:
1. The shifts plan
2. The vacation plan
3. Approval inputs
4. External inputs from Cep01, Opv01, Vyp01 ...
5. Monthly records without approval
6. Daily records without approval
Note More week records continuation can be higher than via this sort order.
4.3.9.12.1 Daily record - view choice
To display an unapproved daily attendance record (WC groups 22, 23), two text display formats composed of record fields may be used within the calendar day cell.
The format is determined by the setting Attendance Row. If the value is set to No or is not specified, the following format is displayed:
Start time + (abbreviated name or name of WC) + recorded hours + “/” + number (fraction) of shifts
If the value is set to Yes, the following format is displayed:
Start time + End time + (abbreviated name or name of WC) + “/” + recorded hours
Example:
07:00 14:00 Worked / 6:30
4.3.9.12.2 Color marking of approved deviation
(TC 1100268)
If a SLM display other than the standard (green) is desired, a setting can be used:
a/ enable this option on the Adm21/Adm22 item form
Dcu06, Deviation background color deviation = 1
b/ on the Slm01 form, set for the affected WC in the item Color for displaying the SLM in the reports (hexa leading #):, the code of the desired color.
Note:
a/ We recommend that the chosen color and its shade do not clash with any of the standard colors used on the Dcu06 form
b/ The color set for SLM in this way will be used in all assemblies and objects that use this item.
Display on Dcu06
If Adm21/Adm22, Dcu06, Variant deviation background color = 1 and if Slm01, WC display color in reports is filled for the current WC, then this color is used for the approved deviation.
4.3.9.13 Editing form
Matrix to display the items in the editing form by group of WCode:
|
7 |
8 |
17 |
18 |
22 |
23 |
24 |
25 |
26 |
|
|
|
Date (By Date) |
x |
X |
x |
|
||||||
|
From the date) |
x |
X |
x |
X |
x |
x |
x |
|||
|
By date |
x |
X |
x |
X |
x |
x |
x (RO) |
|||
|
Half day From / To |
x |
x |
|
|||||||
|
Time From / To |
x |
x |
X |
x |
|
|||||
|
Hours |
x |
x |
||||||||
|
Shifts |
x |
x |
||||||||
|
Comment |
X |
x |
X |
x |
x |
x |
||||
|
|
||||||||||
|
New |
* 1 |
* 1 |
* 1 |
* 1 |
Save |
Save |
Save |
Save |
Save |
Save |
|
Edit |
* 1 |
* 1 |
* 1 |
* 1 |
Clear Save |
Clear Save |
Clear Save |
Clear Save |
Clear Save |
Clear Save |
1 - Approved input buttons and statuses:
|
Status of the |
Buttons |
|
|
New |
Submit for Approval Save |
|
|
0 - Established |
Submit for Approval Clear Save |
|
|
1 - Rejection |
Clear |
|
|
10 - Application for approval |
Download application Approve request Refuse an application Clear |
|
|
23 - Approved, profile ZAM |
Submit for Approval Download application Refuse an application |
|
|
23 - Approved, MNG profile |
Submit for Approval Download application Refuse an application |
4.3.9.14 Mass actions in form
The term bulk actions refers to the execution of an option selected from the Functions and Selections menu, from the Functions group (with a name containing “for all ER in the working set”). This means that the selected action is performed for each ER displayed in the working set.
Processing notes:
- In bulk actions, calculation/closing is not executed for ER that are not valid for attendance.
- Bulk actions (calculation/closing) respect the current state of the working set, i.e. any restrictions defined by filters are applied
4.3.9.15 Agreed WGC – with repeated request
For the Dcu06 form, it is possible to allow the entry of a single-day approved SLM (SLM groups 7, 8, 17, 18) with regular repetition for each subsequent same day until the selected period.
The repeated deviation mode is not allowed for Dov16. When approving a WC in repeated deviation mode, it will be approved as a standard deviation.
Within the Dcu06 form, when entering an agreed-upon single-day WC (according to configuration), an additional item will appear where the user will enter the period until which it should be repeated (by default, until the end of the year). For the manager, a single approval request will be sent - information about the repeated generation and the length of the repeated generation will be displayed in the "Notes for approver" field. After the manager's approval, the request will be duplicated for the required periods. Any corrections to this request will then be made for each record individually.
Note: For requests in this mode, the WC balances from Dov01/Dov02 are not currently handled.
When editing, a deviation without the "Repeat until period" field is displayed without the "Repeat until period" column and behaves as a deviation without repetition.
Generation on a Day Off and a Public Holiday:
Generation of a recurring approved deviation:
a/ if generation on a day off is required
b/ if generation on a public holiday is required
A new deviation is copied only if the given day is a working shift (P, P1) or a holiday working shift (S, S1). For other day types, the day is skipped and no new record is generated.
Description:
When a new single-day approved WC is entered (if the WC is from the Adm06/40
group),
The "Repeat until period" item will appear - a period type with a
period dictionary for the future.By default: not filled.
If the field is left empty (i.e. the period is not specified), the request will be approved as a standard deviation.
Not allowed to select or assign to the past — the system prevents the user from setting a value in the past relative to the current period in the Dcu06 form.
When SAVED, it checks that the deviation is for only one day - From_Date =
To_Date, if not:
the following message will be displayed:
DT005 [E]
[FAT] For the repeated generation mode, only a single-day deviation is allowed!
and the user is returned to editing.
When the request is sent, the text "Repeated {0} from {1} to {2}" will be saved in the WFL note.
When reopening the single-day approved WC (if the WC is from the Adm06/40 group):
The
"Repeat until period" item will appear.
The "Delete linked" button will appear – description below.
After changes and SAVED/SENT of the previously modified deviation,
a query will
be created to delete the linked (previously generated) records:
DT005a [E] [VAR] WC <> for <Start_Date> with repeated generation,
delete linked deviations?
If Yes - See Delete
If No - only one deviation will be modified.
After the request is approved, if the WC is from Adm06/40,
the approved deviation will be copied into each following “day” until the “day”
that exceeds the selected period.
The "Delete linked" button – deletes the current and
previously generated records.
After use, the following message will appear:
DT005b [E]
[VAR] For WC %1 with repeated generation, delete linked deviations from %2 to
%3?
After confirmation, the deviation on which the action was performed, along with
all other linked deviations, will be deleted.
Activation:
- Set WC for possible generation into Adm06/40
- Edit affected profiles – assign Adm06/40.
4.3.9.16 Bulk Deviation Entry Based on a Template
(TC 1120099)
For the Dcu06 form, a function is available for bulk generation of requests for designated ER based on a deviation template (e.g. vacation, time off). It is applicable to customer organizations both with and without the Attendance EGJE scope. Both approval-required and non-approval-required deviations may be used.
The function is linked to customer identification and is subject to a fee.
Note: This description is adapted to the conditions in MSK (for e202512). For other authorized customers, it must be updated.
Requirement defined for implementation:
- Creation of functionality that allows managers to enter vacation and time off for employees in bulk.
- Bulk entry for ER based on a selected element from structure 22, on which pedagogical and non-pedagogical employees are defined.
- Applicable only to ER in an employment relationship, active, without exclusion.
- The functionality is intended for managers in the HR Portal.
- The records are displayed in external inputs Vyp01.
The function is available only from the HRP
client – manager interface, provided the function is enabled for the user.
From the employee HRP interface, the functionality is not available.
The functionality is not available in the clerical interface (JAVA, WEB), as these do not provide the Dov16 and Dcu06 forms
4.3.9.16.1 Basic Solution Design
The solution is based on the Dcu06 form –
Attendance – Calendar.
The Dcu06 form, and thus the bulk deviation entry functionality, is available
only in the HRP client for the manager profile.
For the bulk version of WC, a separate WC must be used (for identification of processing and to distinguish it from the standard WC). In Adm06:
- the WC must be assigned to a standard WC group (for entry),
- and additionally, to group 42,
- and additionally, to a group with a note that is copied to the WFL note.
Configuration required for this customization:
Each ER must have the following parameter combination set in Opv01 / Mode:
- ER available in attendance = 1 – Yes, if not in MES, or 2 – Yes, including MES,
- Transfer of attendance to payroll = Yes.
Affected user profile:
- The manager profile used for bulk deviation entry has the Dcu06 form assigned (the Dcu06 form must be configured according to the current customer requirements for the profile).
- The HRP profile of the affected user must be configured so that the Attendance tile is available and includes the Dcu06 form.
- Structure 22 must be enabled for Attendance in Str01 / Structure Usage.
- To allow filtering by structure 22, each ER must have a direct or indirect link to this structure in Opv01 / Structures.
For bulk deviation entry, a separate WC
must always be defined.
The WC must be enabled and configured for attendance (configuration to the
necessary extent)
4.3.9.16.2 Procedure for an Authorized User (Manager or Clerk)
·
The
manager can enter a bulk absence on Dcu06 for WC with IA 21 and 26 (vacation,
time off) by selecting the defined WC during entry.
The form is available in the HRP interface under a separate tile “Attendance”.
·
The
user activates the Functions and Selections button and selects an option to
restrict the working set to ER for which bulk deviation generation is required.
Several options are available:
o “ER based on a saved selection” – restriction of the working set based on a previously created and saved filter; general use depending on available filters
o “ER for Bulk WC Generation” – displayed only if the user has the Dcu06GenHromSLM option; a special filter based on structure 22, where the customer maintains the division of employees into pedagogical and non-pedagogical staff
o Other filters available within the Dcu06 form
· If this step is not selected, the deviation will be generated for all valid ER in the working set.
• The user selects one suitable employee in the working set and inserts a record with a bulk WC (similar to Dov16).
• The record is
submitted using one of the following buttons:
[Save Bulk Deviation Template] (save draft),
[Cancel] (exit without generation),
[Submit] (send the record for formal approval).
· At this stage, the record is saved only for the affected employee (not for the entire working set).
· If the deviation is processed using the [Submit] button and it is an approval-required deviation, the process waits for approval.
· If the deviation is processed using the [Submit] button and it is a non-approval-required deviation, the process continues as if it were approved.
· If, for any reason, the working set is refreshed, the required restriction of the working set must be set again.
·
The
user opens the record serving as the template for the bulk deviation.
In the record edit window, the [Generate deviations for all ER] button is
displayed.
For each ER in the current working set, a copy of the template record is
created and saved for that ER.
• During insertion, the following checks are performed:
o ER validity and out-of-record status
o Relevant validations for saving a standard request
o Recalculation of deviation hours/shifts according to the current calendar for the ER
· If enabled, notifications about approval/insertion of the deviation are sent to each ER for which a generated deviation was created.
· Deletion of individual deviations follows the same rules as for standard deviations (except for the deviation used as the template, which cannot be deleted by a standard user).
· Bulk deletion is possible if the user has a special permission; from any bulk deviation record, all records created within the same template can be deleted.
· The manager does not perform attendance closing (unless the Attendance scope is implemented). Although the Dcu06 form is intended for attendance management, in this scenario the manager does not close attendance; Dcu06 is used solely for deviation entry
4.3.9.16.3 Procedure for a User of Type Employee or Unauthorized User
· The user will not work with the bulk deviation entry functionality but will have access to deviations generated by this functionality. The employee will not use the Dcu06 form (but will continue to use the Dov16 form as before).
· On the Dov16 form, the employee can enter approval-required deviations for vacation and time off (standard functionality) and can also request cancellation of entries originating from bulk generation.
4.3.9.16.4 Activation of the function
Creation of WC for bulk generation:
Creation and configuration of WC in Slm01
Assignment to accruals in Slm02 and DOCH02
Assignment in Adm06 to the group for entry, to group 42, and to the group requiring a mandatory note upon approval, depending on approval-required or non-approval-required mode
Adjustment of affected profiles:
Availability of Attendance / Dcu06 – configuration to the necessary extent
Assignment of object permissions Dcu06GenHromSLM and Dcu06GenHromSLMDel
In Adm32, configure the required levels for the affected messages
4.3.9.17 Checks and activities on Save
4.3.9.17.1 Restrictions and checks on Save
If, during saving, there are multiple relevant messages from active checks, the first message of FAT level is displayed, and the saving process is interrupted. If only messages of lower levels are identified, all of them will be displayed, and the user can decide how to proceed.
4.3.9.17.1.1 Restriction after changing the status by another user
When employee attendance is closed by another user or period starts to be closed, form doesn't allow saving. In the situation message appears: Illegal or closed period
4.3.9.17.1.2 Limitations when inserting more than 12 hours
If it is stored more than 12 hours to the daily attendance record (for Dcu06 it is an input from WC group 22.23) and is the hours directly entered by the user or calculated based on the specified time From / To. If WC internal algorithm is not 2121, 2122 message appears:
WAR: Record with more
than 12:00 hours, is it an error?" Store Yes/No.
In case more than 24 hours, the error message appears: ERR: Record of more than 24:00 hours!
The input cannot be saved.
4.3.9.17.1.3 Limitations when inserting more than 12 hours - for WC Leave of absence
The 12-hour limitation does not apply to WC of reimbursed Leave of absence from previous periods.
If you enter more than 12 hours for the WC input mode of group 23 (hours input) for WC with IA 1111 with the setting:
Slm01, Attend. & Ext. Inputs, Wage code processing type - refinement
= 6 - Payment of compensatory leave from previous periods
The record is usually entered on the last day of the period, with no time from/to.
Record hours may be up to the current positive balance of the NV.
Entering more hours follows the dialog:
"WC <WC Dcu> over limit by <hours Dcu06> hours. Maximum is <hours m.header> "
Attention:
Using WC with IA 1111 and Setting WC processing type - refinement = 6 is forbidden for WC groups 22, 24, 25, 26, 33.
4.3.9.17.1.4 Checking when saving a record of a work type / replacement on a holiday.
If there is a WC with IA 31, 1006, and 1008 on the stored record, and the date is not a holiday day, or a shift is not scheduled on the holiday day, a dialog will appear:
WCode <WC> cannot be saved, only for scheduled shift on public holiday!
and the user is returned to editing.
For this case we consider the Day with Day type = N, S.
4.3.9.17.1.5 Items hours / shifts are mandatory
For inputs from the WC group 23 - one day input with shift or hours either hours or shifts must be filled. When not, error message is displayed: Hours or shift must be entered in this input!
The input cannot be saved.
4.3.9.17.1.6 DH02, entry limitation of WC according to day type
A DH02 control is available for form Dcu06 to restrict the entry of marked WCs only for a certain day type, e.g., restrict WC 10020 to weekdays only.
Other possible restrictions: enter only on the weekend, enter/do not enter on holidays, etc.
The check is intended for all types of entry for DOCH - approved and unapproved.
DH02 check, if activated (DH02 > 0), when entering a WC on an allowed day and saving it (for approved WCs even when sending):
We check the WC permit for the specified day type.
First, we find out whether a list of allowed types of days is defined for WC on Slm01,
Doch&Ext.inputs, table "WC is intended for day types: “
If the list is empty, we don't check.
If a list of allowed day types is specified for WC:
We check whether only shifts with the allowed day type are in the range of the current deviation.
If the condition is not met:
The message appears: DH02 [U] [VAR] WC <> can only be entered for a day with type <list>.
if message level < FAT – save continues
if message level = FAT – return to editing
4.3.9.17.1.7 Concurrent control of DH02 and SCH05
The DH02 check is performed first, followed immediately by the SCH05 check.
When the DH02 control has FAT level set and a message is to be displayed, the message is displayed immediately.
When the DH02 control is set to a lower level and a warning is to be displayed, the warning is registered and continued. The following SCH05 check may overwrite the DH02 warning message. At the end of the checks, it is checked if any warning message is set and this is displayed ie. only the last registered report is displayed.
4.3.9.17.1.8 SCH09, Overlap check of the saved record
For the process of creating a new approved deviation, whether entered directly in the form or generated from a WC plan, an overlap check is performed before saving to Dcm01 (payroll input).
This check takes place when converting a request from plan to actual request (in forms Dov16, Dcu06, Dov05/Dov06), and it verifies overlaps with both approved and non-approved deviations.
The validation is executed across all forms used for entering approved deviations: Dov16, Dcu06, Dov05, and Dov06.
The check has 3 levels:
SCH09 is used to validate the saved record against entries recorded in monthly attendance (DCM). This check only evaluates conflicts with WCs that have IA codes 21, 22, 26, 63, 64, and 65.
SCH09a is used to validate the saved record against entries stored in daily attendance records, which, however, were not created as direct daily entries but are transformed records from external inputs.
SCH09b is used to validate the saved record against entries in the daily attendance records that were created as direct daily entries (i.e., actual daily attendance records).
This validation does not check for overlaps on public holidays in mode N (3) with WCs using IA codes 31 and 1008.
For all levels, any WC assigned in Slm02, DOCH03 group DM_Prekry with the setting Counted Hours = -1 is excluded from overlap validation. This applies when a WC is intentionally excluded from overlap checks.
If an overlap is detected, one of the following messages will be displayed:
- SCH09 [U] [FAT] Date overlap with another record for the selected employment contract (PV), WC %1, time %2/%3
- SCH09a [U] [FAT] The current record overlaps in time with another record from monthly attendance (MV), WC %1, time %2/%3
- SCH09b [U] [VAR] The current record overlaps in time with another record, WC %1, time %2/%3
- SCH09b1 [U] [VAR] The current record overlaps in time with another record, WC %1, time %2/%3
If the conflicting record is another approved deviation or an external record, the save operation is interrupted — it is not allowed to have two approved deviations, or an approved and an external record, overlapping in time.
For approved deviations, the system checks all records except those that are cancelled or withdrawn (i.e. records in status 1 or 2 are ignored). However, for records in status 11 or 12, entry is not permitted, since it is not yet clear whether the deviation will or will not be approved.
Notes:
a) Each validation can be disabled if the corresponding message is set to zero in Adm32.
b) The messages also display the identification of the conflicting deviation, including the WC, start time, and end time.
c) The SCH09a and SCH09b validations also check for permitted overlaps between WCs.
Both WCs must be registered in Slm02, Doch03, DM037, and one must have Counted Hours = 1, while the other must have Counted Hours = -1.
d) SCH09b is split into two cases:
- If the conflicting WC comes from Source = 1 (system-generated), message SCH09b1 is displayed.
- If the conflicting WC does not come from Source = 1 (created in another way), message SCH09b is displayed.
4.3.9.17.2 Approved inputs (WC groups 7, 8, 17, 18)
Checks:
check overlap with another input (the same as in Dov05 / Dov06)
check when vacation is spread over to periods (months)
with check if second period is also opened.
After save a new entry form offers "Send request?", then starts the workflow (ala Dov05 / Dov06)
4.3.9.17.3 SCH05 - Approved WC for the weekend, shift pattern 7/17.
For approved deviations in the 7/17 shift pattern, when saving/submitting a deviation, there is a restriction on entering a deviation for a day off - either a full day or a half-day.
If it's the wage component 7,17 from the group and the deviation is for a single day (Start Date = End Date), and the planned hours for the day are either 0 or if the range from Start Date to End Date consists only of days off, the following message will be displayed:
SCH05 [U][FAT] Deviation on a day off, unable to calculate hours! Please use wage component with entering Time from/to or hours.
And the user will be returned to the editing mode. If it was a mistake, the record should be canceled. If it wasn't a mistake, the WC with the 8/18 shift pattern must be used.
4.3.9.17.3.1 Sch05 and a deviation for a period without an open period
For approved deviations in mode 7/17, when saving/submitting a deviation, the system checks the restriction for entering a daily/half-day deviation on a day off.
If the SLM (Payroll Component) is from group 7 or 17, and the deviation is for one day (From Date = To Date) and the planned hours for that day = 0, or within the range From Date – To Date there are only days off, then:
a) If the From Date is filled in and the period for that From Date is open and the calendar for the given period has been generated, a message is displayed:
SCH05 [U][FAT] Deviation on a day off, hours cannot be calculated! Use an SLM with Time From/To entry or with hours,
depending on the message severity level, the user is either returned to edit mode or the save function is terminated. If this is an error, the record must be cancelled. If this is not an error, an SLM with mode 8/18 must be used.
b) If the From Date is filled in and the period for that From Date is not open:
i) If the calendar for the given period is generated, the following message is displayed:
SCH05a [U][VAR] Deviation on a day in an invalid period with a generated calendar
Depending on the message severity level, the user is either returned to edit mode or the save function is terminated.
ii) If the calendar for the given period is not generated, the following message is displayed:
SCH05b [U][ERR] Deviation on a day in an invalid period with a non-generated calendar
Again, depending on the message severity level, the user is either returned to edit mode or the save function is terminated.
Note:
The Dov16 and Dcu06 forms have different processing behavior in this situation.
In Dov16, the following message is displayed: “Closed or not permitted period”.
In Dcu06, it is not possible to enter a deviation into a non-open period, therefore no message is displayed.
This is not an error in Dcu06 but an intended feature, since both approved and non-approved entries can be entered there. Until the SLM and the entry type are selected, it is not known whether the entry is approved or non-approved. For this reason, inserting a new record into a closed/invalid period is not allowed at all.
4.3.9.17.4 Approved inputs (WC groups 8, 18)
4.3.9.17.4.1 Check for unfilled time from/to (TC 1024273)
When inserting an approved record into Dcu06 with wage component from groups 8 and 18, it is possible to perform a check for filling in the Time from/Time to items.
The check is controlled by the setting of the DD159 message level (Adm32, Attendance):
DD159 [U] [0] For wage component with the obligation to fill in Time From/To, the items are either unfilled or set to 0:00.
If the DD159 message level > 0, a check is performed during saving:
when saving an approved WC from group 8 or
18, it verifies whether the Time From and Time To items are filled in (they
must be filled and > 0:00).
If the condition is not met, the DD159 message is displayed, with following
conditions
a/ If the DD159 message level < 4, then the user has the option
OK - save
Storno – return back to editing
b/ If the DD159 message level = 4 (FAT),
then the user has only the option
OK - return back to editing
4.3.9.17.4.2 Approved wage component of type absence
(TC-1096997)
When entering a wage component of type absence (DOCH02.NEPR) in the 8/18 input mode on Dcu06, if the start of the deviation is entered outside the planned shift, there may be incorrect evaluation of the deviation within the calculation of daily deviations without the possibility of correcting the original deviation in the monthly records.Furthermore, it is not advisable to correct an approved deviation without the approval of the approver. Therefore, there are checks in place that prevent such a deviation from being entered or raise a warning within the attendance calculation about this risk.
Attendance calculation
If the wage component is of type DOCH02.NEPR (countable) and the start or end of the deviation is entered outside the usual planned shift, the following message is displayed:
DK012a [U] [VAR] absence of wage component<wc>, Day <date>, <time from> / <time to> outside the planned shift <time from> / <time to>
If DK012b > 0 and wage component is from countability DOCH02.NEPR and the start or end of the deviation is entered outside the usual planned shift with possible adjustment, the following message is displayed:
DK012b [U] [0] Absence of wage component <wc>, Day <date> aligned with the planned shift <time from> / <time to>
Approved deviation (Dcu06, Dov05)
SCH06 – Control of approved wage component absence, on the planned shift
If SCH06 > 0, during the saving and submitting of the request for approval, if the wage/salary component is of type DOCH02.NEPR or NVC, the following check is triggeredIf the imput mode = 7
we check for full-day (single-day) deviations or half-day deviations at the start or end of the deviation to ensure they are not entered on a day without a planned shift.
If the condition is not met, we display the SCH06 message, and depending on the severity of the message, the user is returned to the editing mode (FAT). If the severity is lower, we continue with the function.
If the input mode = 8
We check for full-day (single-day) deviations or time deviations at the start or end of the shift to ensure they are not entered on a day without a planned shift.
If both the start time and end time are filled in, they must both be within the planned shift.
If the condition is not met, we display the SCH06 message, and depending on the severity of the message, the user is returned to the editing mode (FAT). If the severity is lower, we continue with the function.
If the input mode = 18
We check for full-day (single-day) deviations or time deviations at the start or end of the deviation to ensure they are not entered on a day without a planned shift.
If both the start time and end time are filled in, they must both be within the planned shift.
If the condition is not met, we display the SCH06 message, and depending on the severity of the message, the user is returned to the editing mode (FAT). If the severity is lower, we continue with the function.
4.3.9.17.5 Monthly input (WC groups 24, 25, 26, 33)
Checks are same as for saving to Dcm01 / Inputs.
WC from group Adm06/33 on form Dcm01.
This is a special monthly deviation that is not reflected in the Dcd01 form, i.e. is used only for entering collective monthly deviations in hours/shifts. WC will not appear on any form / report with daily attendance, but will appear on every form / report with monthly attendance (in Dcm01/Dcm14 it is under the tab Inputs and Inputs - summary).
4.3.9.17.6 Daily input (WC groups 22, 23)
If the user fills shifts column after save form:
erases Time From / To,
calculates hours = hours of planned shift * shifts
mode is set to Not calculate.
Checks are same as in Dcd01 / Inputs.
4.3.9.17.7 Input is outside valid employment
Input should be inside employment validity.
Error message will follow when not fulfilled.
4.3.9.17.8 WC - 951 Work From Home
Only customer KB: for WCode 951 from group 22-26 user item on Osb02 is checked (see description of similar control on the form Dcd01).
4.3.9.17.9 WC - IA 2121.2122 Standby service
Standby service inputs (WCode with internal algorithm 2121, 2122) can be checked for Employee limit.
See description Doch_uzdoc, Standby service.
There is a specific way to process WC standby service in Attendance – Slm01 / Attend.&Ext./ Wage code processing mode in Attendance: mode 5 or 8.
Therefore user can't insert daily input in Dcu06 (Adm06 groups 22 and 23).
These WCs can only be entered in Dcm01; Dcu01, Monthly Inputs.
But user can used Dcu06 for this WC - Monthly Inputs (Group 24, 25, 26, 33).
4.3.9.18 Sources of the displayed records
Dcu06 on the form displays data from several parts of the system EGJE, each source has its own specific processing.
4.3.9.18.1 Plan of shifts (Dcd01, headers)
The planned shift has the structure: sample day, beginning and end of normal shift, length of the planned shift (without a break).
For display only.
4.3.9.18.2 Information line with WTF fulfilment balance in shift
Filling WTF per day - displays data:
Fund - planned hour for shift
Inputs - reported hours to the working fund
Balance - balance of WTF fulfilment
4.3.9.18.3 Daily attendance (Dcd01, Inputs)
Daily attendance record
inputs from the Dcd01 form.
For clarity reasons, WC with IA 904 – Non-working day is blocked.
If is requested do not show invalid records from Dcu01 in Dcu06, it is possiblie to use the choice „Do not show Invalid records in daily attendance“ in menu [Restrict data].
Invalid record is shown – red italics font.
If it is the invalid row (record) displayed, there is possible its „opening“ on
the dialog for editing invalid record and then you can do standard editing
(likewise on Dcd01).
Note: it isn’t possible to open invalid record, which is the type „storno“ (status editing = -3).
4.3.9.18.4 Monthly attendance (Dcm01)
Inputs monthly attendance records from the form Dcm01.
4.3.9.18.5 Approval of WC (Dov05, Dov06)
Inputs from the approved WCs, form Dov05 / Dov06.
4.3.9.18.6 Vacation plan (Dov16, Dcp01, DCP02)
Inputs from the vacation plan, forms Dov16 / Dcp01 / Dcp02.
For display only.
4.3.9.18.7 Payroll inputs (Vyp01, Inputs)
Payroll inputs, from form Vyp01 / Inputs - WCs with IA valid for attendance.
For display only.
If concurrency of the same WC from Opv01 and Vyp01 is found, a record from Vyp01 is displayed on Dcu06 (Opv01 is ignored).
4.3.9.18.8 Payroll inputs (Vyp01, Inputs) - transmission mode 2
If transmission from Vyp01 to attendance is performed using mode 2 (do not transfer during closed attendance), in previous versions, the records from Vyp01 did not appear after the attendance was closed. We have fixed this issue.
Note: Inputs from Vyp01 are only visible for the displayed period but are not visible in calendar days from the previous or following period that are displayed together with the current period.
4.3.9.18.9 Exclusion from records(Opv01 tab)
Inputs from tab Opv01 Exclusion from records.
For display only.
If concurrency of the same WC from Opv01 and Vyp01 is found, a record from Vyp01 is displayed on Dcu06 (Opv01 is ignored).
4.3.9.18.10 Business Travel (Cep01)
Inputs from travel orders (Cep01) valid for attendance.
For display only.
4.3.9.18.11 Manager inputs (Vst15, inputs with hours and shifts)
Inputs from form Vst15 (only shifts or hours). Only in WC Recapitulation (left column).
4.3.9.19 Configuration of Dcu06 form
4.3.9.19.1 Objective rights for form Dcu06
A list and description of the objective rights established for the modification of the standard operation of the form is given in the document EGJE_provdoc.
4.3.9.19.2 Activation form before the first use
Administrator should choose WCs for this form and assign them to groups (Adm06).
Recommendation:
1. If possible, one WC assign to one group only (for groups 7, 8, 17, 18, 22, 23, 24, 25, 26, 33)
2. All WCs defined in group 3, 4, 5, 6 must be defined in groups 22, 23, 24, 25, 26, 33.
3. WCs of type "hours worked" enter only into 22 and 23
4. WC with expected length less the length of shifts, or start time and end time is needed assign only into groups 22 and 23
5. WCs for group 26 please consult with the supplier.
Note: Synchronization Dcu06 - Dcd01, Dcm01: restriction of write permissions
To be able to insert/edit record with Wage code in groups 22, 23 you should add it also to 4 group (write permission to Dcd01).
WC in 24, 25, 26 you should add also to 6 group (write permission to Dcm01).
4.3.9.19.3 Display restrictions for form section
If Dcu06LPanelNe = is set to allowed, the left panel will not be displayed on the Dcu06 form
4.3.9.19.4 Editing rights restriction and closing of attendance
There is also limited mode for user with assigned right
Dcu06ctiDOCH - Dcu01 records from daily monthly inputs only for reading
User with this access right cannot edit records from groups 22, 23, 24, 25, 26, 33. User also can't close/open attendance.
However, approval inputs (group 7, 8, 17, 18) are permitted.
4.3.9.19.5 Items in the editing dialogs configuration
Items in editing forms
*Group WC
*Source
*Status editing
appear only to users with the object right Dcu06_inspektor.
4.3.9.19.6 Editing form – shifts plan
Editing mode (edit sample date) can be enabled with the object right Dcu06editPlSmen.
Displaying the name of WC
Dcu06 form can be use calendars of the WC abbreviation instead of WC name
4.3.9.19.7 Display of WC Name
On the Dcu06 form, in the calendar (for
individual days), the WC name can be replaced with the WC name abbreviation.
The WC name abbreviation is defined in the Slm01 code list, Attendance &
Approval section, in the field Abbreviation for Dcu06 (supports entry of
multilingual versions)
4.3.9.19.8 Form configuration
[Close] – for users with the object Dcu06pocitaj the record calculation is run after save.
It is daily calculation for WC from groups 22, 23 and monthly calculations for WC from groups 24, 25, 26.
4.3.9.19.9 Controlling access to buttons
Button [Restrict data] we can hide assigning right Dcu06nezobrazitZdroje
Button [Function and selections] we can hide assigning right Dcu06nezobrazitFunkce
Buttons [Close] / [Open] in dialog “Edit hours” forms we can hide assigning right Dcu06nesmiUzavrit
Buttons [Close] / [Open] in dialog forms we can hide assigning right Dcu06ZakazUzavrit
Buttons [Approve] / [Disapprove] we can enable assigning right Dcu06schvalit
Icon ![]() [Delete Month] is on the bottom of Dcu06 for users with
right Dcu06SmazatVse
[Delete Month] is on the bottom of Dcu06 for users with
right Dcu06SmazatVse
4.3.9.20 Form’s exceptional states Dov16/Dcu06
The message "button_access_denied" is displayed when, during the workflow approval process, it is determined that the corresponding action (button) is not allowed for the current profile
4.4 Form Dcu07 - Attendance - Overview
The form is intended for managers. It contains an overview of the current fulfilment of WTF and some indicators in the attendance register. It is in tabular format - one line, one employee.
Form header contains buttons with predefined selections. In each row is a button to display the list records for wages (monthly attendance register) and detail - form Dcu06.
Only employees who have a valid ER for at least one day in the current period are displayed on the form, provided that this ER is enabled for attendance and the ER is not in an out-of-record status for the entire month (if attendance is being evaluated).
Note for usage
We recommend re-evaluate the columns and in Adm04 configuration hide the columns not necessary for your organization.
The form header includes:
Period - current period to select the data
Buttons
[All] - restore full display with no filter
[Opened] - view employees with the status of attendance "opened" (editing state = x2)
[With error] - view employees with evaluation attendance with error or fatal error (status of evaluation = -2, -3)
[With fatal error] - view employees with evaluation attendance with fatal error (status of evaluation = -3)
[Closing data for all Employees] - transfers data and closes attendance for all employees in table
[Open data for all Employees] - opens attendance for all employees in table
4.4.1 Table columns
For each employee form will display a line containing:
Employee number and Name,
Starting date - from Opv01
Termination date - from Opv01
Registration state - from Opv01
Employment type - from Opv01
Fund planned working time - monthly working hours in schedule (Dcm01, Monthly header - summary)
Working time entered - reported hours to working fund (Dcm01, Monthly header - summary)
The balance of working time - difference
Worked time in month - WCs declared as "worked" inputs (Dcm01, Monthly header - summary)
Unworked time in month - WCs declared as "not worked" inputs (Dcm01, Monthly header - summary)
Actual vacation - vacation inputs in month
Vacation balance - vacation balance (for referenced month)
Act. Overtime - reported paid overtime in a month
Leave of Absence balance - current balance
Leave of Absence payment / drawing - to be paid in the actual month
Editing state - the state attendance records for employee in period
Status of the calculation - state evaluation from the latest calculations
[Calendar] - button to show the limited display of Dcu06 form (viewing only, and only for HR portal).
[Entry] - button to display the detailed monthly attendance records
4.4.2 Detail of Calendar button
View the form Dcu06 in read only mode for the current employee.
4.4.3 Details of key inputs
Tabular display of the current states of the monthly time sheets for the current PV in the structure:
WC - WC and name
From / To - input date and time - start / end, in parentheses half of shift indication
Hours - hours of the input
Shifts - nr. of shifts of the input
Vacation drawing - shifts / hours of vacation input
Amount - the amount of input
Status of approval - State of input in the process of approval
Line source - source of the line data
Input mode - WC group nr. (when record has been inserted)
For coloring and style of individual records is used the schema from Dcm01, Inputs - Summary.
4.5 Form Dcp07 - Shift planning II.
The form is used to display and update the individual shift plan of an employee (employees) and serves as a parallel (alternative) form for shift planning (alternative to Dcp03).
Note: The form is available only from HRP.
The form can be used by customers with the
Attendance scope implemented, as well as by customers who do not use the
Attendance scope but use shift planning in the DOCH format.
The individual employee plan is derived from the shift calendar assigned to the
employee (Opv01, Mode, Calendar) and is subsequently adjusted as required for
the specific employee.
Under EGJE conditions, the individual employee plan is represented by a sequence of shifts – “daily headers” – for OSČPV and the current period.
For calendar display, unlike Dcp03, Dcp07 does not have three rows but only one. The row showing the shift plan based on Kal01 is not displayed, and the two-row display for identification of the template day (VZD) and additional template day (DVZD) is replaced by a single row (VZD and DVZD are separated by a slash).
Instead of displaying information about the
additional template day, current absences from attendance records can be
displayed (see detailed description below).
The current absence is displayed within a single row instead of the additional
template day.
If a document with a customer-specific description or operating instructions is assigned in Adm20 for the current user/profile and form, a button “DOWNLOAD INSTRUCTIONS” is displayed, allowing the user to view this customer document.
The form is included in the Attendance tile.
It is a form intended for a line manager or attendance clerk who manages a reasonable number of persons (approximately 1–500). It is not intended for an administrator with access to all people.
The form is divided into tabs:
·
Planning
Display and update of individual employee shift plan from the current OSČPV
list
· Settings
o Persons – configuration of the person list
o Template segments – configuration of availability of template days and additional template days
·
Statistics
Display of individual calendar statistics
o
Month
Statistics for the current period
o
Balancing period
Statistics for the current balancing period
4.5.1 The Form headers
Form header has
The "Period" parameter.
Determines the display of data on the Planning tab and both statistics tabs, then display the status for the specified period.
4.5.2 Tab Planning
Display and update of individual employee shift plans from the current OSČPV list used for planning.
In the Planning tab, the actual plan
modifications are performed.
The tab is used to display and update individual employee shift plans from the
current ER list.
The tab is divided into two main sections:
Control section – contains fields and functional elements used to perform shift plan updates
Plan section – contains the display of individual shift plans for employees shown in the current list
The employee plans displayed may be in one of the following three states:
· Closed attendance – attendance records for the current employee and period are already closed; the plan cannot be updated
· Closed shift plan – the shift plan for the current employee and period has been closed by the user; the plan cannot be updated
· Open shift plan – the shift plan can be updated
Closure of the shift plan is indicated in the Status column by status x3 (where x is a space, 1, 2, or 3)
Note:
Before activating the tab, it is strongly recommended to restrict the list to
the minimum number of required employees in order to optimize the form response
time. With a larger number of employees, the form response times for both
display and updates increase significantly.
4.5.2.1 Tab Header – Control Section
This section contains fields for updating the plan, functional buttons, and informational data.
Button availability depends on the current
edit state of the selected row. If the calendar is closed, the buttons are not
available.
When multiple rows are selected, editing buttons are usually available, and
their applicability is validated only at the time they are used.
The [Calculation] / [Open] / [Close] buttons are available regardless of the period status; actual access to the plan is evaluated only when the corresponding function is executed.
Items for selecting a shift to be changed:
Template Day – selection of VZD for changing the planned shift
The lists
contain VZD with standard identification – code and name (see the Settings
tab).
Sorted by code (if not specified – empty field without text).
Additional Template Day – selection of VZD for changing the additional planned shift
The lists
contain DVZD with standard identification – code and name (see the Settings
tab).
Sorted by code (if not specified – empty field without text).
If the code list of additional VZD days is empty, the parameter corresponding to the additional planned shift is not displayed.
The parameter corresponding to the additional planned shift is also not displayed if the user has the fPlanSmienZobrazNeprit permission (see the description of Displaying Absences from Attendance Records).
Form buttons for plan modification:
[Assign] – assigns the selected
Template Day and Additional Template Day to the marked days of the shift plan
in the selected individual calendars, provided they are not closed.
If any of the Template Day selection fields is not filled in, it is not applied
for shift plan modification.
[Remove Assignment] – removes the template day from both the “Template Day” and “Additional Template Day” fields of the selected individual calendars for the selected days, reverting to the state defined by Kal01.
[Empty DOCH Calendar] – sets the current calendar to the “empty” state; all calendar days are set to Template Day – free (see description below).
[Overtime Shift] – marks the shift as an overtime shift (see description below).
Form buttons for plan-related functions:
[Calculation] – updates statistics and executes the set of prescribed validations for the selected plans.
[Open] – opens the shift plans for updating; applies to plans that were previously closed and are selected.
[Close] – closes the selected shift plans for updating. The shift plan is closed if no prescribed validations with FATAL severity are displayed.
[Export] – ???
Information about the status of the current (selected) day:
Information window describing the currently selected Template Day in the selected plan.
Left information field (first column) – information about the currently assigned Template Day from the ER plan in the selected plan cell (day)
Day type: – the Template Day (VZD) assigned in the ER working calendar (daily header) for the selected day in the period
Day type from calendar: – the Template Day (VZD) assigned in the currently assigned calendar from Opv01 for the ER (Kal01) for the selected day in the period
From: – “Defined start of working time:”
a) from the VZD assigned in the daily header, if assigned
b) otherwise from the VZD assigned in Kal01 for the calendar assigned to the ER
for the given day
Example of VZD
display: Ela8,0 – iEla flex 7–22, fixed 9–17
Displayed from VZD: “Kód – abbreviated name:” – “Template Day name:”
Right information field (second column) – information about the currently assigned additional VZD from the ER plan in the selected plan cell (day) and the end of the shift from VZD
Additional day type: – the additional Template Day (VZD) assigned in the ER working calendar (daily header) for the selected day in the period
To: – “Defined end of working time:”
a) from the VZD
assigned in the daily header, if assigned
b) otherwise from the VZD assigned in Kal01 for the calendar assigned to the ER
for the given day
4.5.2.2 Plan Section – Edit Field
In this section, the individual employee plans are displayed. The displayed individual plan for one employee consists of:
+ - Expanding the information for the current PV (see below)
Contents (see following)
Unnamed Column – the second unlabeled column in the plan row (the column preceding Name)
Sequential row number in the list (according to the order of PVs in the Settings tab → Persons → List of Selected Persons)
Name – Employee Identification (ER Number (OSČPV), Last Name, First Name)
Fund - Scheduled WTH(FPD) (valid as of the most recently executed calculation)
State – editing state
Contains the edit status of the current row – analogous to the edit status of attendance
1 .. 31 – individual days of the month
Columns 29 to 31 are displayed only if such days exist in the current period
Within the editing row, the following information is shown for each day of the period:
a) the assigned standard day as defined in the daily header Dcd01, Header
b) the assigned standard day together with an additional standard day as defined in the daily header Dcd01, Header
c) the assigned standard day combined with an absence
By default, the template day code is displayed in regular font on a white background.
On a non-working day, the template day code is displayed in bold font on a white background.
On a public holiday, the template day code is displayed in bold blue font on a white background.
If the template day is designated as a morning shift, it is displayed on a yellow background.
If the template day is designated as an afternoon shift, it is displayed on a green background.
If the template day is designated as a night shift, it is displayed on a red background.
4.5.2.2.1 Obsah informace o PV
Information content of the current row after execution [+]
First row
Type of ER – Code and name of the current Employment Relationship type (druh_pv).
ER Start Date – First valid day of the Employment Relationship.
ER End Date – Last valid day of the Employment Relationship.
Calendar – Code and name of the group calendar currently assigned to the ER.
Org. Structure – Code and name of the ER assignment within the organizational structure (Structure No. 2 or another structure considered organizational, see Adm21 ???).
Profession – Code and name of the ER assignment within the Profession structure (Structure No. 4).
Second row
Contractual Working Time Fund –
Difference from Contractual Working Time –
Calendar Fund –
Calendar Shifts –
Individual Plan Fund –
Overtime Hours –
Planned Shifts –
Overtime Shifts –
Difference from Plan –
Public Holidays (on a Working Day) –
4.5.3 Tab Settings
The tab is divided into sub-tabs: Persons and Sample days
Persons - is designed for managing individuals to be displayed on the 'Planning' tab.
Sample days - is intended for managing sample days for display on the 'Planning' tab.
The manager first selects the people he / she wants to work with in the “Setting tab” from all accessible people and determines their order, so that the substitutable people are close to each other. To process everyone user presses "All persons".
4.5.3.1 Tab Settings, sub tab Persons
The Persons sub-tab is intended for managing the people displayed on the Planning tab.
No limit has been set for the number of rows displayed in this sub-tab (the limit was originally set to 1000).
However, this may result in a significant slowdown of the form’s response time for profiles with extensive access rights
4.5.3.2 Tab Settings, sub tab Sample Days
The "Sample Days" sub-tab is designed for managing sample day (SD) for display on the Planning tab. A bubble can be displayed for each SD.
Each user can select their favorite standard sample days or supplementary sample days (SDs) from the records in Kal05.
Favorite sample days are tied to the user (their personal number) and stored in the system. When the Dcp07 form is opened by a specific user, their saved list of favorite SDs is first loaded and set into the SD list for the form.
Favorite SDs are displayed at the beginning of the table (they are highlighted and bold). The procedure for marking favorite SDs:
a/ Selecting a continuous segment of SDs: select the first SD + hold SHIFT and select the last SD
b/ Selecting randomly placed SDs: select the first SD + hold CTRL + select individual SDs
These marked SDs will appear first on the Planning tab in the lists for the Standard Sample Day and Supplementary Sample Day items.
Newly marked SDs are moved from their
original position to the beginning of the table only after ![]() "reloading"
the tab or upon a new login.
"reloading"
the tab or upon a new login.
It is also possible to check the checkbox "Offer only selected sample days:" and in Planning, the combo boxes for Standard and Supplementary Sample Days will then behave accordingly and only offer the selected ones.
4.5.4 Tab Statistics
The Statistics tab contains statistics of individual calendars from the perspective of the current month or the assigned balancing period.
4.5.4.1 Tab Statistics, sub-Tab – Month
It contains individual calendar statistics from the point of view of the current month.
Calculations of individual items are carried out from the first to the last day of the current period.
In the header of the tab, the [Audit] button is available – it is used to display the audit of changes in the editing state of the shift plan.
4.5.4.1.1 Form Audit – from button
Displays the audit trail of changes to the shift plan editing state. It becomes visible upon activation of the [Audit] button. The content of the table is bound to the row currently selected in the tab.
Includes changes to the field Dcp07, Planning, Status
This field is updated (modified) in the following situations:
• Execution of the Open / Close function from the Dcp07 (Dcp03) form
• Execution of the Close function from the Dcu06, Dcd01, Dcu01, Dcm01 forms
The field remains unchanged when the Open function is executed from the Dcu06, Dcd01, Dcu01, Dcm01 forms. If the attendance record status is modified in the Dcu06, Dcd01, Dcu01, Dcm01 forms and the user then switches to the open Dcp07 form, the forms must be refreshed (using the refresh function, icons, etc.).
The form is of the List / Detail typ.
The List contains:
Displays a list of changes to the shift plan status for the current Employment Relationship.
The default sorting is descending by timestamp.
Change – Timestamp of the shift plan status modification
Editing Status – The new status of the plan after modification
Audit – ???
Changed By – Username of the person who triggered the status change
Details contain:
Contains a detailed description of the currently selected change record.
Changed At: – Timestamp of the shift plan status change
Record Editing Status: – New plan status after the change
Audit: – ???
Changed By: – Name of the user who activated the plan status change
Daily Header Editing Status: – Copy of the attendance record status display from Dcu06
4.5.4.1.2 Row Description – for a Single Employment Relationship.
For each employee, the system displays:
??? Header of the Individual Calendar
Employment Relationship Number (OSČPV)
Full Last Name and First Name
Working Time Fund – Based on Contractual Hours: monthly fund calculated according to the current employment workload (UFPD, see below)
Difference to Contractual Working Time = AFPD – UFPD
If the value is negative, it is shown in bold red font; if the value is positive, it is shown in bold green font.
Calendar-Based Working Time Fund – FPD (PFPD) for the month, derived from the assigned calendar (including public holidays). (Calculated as the sum of “Kal01, Calendar Days, Hours” for the Employment Relationship Number (OSČPV) and the calendar currently assigned in Opv01)
Shifts by Calendar – Monthly number of working shifts based on the calendar (including public holidays)
Fund – Individual Plan – FPD (AFPD) calculated for the month based on the employee’s individual shift schedule (including public holidays)
Overtime (Hours) – Planned overtime expressed in hours
Planned Shifts – Monthly count of working shifts based on the employee’s individual shift schedule (including public holidays)
Overtime (Shifts) – Planned overtime expressed in shifts
Difference to Plan = AFPD – PFPD
If the value is negative, it is shown in bold red font; if the value is positive, it is shown in bold green font
Public Holidays (on Working Days) – Count of holidays coinciding with scheduled working shifts for the current period and the given Employment Relationship (OSČPV)
Calculation of the UFPD column:
The reference period is either a calendar month or a balancing period.
a) First, determine the number of full weeks within the period and calculate the required hours as average number of working days per week × average shift length (Opv01).
b) For the last week, if it is not fully included in the reference period:
Calculate the required hours as the sum of planned shift hours within the last week according to the calendar × average shift length (Opv01).
c) Finally, UFPD = sum of step (a) and step (b)
a)
4.5.4.2 Tab Statistics, sub Tab – Balance period
Contains individual calendar statistics from a balancing period perspective.
Calculations of individual items are carried out from the first to the last day of the balancing period.
It will be displayed for each employee:
??? Header of individual calendar
Contract Number
Full name (Surname, first name)
Bal. period from – the beginning of the balancing period or the beginning of the contract if it is greater than the beginning of the balancing period
Bal. period to – the end of the balancing period or the end of the contract if it is less than the end of the balancing period
Fund – according to employment (UFPD) - determination of the monthly fund according to the current employment (number of days Monday to Friday (including holidays) * Opv01, Description, Average shift length)
Difference in working time = AFPD - UFPD
Work time difference Display "thick red" font if difference < 0, "thick green" font if difference > 0
Fund of cal. (PFPD) - FPD per month according to assigned calendar (including holiday)
(sum from "Kal01, Calendar days, Hours" for contract number and current calendar assignment on Opv01)
Cal. shifts - number of working shifts at the month according to the calendar (including holidays)
Fund - ind. plan (AFPD) - FPD per month according to the employee's individual shift schedule (including holidays)
Shift plan - number of working shifts per month according to the employee's individual shift plan (including holidays)
Plan differences = AFPD - PFPD
Display "thick red" font if difference < 0, "thick green" font if difference > 0
Holidays (in working days) - the number of holiday, the number of holidays that fall on the work shift for actual period and contract number
4.5.5 Operating Forms
4.5.5.1 Process of changing
User Workflow for Setting Selected SD/SSD:
a/ If necessary, update the ER (Plan Version) list.
b/ If necessary, update the list of favorite SD (Sample Day) and SSD (Supplementary Sample Day).
c/ First, select the required sample day or supplementary sample day at the top.
d/ Use the cursor to select the rectangles of days where you want to change the SD/SSD settings.
e/ Click the "Assign" button, and the selected Sample Day (and Supplementary Sample Day, if applicable) will be applied to the entire rectangle (to all cells within it); the new SD and SSD appear in a single cell, separated by a slash.
User Workflow for Reverting to Original Settings (according to Kal01):
a/ Use the cursor to select the rectangles of days where you want to restore the SD/SSD settings.
b/ Click the "Delete assignment" button, and the day will revert to its description as assigned in the calendar for PV according to Opv01.
4.5.5.2 Indications of persons / Employe Relationship in table
Indication of Persons / ER in the Table:
- A standard employee is displayed in black (applies to ER types 1, 21, 22, 31, 52).
- ER that is not valid for at least one day in the reference period is displayed in italics.
- Employees on agreements (ER types 6, 7, 8, 9, 12, 32, 33) are displayed in dark brown.
- Employees with a different type of ER, or without a specified type, are displayed in dark blue.
4.5.5.3 Overtime shift
???
4.5.5.4 Empty DOCH calendar
If the actual attendance plan significantly differs from the standard calendar (as per Kal01) and cannot be adjusted by changing the calendar, combining calendars, or cannot establish a recurring shift cycle, and if shifts need to be modified in a significant part of the plan, it seems more appropriate to create a new calendar from a so-called "blank" calendar – i.e., a calendar that has no defined work shifts for the current period.
For this reason, the Dcp07 form may have a [Blank DOCH Calendar] button available to clear the standard attendance calendar - all days for the current period will be set to “day off”.
This can be done for one current ER or for all selected ERs in the Dcp07 list.
Button [Epmty DOCH calendar] –
Permitted only for users with the right Dcp07PrazdnyKal - Dcp07, Setup of empty calendar
Availability like other buttons for calendar change
Function operates for the current ER or for all ERs in the selection
Function:
Initial query: "Function to clear the plan for the current/selected ER, continue?"
If NO – the function terminates
If YES – proceed with the function
a/ Search in Kal05, VZD with Day Type = 5 (Weekend), if there are multiple DOs of this type, take the first one according to the code
b/ For all selected ERs (selected ER or current ER), set the found SD (day off) for every day in the current period and calendar for ER
c/ For each processed ER, update the display and recalculate statistics for the month and free day.
4.5.5.5 Display of Absences from Attendance Records (DOCH)
For the Dcp07 form, an alternative display method is available in the calendar cell. When the permission fPlanSmienZobrazNeprit = allowed is set, the cell in the calendar row for ER does not display supplementary pattern days, but instead shows absences from attendance records and WC from approval that are not cancelled or selected WC. Displayed are WCs:
a/ from the countability DOCH02.NEPR+NVC, but which are not in the countability DOCH03.Plan_nepr with the setting Countable hours = -1.
b/ from the countability DOCH03. Plan_nepr with the setting Countable hours = 1.
This mode is not allowed for a customer who has supplementary SD defined on Kal05.
For WC absences, the calendar cell displays the abbreviation according to Slm01 (Slm01, Doch&Ext.inputs, Abbreviation for Dcu06) when not filled, the WC code.
4.6 Dcp13 - Employee Sample Plan
This section is not translated to English. This is special functionality which is used only with special conditions and documentation for this is in the Czech version of documentation in section 4.6 (/EGJE_web_uzdoc). In case you need translation please contact Elanor.
4.7 Dcp14 – Attendance Planning
This section is not translated to English. This is special functionality which is used only with special conditions and documentation for this is in the Czech version of documentation in section 4.7 (EGJE_web_uzdoc.docx). In case you need translation please contact Elanor
4.8 Dca11 - Attendance Terminal
This is also special section with documentation only in Czech language. If you need to use, please contact Elanor for translation. Czech version you can find in EGJE_web_uzdoc.docx in section 4.8
Note: The form is not a standard feature in EGJE. Access to the form is chargeable and is granted based on a customer request and subsequent access agreement.
4.9 Report Dcm28f – Overview of vacation and work leave usage
This is also special section with documentation only in Czech language. If you need to use, please contact Elanor for translation. Czech version you can find in EGJE_web_uzdoc.htm in section 4.9
5 Customer solutions
5.1 Komerční banka
5.1.1 Form Mob01 - Approval of applications for mobility KB
The form allows you to create and send request for mobility in the Czech Republic and Slovakia (first localized tab) respectively request for International Mobility (second tab with only English criteria).
Workflow of these data is described in Adm_uzdoc / Adm14 / 32 - Application approval - mobility request KB.
5.1.2 Form Mob01 - Approval of KB mobility application
The form allows you to enter an application for mobility in the Czech Republic and Slovakia (first localized tab) or an application for International Mobility (second tab with English criteria). The workflow for these data is described in Adm_uzdoc / Adm14 / Adm_uzdoc/Akce32_popis.
5.2 Dopravní podnik Prahy
5.2.1 Form Hod01fdpp – Hodnocení osoby
Hod01fdpp Form - Person Rating The form allows you to evaluate DPP employees. The evaluation forms are divided according to the type of job and the evaluation period. Each evaluation form then consists of several evaluation sections, depending on the job and the period.
Hodnocení – legenda
|
|
All mandatory fields are filled in |
|
|
All mandatory fields aren’t filled in |
|
|
Evaluation closed |
|
|
Evaluation open |
|
|
Waiting for the response of the evaluated person |
|
|
Waiting for the response of the arbitrator |
|
|
Waiting for the response of the evaluator |
|
|
The comment is mandatory |
|
|
Display description, help |
|
|
Close dialog, cancel |
|
|
Comment is optional |
6 Note
List of accessible documentation is here.